
Change these VS Code default settings to make it even more awesome
This post is a collection of Visual Studio Code settings that I think are worth changing from their default values. This only includes native VS Code settings; no extensions or themes.
Introduction
Visual Studio Code is an amazing editor that has a ton of settings, with more being introduced all the time. If you don’t keep up with all the release notes, it’s easy to miss some of the new settings. Looking through the list of settings can be overwhelming and time consuming, and it’s hard to know which ones are worth changing. Below I list settings that you may want to consider changing from their default values.
I understand that most of these settings are personal preference, and you may not agree with all of my suggestions. I am simply listing these to make you aware of them. I encourage you to play around with them and see what works best for you.
I’ll note that some of the settings below are mentioned even though they are on by default. This is done for features that were not originally turned on by default when they were introduced, and you may still have them turned off in VS Code due to Settings Sync carrying forward the original setting value.
Settings Sync
Speaking of Settings Sync, if you do not have it enabled, you should consider doing so. It allows you to sync your settings across multiple machines, and can also sync extensions, keyboard shortcuts, user snippets and tasks, UI state, and profiles. It is great for when you wipe your computer, or migrate to a new machine, as it brings all your customizations with you. It used to require an extension, but is now built into VS Code. Read more about it in the official docs.
Changing settings in VS Code
You can access the settings in VS Code from the File -> Preferences -> Settings menu, or use the keyboard shortcut Ctrl+, (Cmd+, on macOS).
From there, use the search box to find the settings mentioned below in this post.
If you prefer to modify the settings.json file directly, you can open it using the button in the top right corner of the settings window.
The settings.json file typically only shows setting values that have been changed from their default.
You can use the GUI setting’s gear icon to Reset Setting to its default value, and it will be removed from the settings.json file.
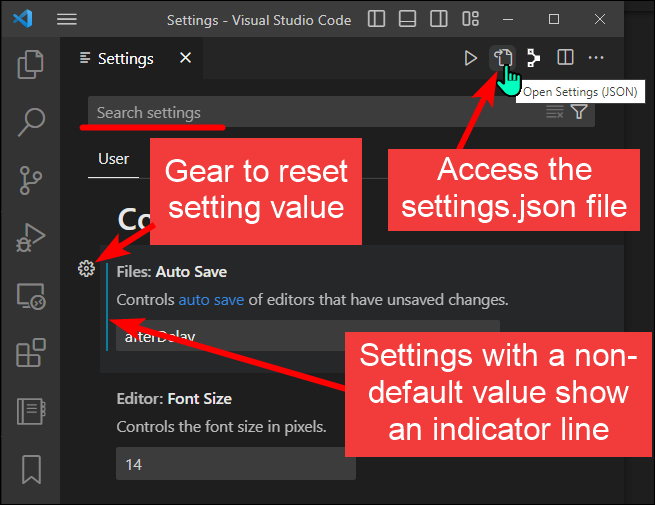
If you want to quickly see what settings you’ve changed from the default values, look in the settings.json file.
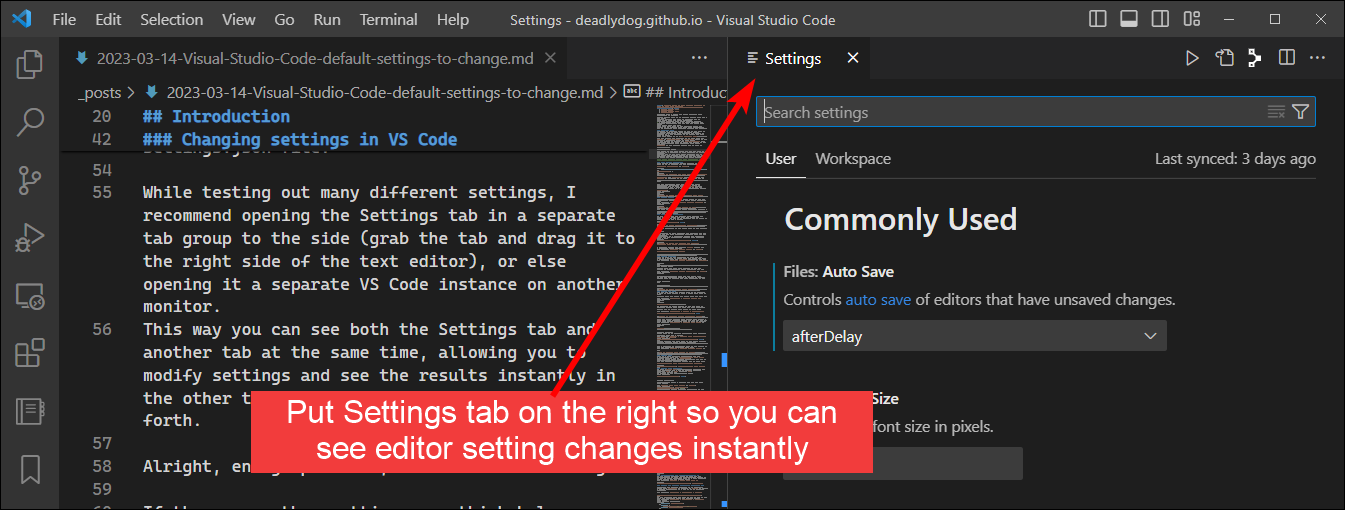
While testing out many different settings, I recommend opening the Settings tab in a separate tab group to the side (grab the tab and drag it to the right side of the text editor), or else opening it a separate VS Code instance on another monitor. This way you can see both the Settings tab and another tab at the same time, allowing you to modify settings and see the results instantly in the other tab without having to switch back and forth.
Alright, enough preamble, let’s see the settings!
If there are other settings you think belong on this list, please let me know in the comments.
Editor UI settings
Show hidden characters
Make hidden characters easily visible in the editor. This is on by default for all languages, except for Plain Text and Markdown, so we have to turn it on there explicitly.
GUI setting: Editor › Unicode Highlight: Invisible Characters to true.
JSON setting:
"[markdown]": {
    "editor.unicodeHighlight.invisibleCharacters": true
},
"[plaintext]": {
    "editor.unicodeHighlight.invisibleCharacters": true
},
Result:

Note: There are separate settings for the Markdown and PlainText languages, which are false by default, so be sure to enable all of them.
Render whitespace
By default VS Code only shows a glyph for space and tab characters when you highlight them.
I prefer seeing the glyph any time there is potentially unexpected whitespace, which is typically when there is more than one whitespace character, and is what the boundary setting value does.
This means you will also see glyphs for indentation, but I find it helpful to see the indentation level at a glance (Python/YAML anyone 😏), and to ensure I’m not mixing tabs and spaces (because I’m weird like that ok! 😜).
GUI setting: Editor › Render Whitespace to boundary.
JSON setting:
"editor.renderWhitespace": "boundary",
Result:

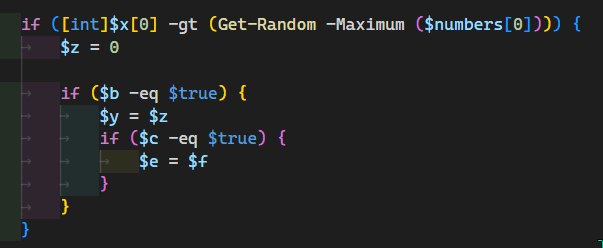
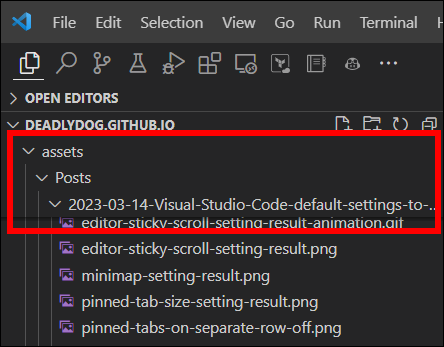
Editor sticky scroll
As you scroll down through nested classes/functions/structures, the names stick to the top of the editor making it easy to see the nested scope you’re currently working in. Works in many different languages, such as JavaScript, TypeScript, C#, JSON, YAML, Markdown, etc.
GUI setting: Editor › Sticky Scroll: Enabled to true.
JSON setting:
"editor.stickyScroll.enabled": true,
Result:
And here it is in action while scrolling through a Markdown file:
You can also quickly toggle this setting on/off from the View > Appearance menu.
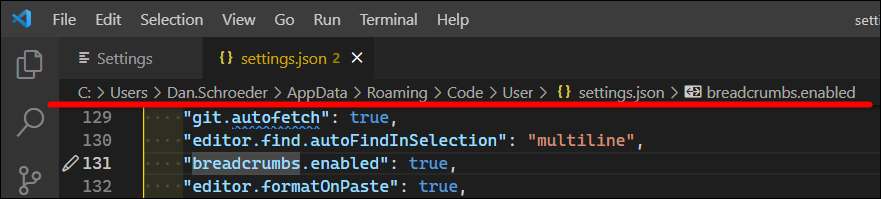
Breadcrumbs navigation
Displays a breadcrumbs navigation bar at the top of the editor for the current tab, showing not only the file path, but also the class and function that is currently in focus.
This setting is now on by default, but it might be turned off if you’ve been using VS Code with Settings Sync for a while.
GUI setting: Breadcrumbs: Enabled to true.
JSON setting:
"breadcrumbs.enabled": true,
Result:
Minimap for vertical scrolling
The minimap is a small preview of the entire file that is displayed on the right side of the editor, replacing the traditional vertical scrollbar.
GUI setting: Editor › Minimap: Enabled to true.
JSON setting:
"editor.minimap.enabled": true
In addition to just enabling the minimap, you can also customize it with many different settings.
If you search for minimap in the settings, you will see the many different settings that you can configure.
The minimap configuration is a very personal preference, so I recommend trying out different settings to see what works best for you.
Below are the non-default minimap JSON settings that I use:
"editor.minimap.showSlider": "always",
"editor.minimap.maxColumn": 100,
"editor.minimap.renderCharacters": false,
"editor.minimap.size": "fill",
Result:

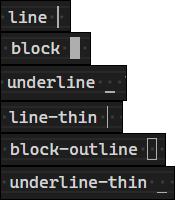
Cursor style
Change the caret (typing cursor) style.
I actually prefer the default line style, but included this setting in the list as you may like a different style better.
GUI setting: Editor: Cursor Style to line.
JSON setting:
"editor.cursorStyle": "line"
Result showing each of the different cursor styles:
Cursor blinking
Control if the caret (typing cursor) blinks or not, as well as the animation it uses for the blink.
This is a subtle UI tweak that you might not even notice, but I like it.
I personally like the expand animation, but you can choose whatever you prefer.
GUI setting: Editor: Cursor Blinking to expand.
JSON setting:
"editor.cursorBlinking": "expand",
This other blog shows gifs of the different animations that you can choose from.
Smooth scrolling
Adds a slight animation to vertically scrolling, rather than the page just jumping to the new location. I find this makes scrolling less jarring and easier to differentiate which direction you are scrolling.
GUI setting: Editor: Smooth Scrolling to true.
JSON setting:
"editor.smoothScrolling": true,
Smooth caret animation
This is similar to the Smooth scrolling setting, only for the caret (the typing cursor). This adds a slight animation of the caret moving to the new location, making it easier to follow, rather than it jumping and just appearing at the new location.
GUI setting: Editor: Cursor Smooth Caret Animation to true.
JSON setting:
"editor.cursorSmoothCaretAnimation": "on",
Result of smooth caret animation off:
![]()
Result of smooth caret animation on (does not look as smooth and nice in the gif due to its low frame rate):
![]()
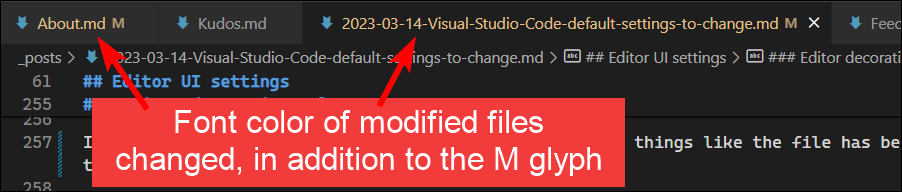
Editor decoration colors
In addition to using glyphs in the tab name to indicate things like the file has been modified, VS Code will also change the color the tab text.
This setting is now on by default, but it might be turned off if you’ve been using VS Code with Settings Sync for a while.
GUI setting: Workbench › Editor › Decorations: Colors to true.
JSON setting:
"workbench.editor.decorations.colors": true
Result:
Wrap tabs
When you have many tabs open you can have them wrap and create another row, rather than having a horizontal scrollbar appear and needing to scroll the tabs into view. This uses more vertical space, but you can see all of your open tabs at once. This will create multiple rows of tabs if needed.
GUI setting: Workbench › Editor: Wrap Tabs to true.
JSON setting:
"workbench.editor.wrapTabs": true,
Result:

Tab height
You can reduce the tab height to save some vertical space, which is especially nice when you have tab wrapping enabled and have multiple rows of tabs.
GUI setting: Window › Density: Editor Tab Height to compact.
JSON setting:
"window.density.editorTabHeight": "compact",
Pinned tabs on separate row
You can have pinned tabs be displayed on their own row, above non-pinned tabs. Tabs can then be easily pinned and unpinned by dragging them in and out of the pinned row.
GUI setting: Workbench › Editor: Pinned Tabs On Separate Row to true.
JSON setting:
"workbench.editor.pinnedTabsOnSeparateRow": true,
Result before:

and after:

Pinned tab size
Set the tab width for pinned tabs to be smaller. I find if I’ve pinned a tab, I often know what it is and don’t need to see the full filename in the tab. You can save some horizontal space by shrinking the tab size for pinned tabs. This is less of an issue if you have pinned tabs show on their own separate row, but I still like to use it as some files have very long names.
You will still see the full filename in the tooltip when you hover the mouse over the tab, and in the breadcrumbs navigation bar when you have the file selected.
GUI setting: Workbench › Editor: Pinned Tab Sizing to shrink.
JSON setting:
"workbench.editor.pinnedTabSizing": "shrink"
Result:
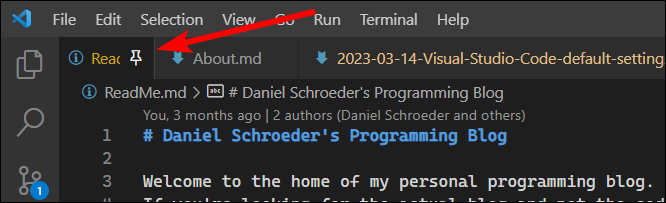
Preview editor tab
When you single click on a file in the file tree, it will open in the preview editor tab by default. There is only one preview tab, so if you single click on a different file in the file tree, it will close the first file you had open so it can display the new file in the preview tab. To have the file open in a non-preview tab, you can double click on the file in the file tree, double-click the preview tab, or edit the file.
If you do not like the preview tab, you can disable it and have all files open in non-preview tabs. I personally like using the preview tab, but I know many people do not.
GUI setting: Workbench › Editor: Enable Preview to false.
JSON setting:
"workbench.editor.enablePreview": false,
Bracket pair colorization
Colorize matching brackets/parenthesis, making it easier to see which opening bracket matches which closing bracket.
There used to be several extensions that provided this functionality, but now it is built into VS Code.
This setting is now on by default, but it might be turned off if you’ve been using VS Code with Settings Sync for a while.
GUI setting: Editor › Bracket Pair Colorization: Enabled to true.
JSON setting:
"editor.bracketPairColorization.enabled": true,
Result (notice how it’s easy to see which opening bracket matches which closing bracket):
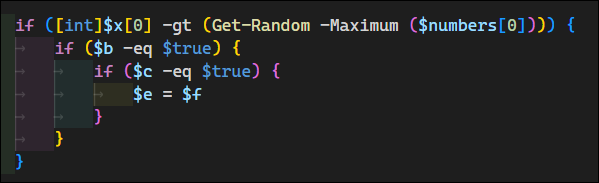
Bracket pair guides
Add a vertical or horizontal line to the editor to help you see which pair of brackets/parenthesis you are currently modifying code for.
GUI setting: Editor › Guides: Bracket Pairs to active.
JSON setting:
"editor.guides.bracketPairs": "active",
Result:
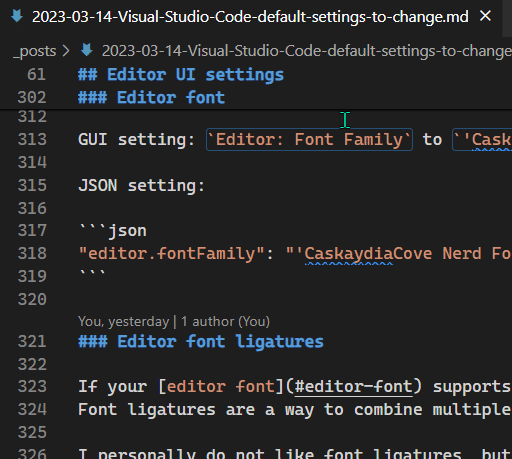
Editor font
Change the font used in the editor. This is a very personal preference, and may require you to install the font on your machine.
I personally like the CaskaydiaCove Nerd Font font.
Another popular one is FiraCode.
Both of these fonts support ligatures, and can be downloaded for free from Nerd Fonts.
You can specify multiple fonts, and VS Code will use the first one that is available on your machine.
GUI setting: Editor: Font Family to 'CaskaydiaCove Nerd Font Mono',Consolas, 'Courier New', monospace.
JSON setting:
"editor.fontFamily": "'CaskaydiaCove Nerd Font Mono',Consolas, 'Courier New', monospace",
Editor font ligatures
If your editor font supports it, you can enable font ligatures.
Font ligatures are a way to combine multiple characters into a single glyph, such as == becoming ≡, or -> becoming →.
I personally do not like font ligatures, but I know many people do.
GUI setting: Editor: Font Ligatures, which must be edited in the settings.json file.
JSON setting:
"editor.fontLigatures": true,
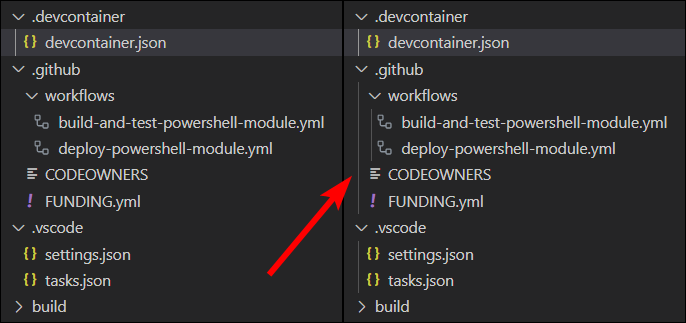
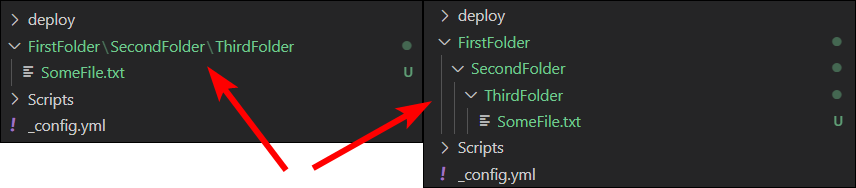
File tree indentation
Increase the indentation of nested items in the file tree so it is easier to tell when files are in a folder.
GUI setting: Workbench › Tree: Indent to 11, or whatever value you prefer.
Default is 8.
JSON setting:
"workbench.tree.indent": 11,
File tree indentation guide lines
Show vertical lines in the file tree to help you see which files are in which folders. By default these are only shown when you hover over the mouse over the file tree, but I prefer to always show them.
GUI setting: Workbench › Tree: Render Indent Guides to always.
JSON setting:
"workbench.tree.renderIndentGuides": "always",
Result (before and after):
File tree indentation guide lines color
Change the color of the file tree indentation guide lines so they are easier to see. I found the default color to be too dark and hard to see on some monitors, so I make it brighter. You can choose whatever color you prefer.
GUI setting: Workbench: Color Customizations, which must be edited in the settings.json file.
JSON setting:
"workbench.colorCustomizations": {
  "tree.indentGuidesStroke": "#999999"  // Default is #555555.
},
File tree sticky scroll
You can also enable sticky scroll in the file navigation tree. This will keep the directory hierarchy visible as you scroll through the file tree.
GUI setting: Workbench › Tree: Enable Sticky Scroll to true.
JSON setting:
"workbench.tree.enableStickyScroll": true,
Result:
File tree compact folders
By default the file navigation tree will collapse folders that only contain a single folder. This saves a bit of vertical space, but can also make it harder to drag and drop files or folders into the collapsed folder. I prefer to disable it.
GUI setting: Explorer: Compact Folders to false.
JSON setting:
"explorer.compactFolders": false,
Result (enabled and disabled):
Debug toolbar location
By default the debug toolbar floats so that it is always visible and can be repositioned. The problem is it often floats over other controls or tabs, making them hard to access. You can dock the debug toolbar, but then it is only visible when you are in the Run And Debug view. Instead, I prefer to show the debug toolbar in the Command Center. This way it is always visible and accessible, but does not block any other controls.
GUI setting: Debug: Tool Bar Location to commandCenter.
JSON setting:
"debug.toolBarLocation": "commandCenter",
Result before, with controls obstructed:

Result after:

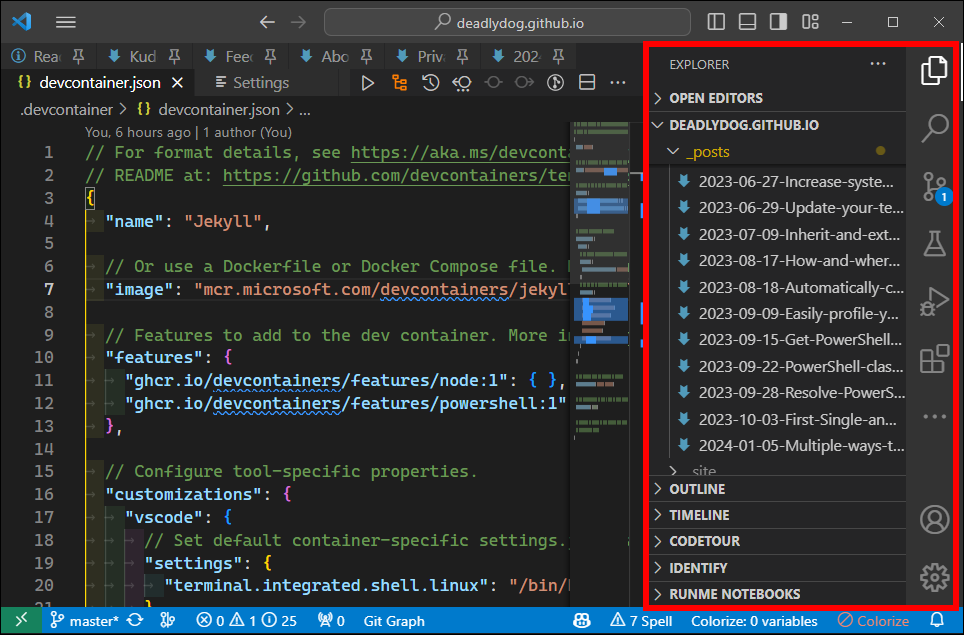
Side bar location
By default the side bar is shown on the left side of the editor. I personally prefer this, but others prefer it on the right side so that when you open and close the side bar, all the text in the editor does not suddenly get shifted.
GUI setting: Workbench › Side Bar: Location to right.
JSON setting:
"workbench.sideBar.location": "right",
Result of side bar on the left (default):
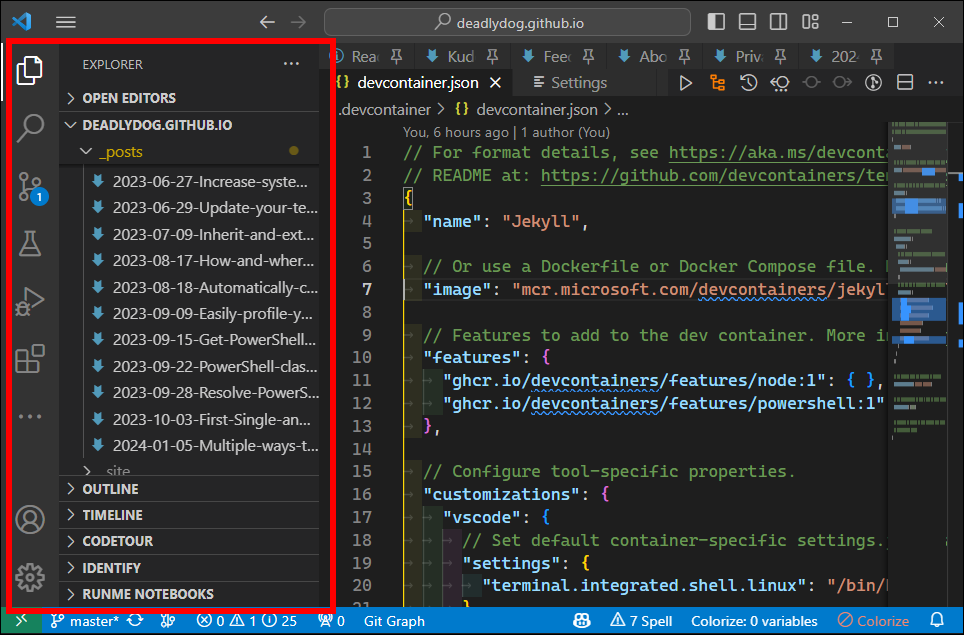
Result of side bar on the right:
Activity bar location
By default the activity bar is shown on the side of the Side Bar. If you want to save a bit of horizontal space at the expense of being able to see more extension icons at once, you can move the activity bar to the top of the Side Bar.
GUI setting: Workbench › Activity Bar: Location to top.
JSON setting:
"workbench.activityBar.location": "top",
Result:
Editor file and formatting settings
Save files automatically
If you’re tired of constantly hitting Ctrl+S to save your files, you can enable auto-save.
I personally like having it save files automatically after 1 second, but you can also choose to have it save when the editor or VS Code lose focus. Choose whatever works best for you.
GUI setting: Files: Auto Save to afterDelay, and Files: Auto Save Delay to 1000.
JSON setting:
"files.autoSave": "afterDelay",
"files.autoSaveDelay": 1000,
Trim trailing whitespace
Automatically remove trailing whitespace at the end of any lines when the file is saved.
GUI setting: Files: Trim Trailing Whitespace to true.
JSON setting:
"files.trimTrailingWhitespace": true,
Note: When working in source controlled files, this can sometimes make the file diff very large if the diff viewer is not configured to ignore whitespace changes.
Insert final newline
Automatically add a final newline to the end of the file when you save it. This is especially helpful if you are working with text files that will be accessed on unix, as unix requires a final newline to be present on text files.
GUI setting: Files: Insert Final Newline to true.
JSON setting:
"files.insertFinalNewline": true,
Trim final newlines
While we typically want a final newline, having more than one final newline looks sloppy. This setting will automatically trim any additional final newlines from the end of the file when you save it.
GUI setting: Files: Trim Final Newlines to true.
JSON setting:
"files.trimFinalNewlines": true,
Format on paste
When you paste text into the editor, VS Code can automatically format the text for you according to any linters or formatting rules you have configured. This is especially useful when pasting code snippets from the internet.
GUI setting: Editor › Format On Paste to true.
JSON setting:
"editor.formatOnPaste": true,
Format on save and format save mode
Automatically format a file when you save it, applying linting rules and other formatting rules.
GUI setting: Format On Save to true.
JSON setting:
"editor.formatOnSave": true,
Along with this setting, you can specify the format mode.
By default it will format the entire file.
I prefer to only format the lines that I have changed, which is what the modifications setting value does.
This is especially helpful when working with files in source control and you do not want your pull request diff to include a ton of formatting changes for lines that you did not edit, which may hide the actual changes you made.
GUI setting: Format On Save Mode to modifications.
JSON setting:
"editor.formatOnSaveMode": "modifications",
Auto guess encoding
When you open a file, VS Code will guess the encoding of the file so it displays properly, and use that encoding when saving the file, rather than changing it to the default encoding type (which is specified by the files.encoding setting).
GUI setting: Files: Auto Guess Encoding to true.
JSON setting:
"files.autoGuessEncoding": true,
Default language for new files
When you create a new tab in VS Code, but have not saved it and given it a file extension yet, VS Code does not know the file type and what language it is and thus can not provide services like syntax highlighting, intellisense, etc. You can provide a default language for new tabs that are not saved yet to get these services.
I work a lot in PowerShell, so I set the default language to powershell.
You may want to set it to something like javascript, typescript, python, csharp, markdown, etc.
The supported language identifiers are listed here.
GUI setting: Files: Default Language to powershell.
JSON setting:
"files.defaultLanguage": "powershell",
Automatically use find-in-selection if multiple lines are selected
If you select multiple lines of text and use Ctrl+F or Ctrl+H to open the Find or Replace dialog respectively, VS Code can automatically toggle on the Find in Selection option of the dialog.
To me, it feels intuitive that if I have multiple lines of text selected, I want to search within those lines, not the entire file.
GUI setting: Editor › Find: Auto Find In Selection to multiline.
JSON setting:
"editor.find.autoFindInSelection": "multiline",
Terminal settings
Change the default integrated terminal, and add other terminals
If you use the integrated terminal, you can configure the default terminal to be something other than cmd.exe on Windows or bash on Linux/macOS.
I prefer PowerShell, so I set it as my default.
I use Windows, so I edit the Windows profile settings.
Use the Linux and Osx profiles accordingly for those platforms.
GUI setting: Terminal › Integrated › Default Profile: Windows to PowerShell.
JSON setting:
"terminal.integrated.defaultProfile.windows": "PowerShell",
If the terminal that you want to use is not in the list, you can add it to your list of terminals that are available using the setting below.
GUI setting: Terminal › Integrated › Profiles: Windows, which must be edited in the settings.json file.
JSON setting (example):
"terminal.integrated.profiles.windows": {
  "PowerShell": {
    "source": "PowerShell",
    "icon": "terminal-powershell"
  },
  "Command Prompt": {
    "path": [
      "${env:windir}\\Sysnative\\cmd.exe",
      "${env:windir}\\System32\\cmd.exe"
    ],
    "args": [],
    "icon": "terminal-cmd"
  },
  "Git Bash": {
    "source": "Git Bash"
  }
},
Terminal font
Similar to the editor font, you can configure the font that is used in the integrated terminal.
Again, I prefer the CaskaydiaCove Nerd Font Mono font which you can get free from Nerd Fonts, but feel free to use whatever font you prefer.
You may want to ensure you pick a font that supports any ligatures that you may want to use.
GUI setting: Terminal › Integrated: Font Family to "CaskaydiaCove Nerd Font Mono".
JSON setting:
"terminal.integrated.fontFamily": "CaskaydiaCove Nerd Font Mono",
Terminal cursor style
You can configure the cursor style that is used in the integrated terminal.
I prefer the line cursor style over block or underline, but you can choose whatever you prefer.
GUI setting: Terminal › Integrated: Cursor Style to line.
JSON setting:
"terminal.integrated.cursorStyle": "line",
Scrollback
The integrated terminal has a scrollback buffer that stores the output of previous commands.
It defaults to 1000 lines, but I prefer to increase it as some scripts can output a lot of text and I like to ensure I’m able to view it all.
GUI setting: Terminal › Integrated: Scrollback to 10000.
JSON setting:
"terminal.integrated.scrollback": 10000,
Git settings
Autofetch
Automatically fetch from the remote repository periodically. This allows you to see easily if your local repository is out of date or not, without having to fetch manually.
GUI setting: Git: Autofetch to true.
JSON setting:
"git.autofetch": true,
Auto stash
Automatically stash your changes before pulling, and restore them after the pull succeeds. Without this, you may be presented with a prompt or error if you have uncommitted changes and try to pull.
GUI setting: Git: Auto Stash to true.
JSON setting:
"git.autoStash": true,
Merge editor
When you are resolving merge conflicts, VS Code will open the visual merge editor to help you resolve the conflicting lines.
GUI setting: Git: Merge Editor to true.
JSON setting:
"git.mergeEditor": true,
Smart commit
By default if you have not staged any changes, VS Code will prompt you to stage them before you can commit, giving you the options “Yes”, “No”, “Always”, and “Never”.
- If you selected “Always”, it will have automatically stage all changes for you before committing them.
- If you selected “Never”, the Commit button will be disabled until you stage some changes.
I prefer to not be prompted and for it to automatically stage all changes before committing, so I use this setting.
GUI setting: Git: Enable Smart Commit to true.
JSON setting:
"git.enableSmartCommit": true,
If you prefer requiring changes to be manually staged before they can be committed, and do not want to be prompted, you can set the above enableSmartCommit setting to false, and also set suggestSmartCommit to false.
GUI setting: Git: Suggest Smart Commit to false.
JSON setting:
"git.suggestSmartCommit": false,
Markdown settings
Pasting URLs into Markdown
Automatically wrap hyperlinks pasted into markdown files with the markdown link syntax.
For example, pasting https://someurl.com into a markdown file will be converted to [Title](https://someurl.com).
GUI setting: Markdown › Editor › Paste URL As Formatted Link: Enabled to smart.
JSON setting:
"markdown.editor.pasteUrlAsFormattedLink.enabled": "smart",
Markdown validation
Validate your markdown files and notify you of some common errors, such as broken links to pages or images in your repo.
GUI setting: Markdown › Validation: Enabled to true.
JSON setting:
"markdown.validate.enabled": true,
Conclusion
I hope you’ve found these default setting adjustments useful.
If you have suggestions for other default settings that I missed, please let me know in the comments below.
I plan to update this post as I find more useful settings to tweak, and as new ones are introduced, so be sure to check back from time to time.
Happy coding!
Comments
itsko
In several of your images, your indentations are colored (not just the brackets). Which setting is this?
Daniel Schroeder
Hi itsko, to have the indentation be colored I’m using the indent-rainbow extension: https://marketplace.visualstudio.com/items?itemName=oderwat.indent-rainbow
Leave a Comment
Your email address will not be published. Required fields are marked *