Get up and running with AutoHotkey
AutoHotkey (AHK) is an amazing programming language for automating tasks and keystrokes in Windows. In this post we’ll look at how you can get your first AHK script up and running, and other configurations and processes you may want to adopt. I’ve given some of these AHK setup instructions in previous posts, but figured they deserved their own dedicate post.
Install AHK and run your first script
To get up and running with AHK:
- Download and install the current version of AutoHotkey.
- Create a new text file with the extension
.ahk. e.g. MyHotkeys.ahk. -
Open the text file in an editor, such as Notepad, and add some AHK code to the file, such as:
#b::MsgBox, "Hello World!" - Save the file.
- Double-click the file to run it, or right-click it and choose
Run Script.
You should see a new AutoHotkey icon appear in your system tray ![]() .
This is your running script.
.
This is your running script.
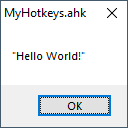
If you used the line of code provided above, when you press Windows key + b you should see a message box pop up that says “Hello World!”.

You can right-click the system tray icon and choose Exit to kill your script at any time.
If you edit the script, right-click the system tray icon and choose Reload This Script to restart the script with the changes applied.
![]()
You did it! You wrote and ran your first AHK script.
Editing AHK scripts
While you can use any text editor to write your scripts, I would recommend either:
- Visual Studio Code with the AutoHotkey Plus extension installed - A very nice experience that is constantly receiving updates.
- SciTE4AutoHotkey - A great IDE, but hasn’t had an update since 2014.
Both options provide syntax highlighting, intellisense, and debug support. There are other editors/IDEs as well, but these are the 2 I have experience with and have enjoyed.
Run scripts automatically at startup
While it’s cool that you can simply double-click your script file to run it, you likely don’t want to have to do this every time you restart your computer.
You can have your script run automatically when you log into Windows by doing the following:
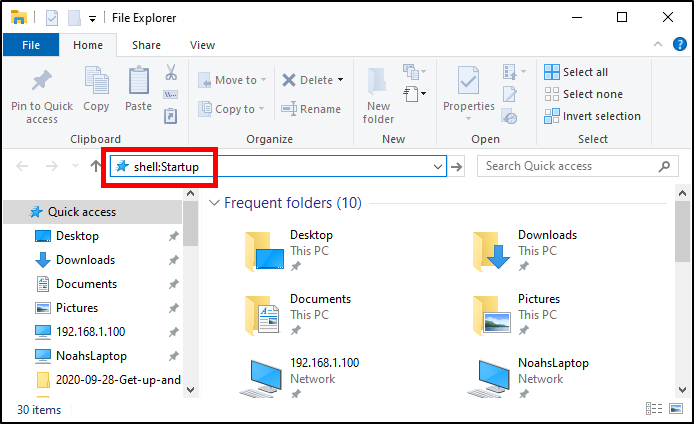
- Open File Explorer.
- In the address bar, type
shell:Startupand hit enter.
- You should now be in your user’s Startup directory. Every file in this directory will be executed automatically when the user logs into Windows.
- Find your .ahk script file and copy it.
- Back in your user’s Startup directory, paste a shortcut to your .ahk file*.

That’s it. Now the next time the user logs into Windows, the script will be started automatically.
*You don’t need to paste a shortcut; you could paste the actual .ahk file itself in the Startup directory and things would work as expected. However, I prefer to keep the actual .ahk file somewhere that it will be backed up, such as in a Git repository, or in a OneDrive folder.
Allow AHK to interact with apps running as admin
If you run other applications as admin on your computer, you may notice that AHK cannot interact with them. This is because in order for AHK to interact with applications running as admin, it either also needs to run as admin, or we need to digitally sign the AutoHotkey.exe.
I recommend digitally signing the AutoHotkey executable. It’s a one-time setup operation and only takes about 30 seconds to do. To digitally sign the AutoHotkey executable:
- Download and unzip the EnableUIAccess.zip file.
- Double-click the
EnableUIAccess.ahkscript to run it, and it will automatically prompt you. - Read the disclaimer and click
OK. - On the
Select Source Fileprompt choose the “C:\Program Files\AutoHotkey\AutoHotkey.exe” file; it’s typically already selected by default so you can just hit theOpenbutton. (Might be Program Files (x86) if you have 32-bit AHK installed on 64-bit Windows) - On the
Select Destination Fileprompt choose the same “C:\Program Files\AutoHotkey\AutoHotkey.exe” file. Again, this is typically already selected by default so you can just hit theSavebutton. - Click
Yesto replace the existing file. - Click
Yeswhen prompted toRun With UI Access.
That’s it; AutoHotkey should now be able to interact with all windows/applications, even ones running as admin. I’ve blogged about this in the past, so if you’re interested you can see this post for more background information.
Transform your script into an executable
Perhaps you’ve written a cool AHK script that you want to share with your friends, but you don’t want them to have to install AutoHotkey.
AutoHotkey has you covered!
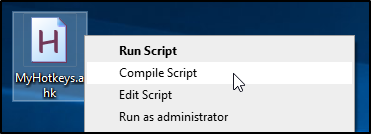
Simply right-click on your .ahk script file and choose Compile Script.

This will create a .exe executable from your script file. Double-clicking the .exe file will have the same result as double-clicking the .ahk file to run it, except the .exe does not require that AutoHotkey be installed on the computer.
A few quick AHK script examples
To give a few examples of the types of things you can do with AutoHotkey:
-
Hotkey to expand your full address when you type
myaddress:::myaddress::123 My Street, My City, My Province/State, My Postal/Zip Code, My Country -
Hotkey to open a new email message for you to send when you press Ctrl + Shift + e:
^+e::Run, mailto: -
Hotkey to open a frequent directory when you press Windows Key + o:
#o::Run, C:\Some folder I open often -
Hotkey to open a frequent website when you press Ctrl + Alt + w:
^!w::Run, http://Some.Website.com
Lifehack has a few more useful script examples if you’d like to check them out.
You can do way more than quick one-line scripts as well. For example, if you use Zoom check out this post that gives an AHK script that will close excess Zoom windows. Hopefully these examples will peek your curiosity 😊
Conclusion
Now that you know how easy it is to run AHK code, check out the official quick start tutorial to learn the AHK language syntax and common operations and commands. The tutorial and documentation will help you discover how truly powerful the language is, and will hopefully give you some ideas on how you can automate more of your daily tasks.
Shameless Plug: You can also checkout my open source project AHK Command Picker that allows you to use a GUI picker instead of having to remember a ton of keyboard shortcuts.
Happy automating!

Leave a Comment
Your email address will not be published. Required fields are marked *