
Several ways to explore your Azure resources
Here I present a few ways to explore your Azure resources, for when the portal’s search and filter functionality is not enough.
Context
I needed to find all of the Azure Cloud service (classic) resources that we had in our organization, since that service is being retired on August 31, 2024.
I initially overlooked the Azure portal’s All Resources blade, which would have allowed me to filter by resource type.
Along the way I discovered some other ways to browse and filter my Azure resources, and thought I’d share them here.
Spoiler: I show how to find the Classic services in the Azure Portal and Azure Resource Graph Explorer sections below.
Update: For an even better way to track down services that are being retired, check out my post on the Azure Service Retirement Workbook.
Ways to explore your Azure resources
It is important to note that all of the approaches below require you to have access to the Azure subscription you want to explore. You can only browse and search across subscriptions you have permissions for. If you are wanting to search your entire organization, ensure you have access to all subscriptions.
Azure portal
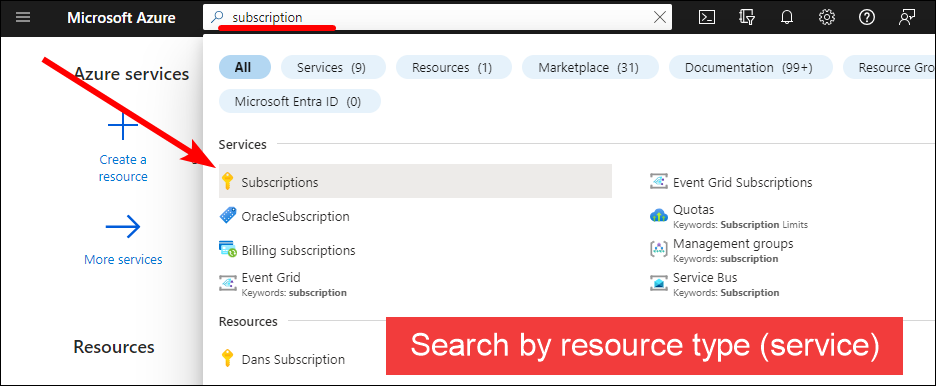
The easiest and most user-friendly way to explore your Azure resources is through the Azure portal: https://portal.azure.com.
You can use the global search bar at the top center of the web page to search for resources by name, resource type (service), or resource group.
If you want to just browse your resources, navigate to the Subscriptions blade and then drill down into the resource groups and their resources to inspect them.

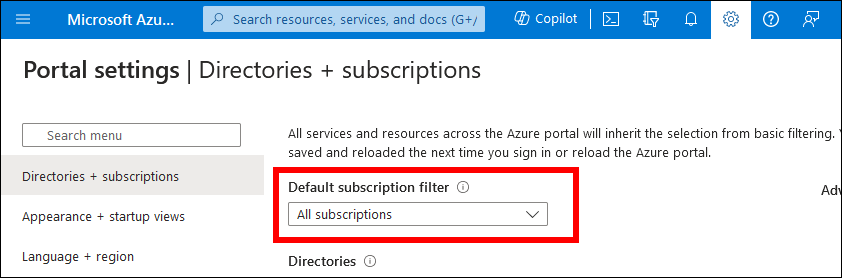
NOTE: To ensure you are able to view and search all of the subscriptions you have access to, click the gear icon on the top-right of the webpage and ensure the Default subscription filter is set to All subscriptions, otherwise you may not see the resources you expect.
There is also an All Resources blade that will allow you to browse, search, sort, and filter all resources in the subscriptions you have access to.
It shows you the resource Name, Type, Location, Resource Group, and Subscription, and also allows you to filter your resources by Tag.
This is a powerful blade that can be useful for finding resources of a specific type, in a specific location, or with a specific tag.
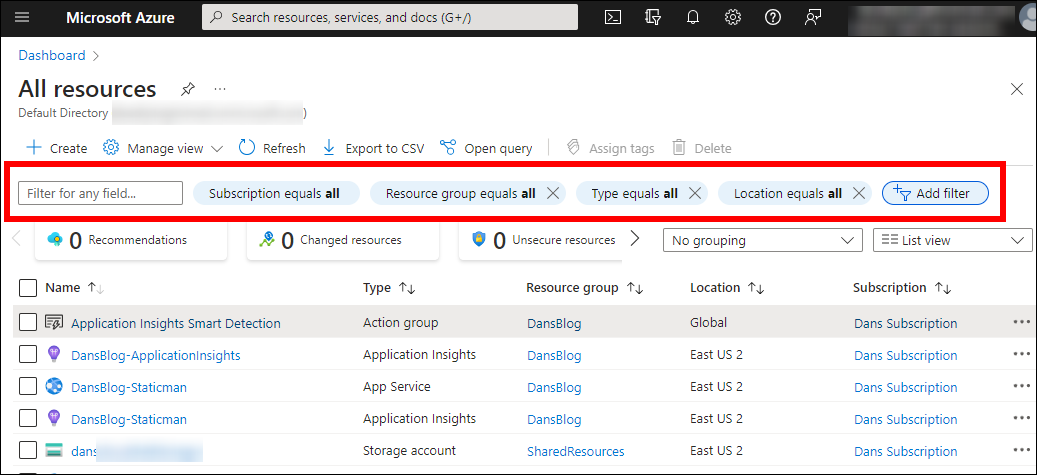
To solve my initial problem, I could use the All Resources blade to filter by Type Cloud service (classic).
The portal does not always expose all of the properties of a resource, or let you search or filter by them. If you are looking for something more specific, you may need to use another approach.
Azure Resource Explorer
Another way to browse resources is with the Azure Resource Explorer: https://resources.azure.com.
This can show you the API endpoints for your resources, and let you explore them in a tree view. It may also expose some properties that the portal does not. I have found this view is not that helpful on its own, but can be when used in conjunction with the other approaches below.
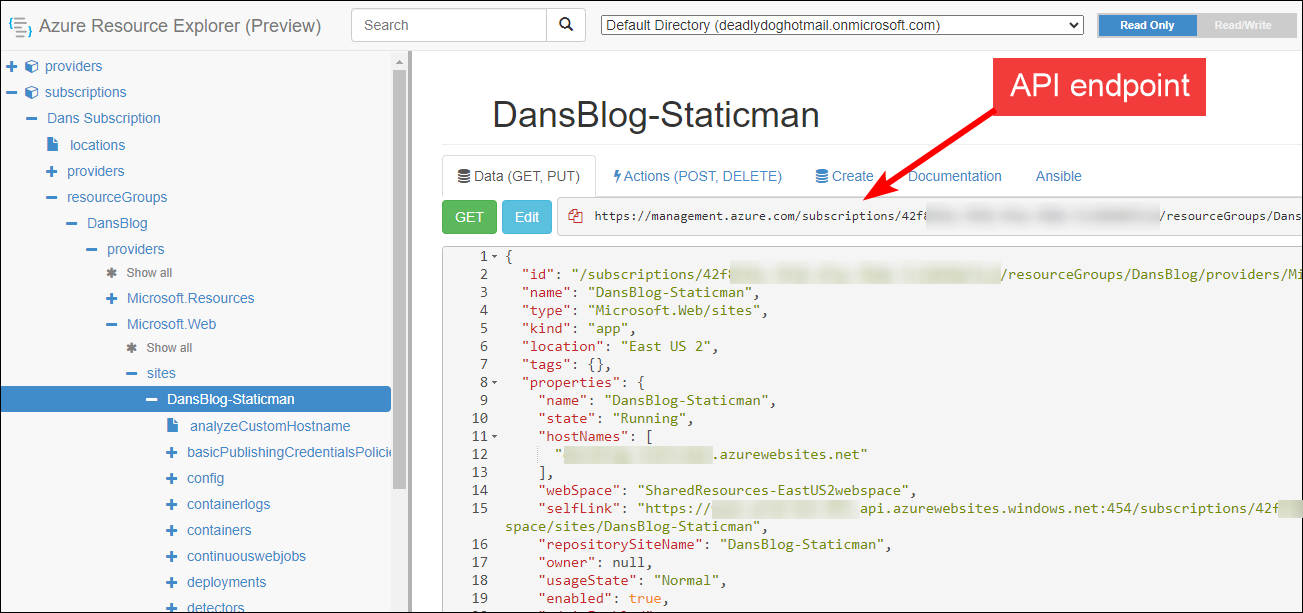
If you do not see the resources you expect, you may need to change the directory using the dropdown box at the top. If your organization has a lot of resources, the page can be very resource intensive and bring your browser to its knees.
Azure PowerShell module
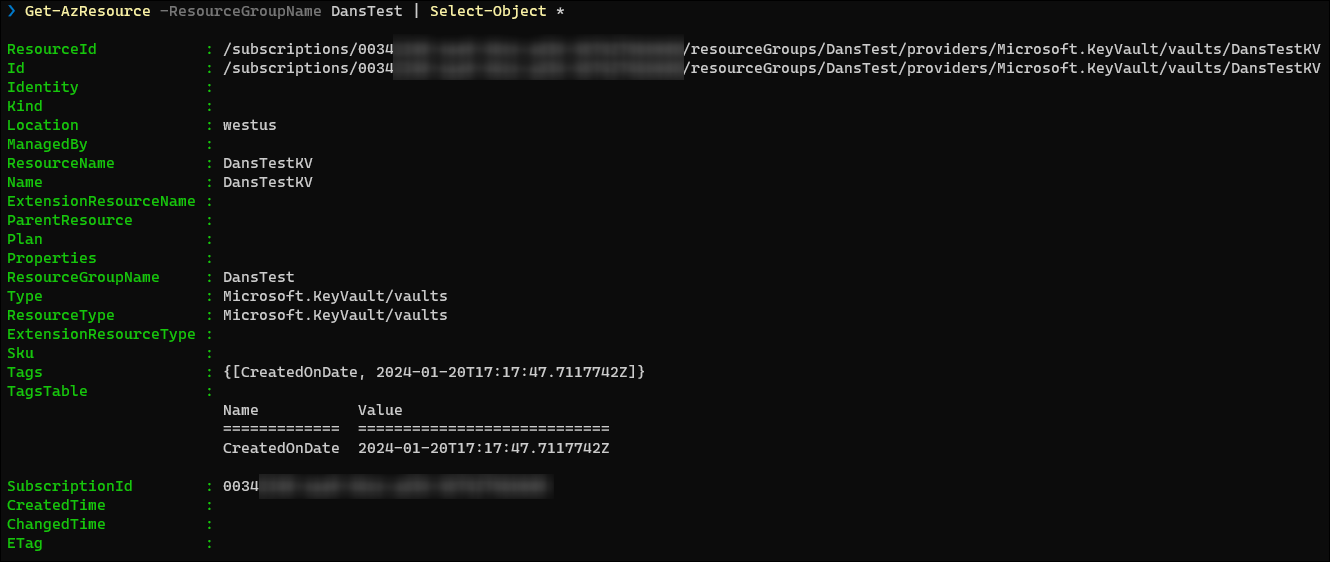
You can leverage the Az Azure PowerShell module to explore your resources from PowerShell.
The Az module is actually comprised of many different modules and can be quite large.
To simply install all of the modules from the PowerShell Gallery, use the command:
Install-Module -Name Az -Repository PSGallery
However, you may prefer to only install the specific modules you need. You can view all of the various Az modules on the PowerShell Gallery.
To start, you may want to install just the Az.Resources module, which will allow you to explore your resources:
Install-Module Az.Resources -Repository PSGallery
Once installed, use Connect-AzAccount to connect to your Azure account.
Now that the module is installed and connected, you can use Get-AzResource to explore the resources in the subscription you are connected to.
To list the subscriptions you have access to, use Get-AzSubscription, and to change subscriptions, use Set-AzContext -Subscription <subscription name>.
The PowerShell module exposes more properties than the portal does, and you can use regular PowerShell commands to filter and search for resources you want. You can also use the Az module to create, modify, and delete resources as well. For more information, check out the Az module documentation.
Azure CLI
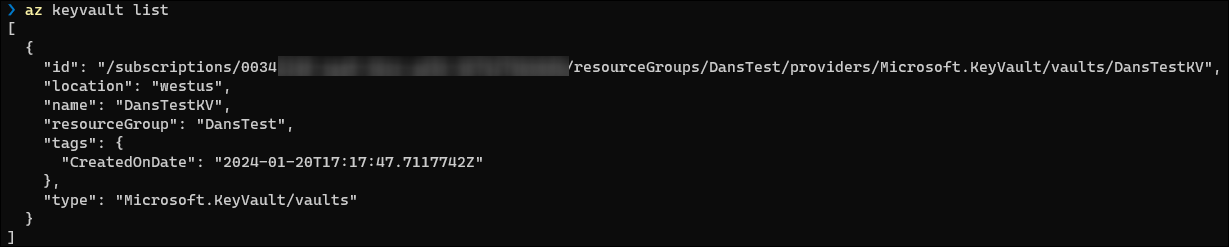
If you prefer to not use PowerShell, you can use the Azure CLI instead. You will need to download and install the package that is specific to your operating system.
Once you have the CLI installed, use az login to connect to your Azure account.
Now that the CLI is installed and connected, you can use az resource list to explore the resources in the subscription you are connected to.
To view all of the subscriptions you have access to, use az account list, and to change subscriptions, use az account set --subscription <subscription name>.
The CLI has subcommands for many resource types, such as az vm list or az webapp list to list just VMs or web apps.
Use az --help to see all of the available commands.
The CLI may expose more properties than the portal, and allows you to also create, modify, and delete resources. For more information, check out the Azure CLI documentation.
Azure Rest API
The Azure Rest API is one of the most powerful ways to explore your resources, but it is also the most difficult.
All of the methods mentioned above use the Rest API under the hood. Using the Rest API does not allow for easy browsing of your resources like the approaches above, as you often need to know the API endpoint for the resource you are looking for. This is where the Azure Resource Explorer can help, as it can show you the API endpoints for your resources. Otherwise you often have to read through the API docs.
When testing the Rest API, it can be helpful to use a tool like Postman or Thunder Client for VS Code. There are client libraries that can make is easier to use the Rest API in your own code, and they have support for languages such as .NET, Java, Node.js, and Python.
For more information, see the Rest API documentation.
Azure Resource Graph Explorer
Azure Resource Graph Explorer is a service that allows you to query your Azure resources using the Kusto query language. It is extremely powerful, and you can use it from the Portal, Azure PowerShell, Azure CLI, or the Rest API.
The easiest way to use it is from the Azure portal.
From the portal, use the global search bar to search for Resource Graph Explorer, or go to https://portal.azure.com/#view/HubsExtension/ArgQueryBlade.
You will be presented with a blank query editor, a Get started view that has several example queries to choose from, and a tree view on the left with a search bar and the various resource types and their properties.
The example queries can show you how to use the Kusto query language, and the tree view makes it easy to add filters to your query for the resource types and properties that you are interested in.
For example, here is a Kusto query to retrieve all of the action groups (alerts) that send email notifications to me@domain.com; something that you cannot simply search for in the Action Groups or Alerts blade of the portal:
resources
| where type == "microsoft.insights/actiongroups"
| where properties['emailReceivers'][0]['emailAddress'] == "me@domain.com"
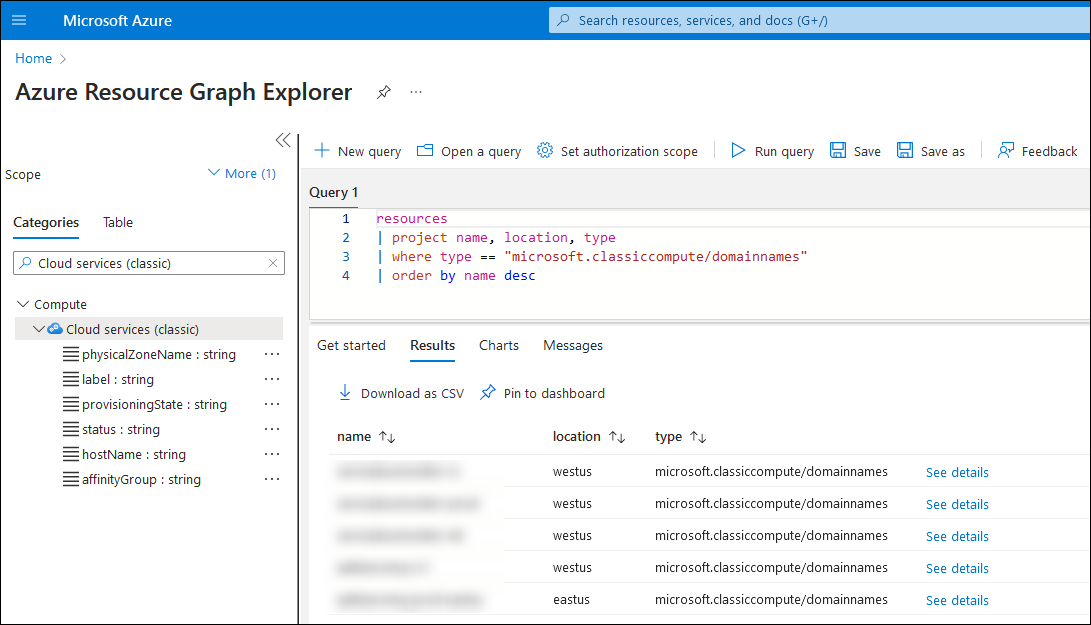
Here is a query that could be used solve my initial problem to retrieve all of the Cloud service (classic) resources:
resources
| where type == "microsoft.classiccompute/domainnames"
| order by name desc
Here’s a screenshot of the query editor with the above query:
If needed, I could refine the query to further filter down the results based on other resource properties.
The portal allows you to download the query results as a CSV file, so they are easy to share with others. Also, unlike the PowerShell module and CLI, the Resource Graph Explorer is not scoped to a specific subscription at a time, so you can easily query across all of your subscriptions.
For more information, check out the Azure Resource Graph documentation.
When to use each tool
So we’ve seen multiple ways you can explore your Azure resources. When should you use each one?
I want to browse my resources and see what’s there.
Use the Azure portal to navigate around your subscriptions and their resources.
I want to find a specific resource, a specific type of resource, or resources with a specific property.
Start with the Portal’s global search bar. From there, try the blade for the resource type you are looking for (e.g. the Subscriptions blade). If those do not provide the searching and filtering you need, use the Azure Resource Graph Explorer.
I want to find a specific resource or property as part of an automated script.
Use the Azure PowerShell module or Azure CLI.
I want to find resources as part of my application.
Use the Azure Rest APIs with one of the client libraries. The Azure Resource Explorer may help you find the API endpoints you need, and specific properties to filter on.
Of course, these are just recommendations, and you can use whichever approach you prefer for your scenario.
Conclusion
We’ve seen several ways to get started exploring your Azure resources.
For my initial problem of finding all “Cloud service (classic)” resources, I could have also used the Azure PowerShell module or Azure CLI. The Azure Portal and Azure Resource Graph Explorer can be the easiest to get started with, as they allow you to browse through services and properties easily, which is nice when you do not know the specific properties, terms, and syntax to use. Also, they do not require any additional setup (no software to install or connecting to Azure). It all comes down using the tool you are most comfortable with though.
Hopefully you’ve learned something new and this helps you find the resources you are looking for!
Happy exploring!
Leave a Comment
Your email address will not be published. Required fields are marked *