
Multiple ways to setup your CI/CD pipelines in GitHub Actions
In this post I’ll show different approaches to setting up your build and deployment workflows with GitHub Actions, as well as some pros and cons of each.
TL;DR
While I show several approaches here, the one I recommend using is the “Include approach with reusable workflows” (Approach 5), so you can skip straight to that section if you like and take in the sample code.
This sample GitHub repository contains all of the examples shown in this post, and you can see how the workflow runs look in the GitHub Actions web UI here. Feel free to fork the repo and play around with it yourself.
Background
Over the summer I created the tiPS PowerShell module in GitHub and decided to use GitHub Actions for the CI/CD process. For the past few years I have been using Azure DevOps for my CI/CD pipelines, but I wanted to try out GitHub Actions to see how it compared, especially since my code was also hosted in GitHub. The approaches I show here are ones I tried out in the tiPS project as it evolved, until settling on an approach I was happy with.
Terminology
Azure DevOps and much of the industry use the term “pipeline” to refer to the automated steps to build and deploy software, but GitHub Actions uses the term “workflow” instead. For the purposes of this post, the terms “pipeline” and “workflow” are interchangeable.
Similarly, Azure DevOps uses the term “template”, while GitHub Actions uses the term “reusable workflow”, so I may use them interchangeably as well.
The approaches
Some CI/CD criteria we want to meet in our examples are:
- Deploy to the
stagingenvironment automatically when amainbranch build completes successfully. - Manual intervention should be required to deploy to the
productionenvironment. e.g. A manual approval. - PR builds and non-main branch builds should:
- Not trigger automatic deployments.
- Manual deployments should still be possible when needed.
- All builds should upload their artifacts so they can be downloaded/inspected.
The approaches we will look at are:
- Place all of the build and deployment steps in a single workflow file.
- Have a deploy workflow listen for when the build workflow completes (
pullapproach). - Have the build workflow trigger the deploy workflow (
pushapproach). - Have the deploy workflow include the build workflow (
includeapproach). - Have the deploy workflow include the build workflow, and use a template for the deployment jobs (
includeapproach with reusable workflows).
I typically prefer to use the include approach, but I’ll show each approach so you can decide which one you prefer for a given scenario.
If you are curious or confused about any of the workflow yaml syntax shown in the examples below, checkout the workflow syntax for GitHub Actions docs.
I created this sample GitHub repository that contains all of the examples shown in this post, so you view their code and can see how they look in the GitHub Actions web UI.
In the example yaml code below, I use the “👇” emoji to call out specific things to take note of, or that have changed from one approach to the next.
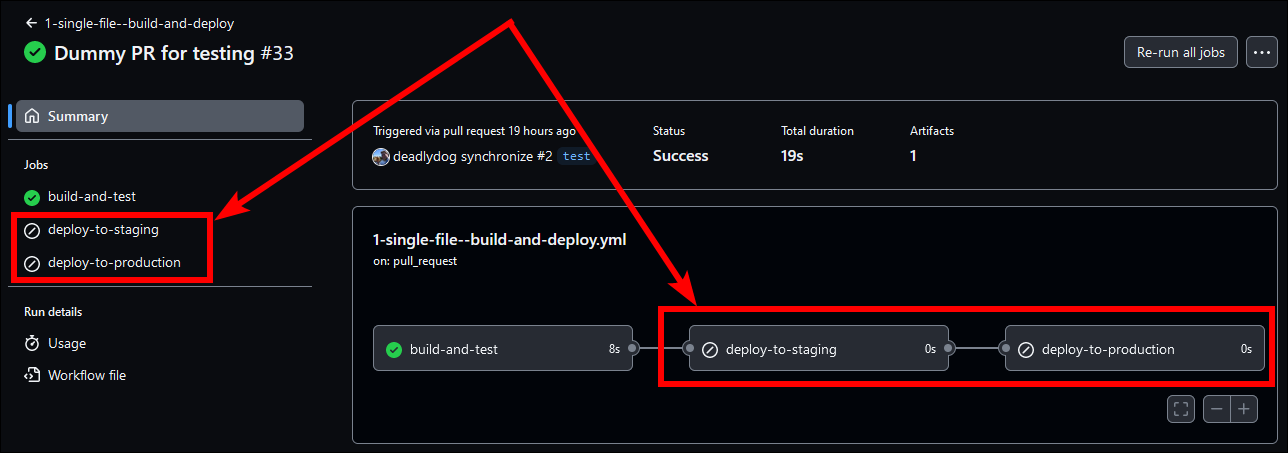
Approach 1: Build and deploy with a single workflow file
Here is an example of a single workflow file that builds and deploys some code:
name: 1-single-file--build-and-deploy

on:
  pull_request:
    branches: main # Run workflow on PRs to the main branch.

  # Run workflow on pushes to any branch.
  push:

  # Allows you to run this workflow manually from the Actions tab.
  workflow_dispatch:

env:
  artifactName: buildArtifact

jobs:
  build-and-test:
    runs-on: ubuntu-latest
    steps:
      - name: Checkout the repo source code
        uses: actions/checkout@v3

      # Steps to version, build, and test the code go here.

      - name: Upload artifact
        uses: actions/upload-artifact@v4
        with:
          name: ${{ env.artifactName }}
          path: ./ # Put the path to the build artifact files directory here.

  deploy-to-staging:
    # 👇 Only run this deploy job after the build-and-test job completes successfully.
    needs: build-and-test
    runs-on: ubuntu-latest
    # 👇 Only run on pushes (not PRs) or manual triggers to the main branch.
    if: (github.event_name == 'push' || github.event_name == 'workflow_dispatch') && github.ref == 'refs/heads/main'
    steps:
      - name: Download artifact
        uses: actions/download-artifact@v4
        with:
          name: ${{ env.artifactName }}
          path: ./buildArtifact

      # Steps to deploy the code go here.

  deploy-to-production:
    # 👇 Only run this deploy job after the deploy-to-staging job completes successfully.
    needs: deploy-to-staging
    runs-on: ubuntu-latest
    environment: production # Used for environment-specific variables, secrets, and approvals.
    steps:
      - name: Download artifact
        uses: actions/download-artifact@v4
        with:
          name: ${{ env.artifactName }}
          path: ./buildArtifact

      # Steps to deploy the code go here.
There are a few things to note here.
First, the workflow is automatically triggered when a PR to the main branch is created, or when a change is pushed to any branch.
It can also be manually triggered.
Second, the workflow has 3 jobs: build-and-test, deploy-to-staging, and deploy-to-production.
Notice in the deploy-to-staging job we use a conditional if statement to ensure we do not deploy if the workflow was triggered by a PR, or if the push was not for the main branch.
Technically we did not need to create separate deploy jobs, and could have just put the deployment steps in the build-and-test job.
In general, it is a good idea to separate the build steps from the deployment steps to maintain a separation of concerns.
A technical reason for keeping them separate is GitHub Actions allows you to add approvals to a job via the environment key.
Approvals are often used to block deployments until someone manually approves it.
Only jobs support an environment, and you would typically have a deployment job for each environment that you need to deploy to.
Lastly, if you do decide to use a single job for both the build and deployment steps, then you technically do not need the Upload artifact and Download artifact steps.
I would still recommend using the Upload artifact step though so that the build artifact is available for download in the GitHub Actions UI, in case you need to inspect its files.
Pros and cons of using a single workflow file
Pros:
- Simple to setup, as it is only a single file.
- Workflow environment variables can be easily used by all jobs.
e.g.
env.artifactName
Cons:
- The workflow file may quickly grow in size as more steps and jobs are added. Having a single yaml file that is several hundred or thousands of lines long can be more difficult to maintain and daunting to look at.
- Workflow code changes are required to deploy from any branch other than
main. - If you want to deploy to multiple environments, you will need to duplicate the deployment steps for each environment (Approach 5 and the Reusable Workflows section below show how to solve this). Duplicate code is harder to maintain and can easily lead to bugs if the code is not kept in sync.
-
The deployment jobs/steps will be skipped for PRs and branch builds, but will still show up in the workflow web UI. This can be confusing to users, as they may not understand why those jobs/steps were skipped and that they cannot be manually triggered.
-
The PR builds and non-main branch builds will show up in the same
1-single-file--build-and-deployworkflow runs as themainbranch builds. If there are a lot of PR runs or pushes to branches, they may bury themainbranch runs, forcing you to go back several pages in the web UI to find themainbranch runs to answer questions like, “When was the last time we deployed to production?”.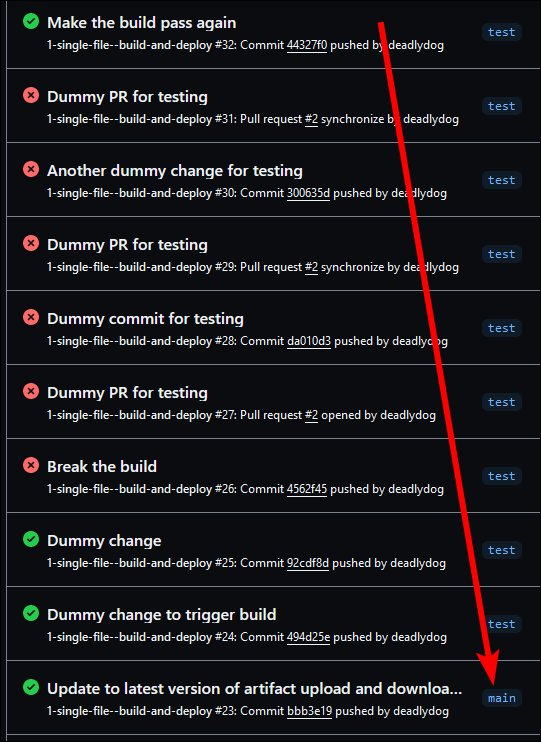 )
)
To see what the GitHub Actions UI looks like with this approach, check out the workflow runs in the sample repository.
Approach 2: Deploy workflow listens for build workflow to complete (Pull approach)
Here is an example of a workflow file that just builds the code:
name: 2-pull--build

on:
  pull_request:
    branches: main # Run workflow on PRs to the main branch.

  # Run workflow on pushes to any branch.
  push:

  # Allows you to run this workflow manually from the Actions tab.
  workflow_dispatch:

env:
  artifactName: buildArtifact

jobs:
  build-and-test:
    runs-on: ubuntu-latest
    steps:
      - name: Checkout the repo source code
        uses: actions/checkout@v3

      # Steps to version, build, and test the code go here.

      - name: Upload artifact
        uses: actions/upload-artifact@v4
        with:
          name: ${{ env.artifactName }}
          path: ./ # Put the path to the build artifact files directory here.
And the accompanying workflow file that deploys the code using the pull approach:
name: 2-pull--deploy

on:
  # 👇 Run workflow anytime the 2-pull--build workflow completes for the main branch.
  # Unfortunately, can not have it only run on successful builds, so it will run when builds fail too.
  workflow_run:
    workflows: 2-pull--build
    types: completed
    branches: main

  # Allows you to run this workflow manually from the Actions tab.
  workflow_dispatch:
    inputs:
      # 👇 Must specify the build artifacts to deploy when running manually.
      workflowRunId:
        description: 'The build workflow run ID containing the artifacts to use. The run ID can be found in the URL of the build workflow run.'
        type: number
        required: true

env:
  artifactName: buildArtifact # This must match the artifact name in the 2-pull--build workflow.
  # 👇 Ternary operator to use input value if manually triggered, otherwise use the workflow_run.id of the workflow run that triggered this one.
  workflowRunId: ${{ github.event_name == 'workflow_dispatch' && inputs.workflowRunId || github.event.workflow_run.id }}

jobs:
  deploy-to-staging:
    # 👇 Only run the deployment if manually triggered, or the build workflow that triggered this succeeded.
    if: ${{ github.event_name == 'workflow_dispatch' || github.event.workflow_run.conclusion == 'success' }}
    runs-on: ubuntu-latest
    steps:
      # 👇 Must use a 3rd party action to download artifacts from other workflows.
      - name: Download artifact from triggered workflow
        uses: dawidd6/action-download-artifact@v2
        with:
          run_id: ${{ env.workflowRunId }}
          name: ${{ env.artifactName}}
          path: ./buildArtifact
          search_artifacts: true

      # Steps to deploy the code go here.

  deploy-to-production:
    # Only run this deploy job after the deploy-to-staging job completes successfully.
    needs: deploy-to-staging
    runs-on: ubuntu-latest
    environment: production # Used for environment-specific variables, secrets, and approvals.
    steps:
      # Must use a 3rd party action to download artifacts from other workflows.
      - name: Download artifact from triggered workflow
        uses: dawidd6/action-download-artifact@v2
        with:
          run_id: ${{ env.workflowRunId }}
          name: ${{ env.artifactName}}
          path: ./buildArtifact
          search_artifacts: true

      # Steps to deploy the code go here.
Here the build workflow is separate from the deployment workflow.
The build workflow is triggered when there is a push to any branch, a PR to the main branch, or when manually triggered.
The deployment workflow uses the on.workflow_run trigger to wait and listen for the build workflow to complete against the main branch.
Because the build uses its own workflow, the deployment workflow needs a reference to the build’s workflow run ID so it knows which build run to download the artifacts from.
This is provided automatically when the build triggers the deployment workflow, but must be provided manually when the deployment workflow is manually triggered.
You can find the build workflow run ID by opening the build workflow run in the GitHub Actions UI and looking at the URL.
The URL will look something like https://github.com/deadlydog/GitHub.Experiment.CiCdApproachesWithGitHubActions/actions/runs/6985605790, where the run ID is 6985605790.
The next thing to note is that the artifactName environment variable is duplicated in both the build and deployment workflows.
We could have the build workflow create an output variable that the deployment workflow could reference, but for the sake of simplicity I just duplicated the environment variable here.
Next, notice that the deploy-to-staging job has a conditional if statement that will only run the job if the workflow was manually triggered, or if the build workflow completed successfully.
Unfortunately, at this time, the on.workflow_run event does not have a property to indicate that the deploy workflow should only be triggered if the build workflow completed successfully, so we have to do the check ourselves on the job.
Lastly, the deployment jobs use a 3rd party action to download the build artifact. At this time, GitHub Actions does not have a built-in action to download artifacts from other workflows. They do provide API endpoints to download artifacts from other workflows, but it is simpler to use the 3rd party action.
Pros and cons of using the pull approach
Pros:
- The build and deployment steps are separated into their own workflows, making them easier to maintain and understand.
-
The build workflow only shows the build steps in the GitHub Actions UI, and the deployment workflow only shows the deployment steps, so we do not constantly have “skipped” jobs for non-deployment builds like in the previous single-workflow-file approach.
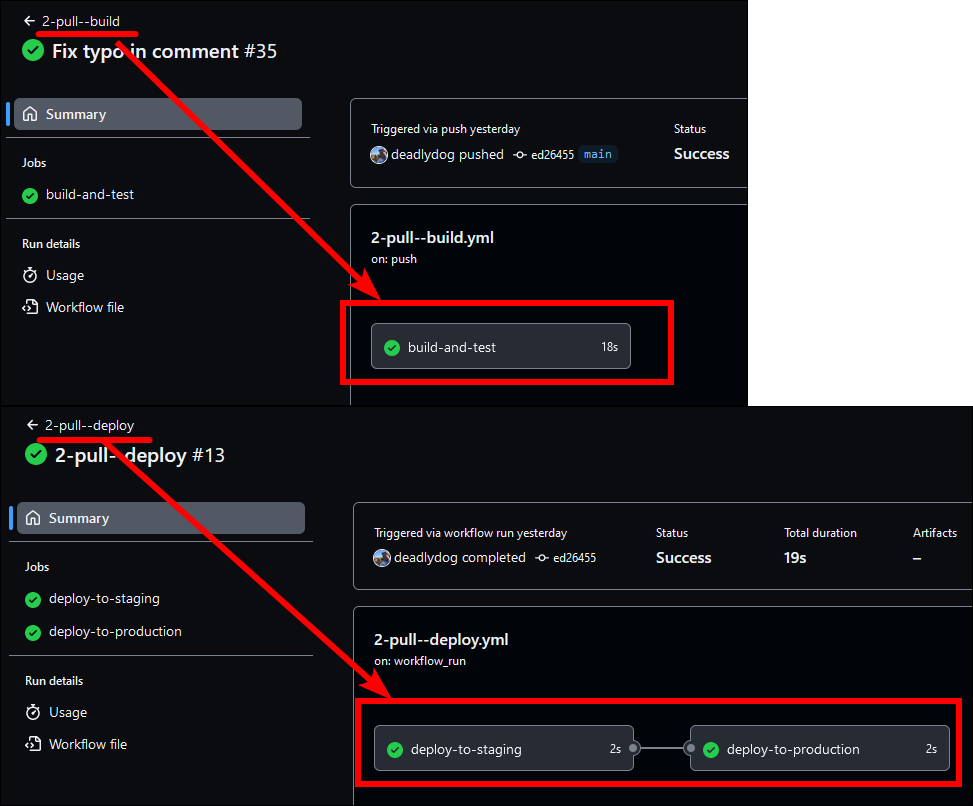
- Non-main branches and PRs can be manually deployed without any workflow code changes.
- Builds for PRs and non-main branches that we do not want deployed do not trigger deployment workflows.
Cons:
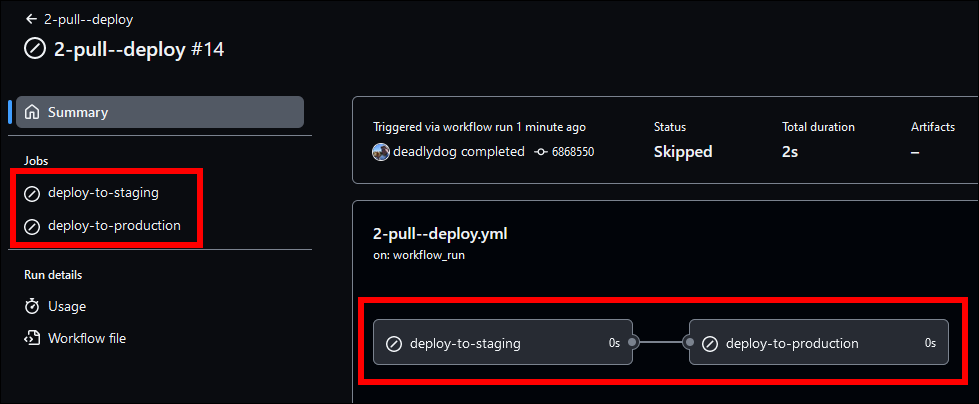
-
The deployment workflow is triggered even if the build workflow for the main branch fails, resulting in skipped deployment runs showing in the workflow UI. This can be confusing to users, and it clutters the workflow UI.
-
The name of the deployment workflow run is always
2-pull--deploy, rather than the commit message of the build workflow run that triggered it. It also does not show the commit SHA. This can make it difficult to find the deployment workflow run you are looking for in the GitHub UI.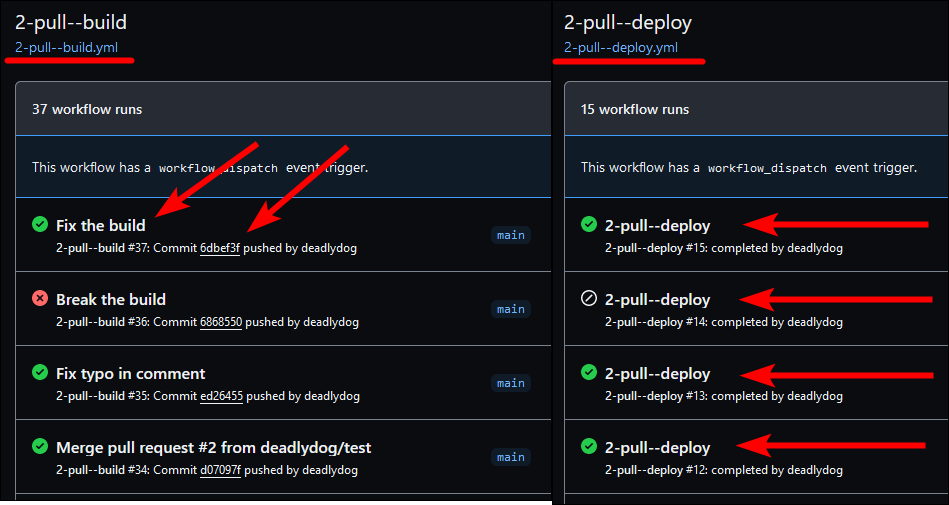
-
Certain variables must be duplicated between the build and deployment workflows (e.g.
env.artifactName), or additional code added to pass the variables between the workflows.
To see what the GitHub Actions UI looks like with this approach, check out the workflows in the sample repository for the pull build runs and pull deploy runs.
Similarities to Azure DevOps classic pipelines
After using Azure DevOps classic pipelines for years, this approach felt very natural and is probably the one most similar to classic pipelines. In Azure DevOps, you would explicitly create separate build and deployment pipelines, and the first step of the deployment pipeline setup is specifying the build pipeline that it should pull the artifacts from, and potentially automatically trigger off of. So the build pipeline would not know anything about the deployment pipeline, and the deployment pipeline could be automatically triggered when the build pipeline completed successfully.
This approach worked quite well in GitHub at first, but I really did not like how blank, skipped deployment workflow runs got created when the main branch build failed. It quickly cluttered up the deployment runs when issues were encountered with the build workflow that took many attempts to fix. Also, having every deployment run named the same thing made finding a specific deployment very painful.
Listening for other events to trigger the deployment workflow
Rather than triggering the deployment workflow when a build workflow completes, you may want to trigger the deployment workflow on other events, such as when a new image is uploaded to a container registry, or when a new release is created. These are valid scenarios that may be suitable for your project. One thing to consider is that you will either need to no longer upload the artifact to the container registry for non-main branch builds, meaning you are not able to inspect and test them, or you will need to add code to your deployment workflow to determine if the artifact should be deployed or not. This may or may not be a big deal, depending on your project requirements.
Approach 3: Build workflow triggers deploy workflow (Push approach)
Here is an example of a workflow that builds the code and then triggers a deployment workflow:
name: 3-push--build

on:
  pull_request:
    branches: main # Run workflow on PRs to the main branch.

  # Run workflow on pushes to any branch.
  push:

  # Allows you to run this workflow manually from the Actions tab.
  workflow_dispatch:
    inputs:
      # 👇 Allow deploying non-main branch builds.
      deploy:
        description: 'Deploy the build artifacts. Only has effect when not building the main branch.'
        required: false
        type: boolean
        default: false

env:
  artifactName: buildArtifact

jobs:
  build-and-test:
    runs-on: ubuntu-latest
    steps:
      - name: Checkout the repo source code
        uses: actions/checkout@v3

      # Steps to version, build, and test the code go here.

      - name: Upload artifact
        uses: actions/upload-artifact@v4
        with:
          name: ${{ env.artifactName }}
          path: ./ # Put the path to the build artifact files directory here.

  # 👇 Trigger the deployment workflow.
  trigger-deployment:
    needs: build-and-test
    # 👇 Only trigger a deployment if the deploy parameter was set, or this build is for a push (not a PR) on the default branch (main).
    if: inputs.deploy || (github.event_name != 'pull_request' && github.ref == format('refs/heads/{0}', github.event.repository.default_branch))
    uses: ./.github/workflows/3-push--deploy.yml
    # 👇 Allow the deployment workflow to access the secrets of this workflow.
    secrets: inherit
And here is the accompanying deployment workflow:
name: 3-push--deploy

on:
  # 👇 Allow this workflow to be called by the 3-push--build workflow.
  workflow_call:

env:
  artifactName: buildArtifact # This must match the artifact name in the 3-push--build workflow.

jobs:
  deploy-to-staging:
    runs-on: ubuntu-latest
    steps:
      # 👇 Can use the native download-artifact action.
      - name: Download artifact
        uses: actions/download-artifact@v4
        with:
          name: ${{ env.artifactName }}
          path: ./buildArtifact

      # Steps to deploy the code go here.

  deploy-to-production:
    # Only run this deploy job after the deploy-to-staging job completes successfully.
    needs: deploy-to-staging
    runs-on: ubuntu-latest
    environment: production # Used for environment-specific variables, secrets, and approvals.
    steps:
      - name: Download artifact
        uses: actions/download-artifact@v4
        with:
          name: ${{ env.artifactName }}
          path: ./buildArtifact

      # Steps to deploy the code go here.
Once again the build workflow is separate from the deployment workflow. The build workflow will trigger on a push to any branch, PRs to the main branch, or when manually triggered. Rather than the deploy workflow listening for the build workflow to complete, the build workflow explicitly calls the deploy workflow as its final job.
Looking at the trigger-deployment job, we can see that only builds made from the main branch will trigger the deployment workflow.
A deploy parameter is also provided in the build workflow that can be set when manually triggering a build, allowing for non-main branch builds to be deployed as well, if needed.
Notice that the job provides the secrets: inherit key, which allows the deployment workflow to access the secrets of the build workflow.
Without this, the deployment workflow would not have access to the GitHub repository secrets.
Aside: In addition to passing secrets to the deployment workflow, you can also pass other parameters to the deployment workflow by using the
withkey. While none are shown in this example, I will mention that in order to pass non-string values (e.g. boolean or number), I had to use thefromJSONfunction to maintain the variable’s type, as shown in this GitHub issue.
Looking at the deployment workflow, you can see we are using the on: workflow_call event to allow the workflow to be called by the build workflow.
Since the build workflow is triggering the deployment workflow, the end result is a single workflow run, meaning we can use the native actions/download-artifact action to download the build artifact, rather than having to use a 3rd party action.
Pros and cons of using the push approach
Pros:
- The build and deployment steps are separated into their own workflows, making them easier to maintain and understand.
- Non-main branches and PRs can be manually deployed without any workflow code changes.
- Builds for PRs and non-main branches that we do not want deployed do not trigger deployment workflows.
Cons:
-
Since the deployment workflow is never triggered by GitHub, but is instead called by the build workflow, it means the deployment workflow will never show any runs.
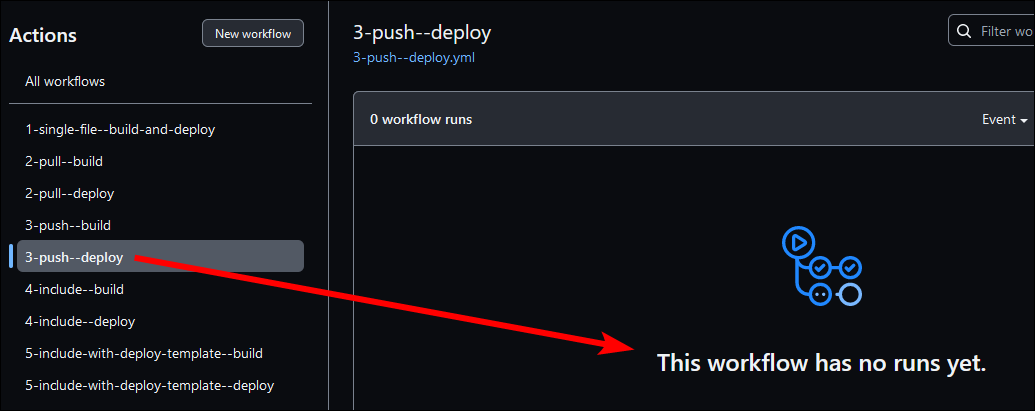
Instead, the deploy jobs will show up as part of the build workflow run. This means that builds for PRs and non-main branches will be mixed in with the
mainbranch builds and deployments. Just like with the1-single-file--build-and-deployapproach, this may bury the deployments under several pages of non-main branch runs, making it difficult to find runs you care about in the GitHub UI.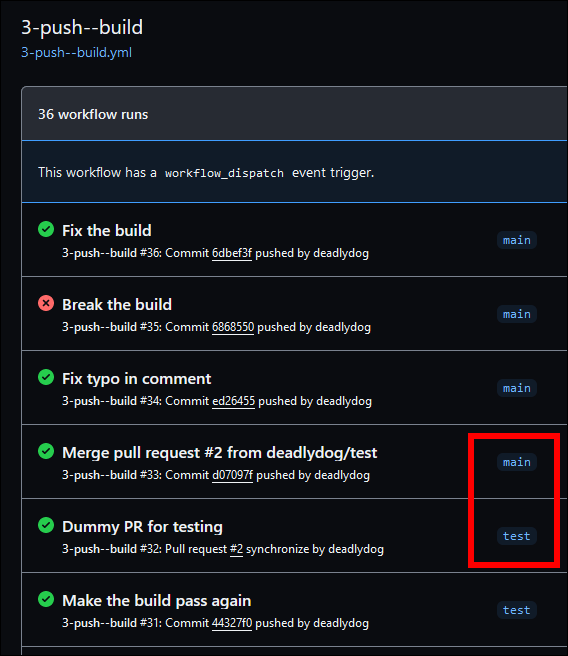
-
Since the deployment jobs show up in the build workflow run, the GitHub UI prefixes each of the deployment jobs with the name of the job from the build workflow. This can make it difficult to see the full name of the deployment jobs in the generated diagram. Thankfully, the jobs are listed on the left in a tree view as well, so you can still read the full name there more easily.
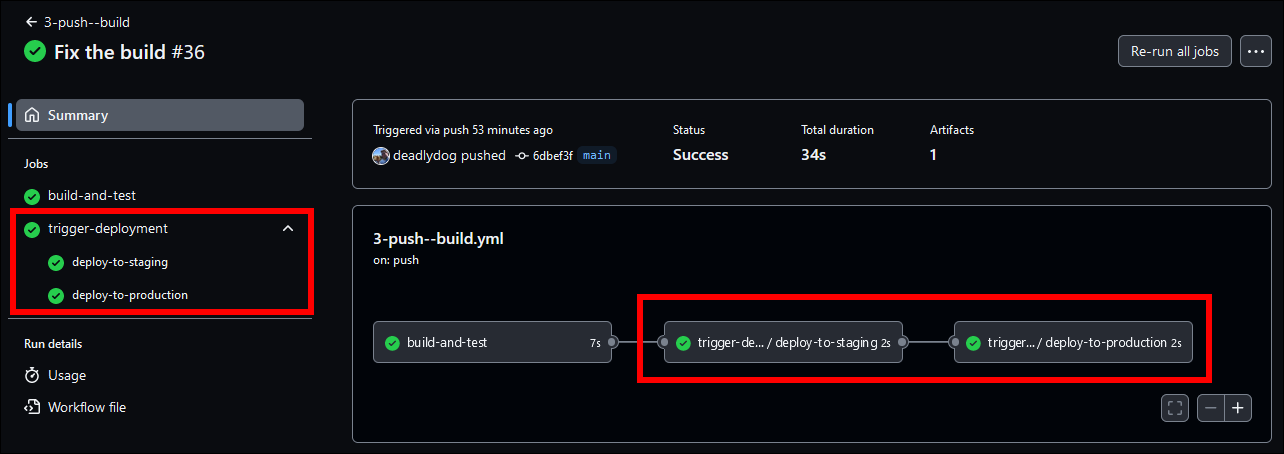
To see what the GitHub Actions UI looks like with this approach, check out the workflows in the sample repository for the push build runs and push deploy runs.
Approach 4: Deploy workflow includes build workflow (Include approach)
Here is an example of a workflow that builds the code:
name: 4-include--build

on:
  pull_request:
    branches: main # Run workflow on PRs to the main branch.

  # 👇 Run workflow on pushes to any branch, except the main branch.
  push:
    branches-ignore: main

  # Allows you to run this workflow manually from the Actions tab.
  workflow_dispatch:

  # 👇 Allows this workflow to be called from the deployment workflow.
  workflow_call:

env:
  artifactName: buildArtifact

jobs:
  build-and-test:
    runs-on: ubuntu-latest
    steps:
      - name: Checkout the repo source code
        uses: actions/checkout@v3

      # Steps to version, build, and test the code go here.

      - name: Upload artifact
        uses: actions/upload-artifact@v4
        with:
          name: ${{ env.artifactName }}
          path: ./ # Put the path to the build artifact files directory here.
And here is the accompanying deployment workflow:
name: 4-include--deploy

on:
  # 👇 Trigger the workflow on a push to the main branch.
  push:
    branches: main

  # 👇 Allows you to run this workflow manually (for any branch) from the Actions tab.
  workflow_dispatch:

env:
  artifactName: buildArtifact # This must match the artifact name in the 4-include--build workflow.

jobs:
  # 👇 Call the build workflow to create the artifacts to deploy.
  build-and-test:
    uses: ./.github/workflows/4-include--build.yml
    secrets: inherit # Pass secrets to the build workflow, if necessary.

  deploy-to-staging:
    # 👇 Only run this deploy job after the build-and-test job completes successfully.
    needs: build-and-test
    runs-on: ubuntu-latest
    steps:
      - name: Download artifact
        uses: actions/download-artifact@v4
        with:
          name: ${{ env.artifactName }}
          path: ./buildArtifact

      # Steps to deploy the code go here.

  deploy-to-production:
    # Only run this deploy job after the deploy-to-staging job completes successfully.
    needs: deploy-to-staging
    runs-on: ubuntu-latest
    environment: production # Used for environment-specific variables, secrets, and approvals.
    steps:
      - name: Download artifact
        uses: actions/download-artifact@v4
        with:
          name: ${{ env.artifactName }}
          path: ./buildArtifact

      # Steps to deploy the code go here.
You will notice that we still have separate build and deployment workflows. One key difference here is the specific triggers for each workflow. They have been set up so that the build workflow is only triggered by non-deployment builds, and the deployment workflow is triggered by builds that are meant to be deployed.
The build workflow will trigger on a push to any branch EXCEPT the main branch, PRs to the main branch, or when manually triggered.
It also allows other workflows to call it via the workflow_call event.
The build workflow no longer triggers deployments, neither directly (push) nor indirectly (pull).
The deployment workflow will now trigger on a push to the main branch, or when manually triggered.
The manual trigger allows non-main branch deployments if needed.
A key thing to note here is that the deployment workflow includes the build workflow via the uses key, so when a deployment is triggered it will first run the build jobs as part of its workflow run.
This is similar to the push approach mentioned earlier, except that the dependency has been inverted so instead of the build workflow calling the deployment workflow, the deployment workflow calls the build workflow.
This improves the workflow UI experience, as the deployment jobs will show up as part of the deployment workflow run, rather than the build workflow run like they did with the push approach.
I came across this approach on this excellent blog post when I wasn’t satisfied with the pull and push approaches.
Pros and cons of using the include approach
Pros:
- Builds for PRs and non-main branches that we do not want deployed do not trigger deployment workflows, and show up in the GitHub UI under the build workflow. These are typically throwaway builds, so it is nice to not have them cluttering up the deployment workflow runs.
- Builds that are deployed show up in the GitHub UI under the deployment workflow, making it easy to find the last time a deployment occurred.
- Non-main branches and PRs can be manually deployed without any workflow code changes.
Cons:
-
In the deployment workflow run GitHub UI, the build job name is prefixed with the name of the build job in the deployment workflow, which is a minor annoyance.
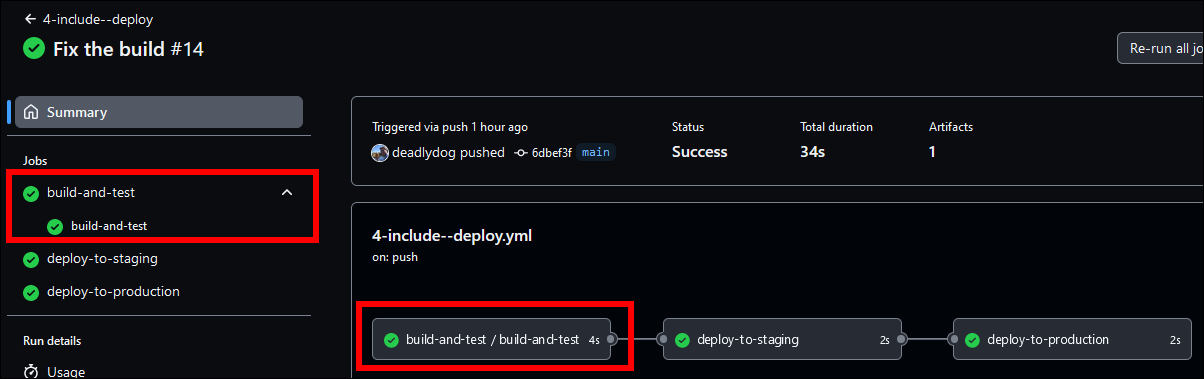
To see what the GitHub Actions UI looks like with this approach, check out the workflows in the sample repository for the include build runs and include deploy runs.
Reusable workflows (templates)
You probably noticed that we are always deploying to 2 environments: staging and production. You may have even more environments that you need to deploy to. This results in a lot of duplicate code in the deployment workflows.
To avoid the duplicate code, we can use a reusable workflow to define the deployment jobs, and then include the reusable workflow in the deployment workflow. Azure DevOps calls these “templates”, but GitHub Actions calls them “reusable workflows”. You can think of a reusable workflow as a function that accepts parameters, so you define it once, and then can call it multiple times with different parameters.
One caveat to be aware of is that while templates may also include other templates, GitHub only allows up to 4 levels of template nesting.
Also, a workflow may only call up to 20 other workflows, including nested ones.
And just like regular workflows, reusable workflows must be placed directly in the .github/workflows directory.
See the GitHub docs on reusable workflows for more information and limitations.
Although I am only now introducing reusable workflows here, we’ve actually already been using them in the push and include approaches above, but were not calling them multiple times.
Let’s see how to do that now.
Approach 5: Deploy workflow includes build workflow, and uses template for deployments (Include approach with reusable workflows)
Here is an example of a workflow that builds the code:
name: 5-include-with-deploy-template--build

on:
  pull_request:
    branches: main # Run workflow on PRs to the main branch.

  # Run workflow on pushes to any branch, except the main branch.
  push:
    branches-ignore: main

  # Allows you to run this workflow manually from the Actions tab.
  workflow_dispatch:

  # 👇 Allows this workflow to be called from the deployment workflow, but the parameters must be provided.
  workflow_call:
    inputs:
      artifactName:
        description: The name of the artifact to upload to.
        required: true
        type: string

env:
  # 👇 Provide a default artifact name for when this workflow is not called by the deployment workflow.
  artifactName: ${{ inputs.artifactName || 'buildArtifact' }}

jobs:
  build-and-test:
    runs-on: ubuntu-latest
    steps:
      - name: Checkout the repo source code
        uses: actions/checkout@v3

      # Steps to version, build, and test the code go here.

      - name: Upload artifact
        uses: actions/upload-artifact@v4
        with:
          name: ${{ env.artifactName }}
          path: ./ # Put the path to the build artifact files directory here.
And here is the accompanying deployment workflow:
name: 5-include-with-deploy-template--deploy

on:
  # Trigger the workflow on a push to the main branch.
  push:
    branches: main

  # Allows you to run this workflow manually (for any branch) from the Actions tab.
  workflow_dispatch:

env:
  # 👇 Set the artifact name that will be used by the build and deployments, so it is now only defined in one place.
  artifactName: buildArtifact

jobs:
  # 👇 Call the build workflow to create the artifacts to deploy, and provide the artifact name.
  build-and-test:
    uses: ./.github/workflows/5-include-with-deploy-template--build.yml
    with:
      artifactName: ${{ github.env.artifactName }}
    secrets: inherit # Pass secrets to the build workflow, if necessary.

  deploy-to-staging:
    # Only run this deploy job after the build-and-test job completes successfully.
    needs: build-and-test
    # 👇 Call the deploy template with the proper environment name to deploy the artifacts.
    uses: ./.github/workflows/5-include-with-deploy-template--deploy-template.yml
    with:
      artifactName: ${{ github.env.artifactName }}
      environmentName: staging
    secrets: inherit # Pass repository secrets to the deployment workflow.

  deploy-to-production:
    # Only run this deploy job after the deploy-to-staging job completes successfully.
    needs: deploy-to-staging
    # 👇 Call the deploy template with the proper environment name to deploy the artifacts.
    uses: ./.github/workflows/5-include-with-deploy-template--deploy-template.yml
    with:
      artifactName: ${{ github.env.artifactName }}
      environmentName: production
    secrets: inherit # Pass repository secrets to the deployment workflow.
We now have on additional workflow file, which is the reusable workflow (template) that defines the deployment job:
name: 5-include-with-deploy-template--deploy-template

on:
  # 👇 Allows this workflow to be called from the deployment workflow, but the parameters must be provided.
  workflow_call:
    inputs:
      artifactName:
        description: The name of the artifact to download and deploy.
        required: true
        type: string
      environmentName:
        description: The name of the environment to deploy to.
        required: true
        type: string

jobs:
  deploy:
    runs-on: ubuntu-latest
    # 👇 Allows using variables and secrets defined in the provided environment.
    environment: ${{ inputs.environmentName }}
    steps:
      - name: Download artifact
        uses: actions/download-artifact@v4
        with:
          name: ${{ inputs.artifactName }}
          path: ./buildArtifact

      # Steps to deploy the code go here.
I could have left the build workflow identical to the include approach shown earlier, however I thought that I would show how to allow the artifact name to be provided as a parameter.
This allows the deployment workflow to provide the artifact name to the build workflow, so that we do not have to hardcode the value in 2 separate files as we had been doing earlier.
Since the build may still be triggered outside of a deployment workflow, we had to update the env: artifactName to use a default value when the input value is not provided.
This same approach can be used for other values that you want shared between different workflows.
This excellent blog post shows how to also to use the ternary operator to provide a default value, and also explains why we cannot use env variables in a job’s if clause.
Next we see the deployment workflow.
As mentioned above, you can see that we now pass the artifact name to the build workflow, so the only place the artifact name value is defined is in the deployment workflow.
Next, notice that the workflow no longer duplicates the deployment steps in the deploy-to-staging and deploy-to-production jobs, but instead calls the new reusable workflow with the appropriate parameters; namely the environmentName.
In our example the deployment code was simply # Steps to deploy the code go here., but in a real world scenario the deployment steps may be several hundred lines of yaml code, so not duplicating it is a big win.
Finally, look at the reusable workflow.
You can see it takes 2 parameters: artifactName and environmentName.
It defines a single job that is used to perform the deployment.
GitHub allows you to create environment-specific variables and secrets, which can be used by the jobs in the workflow.
These are configured in the GitHub repository web UI under the “Settings” tab, and then the “Environments” menu item.
I personally prefer to have the variable values defined directly in the workflow files so that they are under source control.
If you take that approach, you would simply add additional parameters to the reusable workflow and pass them in from the deployment workflow, just like we did with the artifactName and environmentName parameters.
Secrets of course should not be committed to source control, so you would still want to define those in the GitHub UI, or use a 3rd party secret manager like Azure Key Vault.
Pros and cons of using reusable workflows (templates)
This approach has the same pros and cons as the include approach above, as well as:
Pros:
- The deployment job is only defined once so there is no duplicated code.
Cons:
-
Similar to
3-push--deployabove, because the template will only be referenced by other workflows and never directly triggered itself, it still shows up in the GitHub Actions UI as a workflow, but will never have any runs shown, which may be confusing to users.
To see what the GitHub Actions UI looks like with this approach, check out the workflows in the sample repository for the build runs and deploy runs.
GitHub does not allow you to place reusable workflows in subdirectories, so they are mixed in with other workflow files.
It is a good idea is to prefix them with a word like template to make it clear that they are reusable workflows, and not meant to be triggered directly.
When using the include approach and this one, you probably do not want to name your workflow just deploy, since it actually both builds and deploys.
You may want to name the workflows something like build-and-test and build-test-and-deploy to more accurately reflect what they do, and call the deployment reusable workflow something like template-deploy.
This is the approach I typically use for my projects.
Conclusion
In this post we’ve seen a number of different approach you can take to define your build and deploy workflows.
I typically prefer the last include with reusable workflows approach, but you may prefer another depending on your needs.
The example code I’ve shown here is very simple and should simply be used as a starting point. You may want additional triggers for your workflows, such as when a tag is created, or on a schedule. You may want to create additional templates for other operations, such as running load tests, or running a security scan.
My goal with this post was to share the various ways I’ve found to structure GitHub CI/CD workflows, and hopefully give you some ideas on how to structure your own.
Finally, a reminder that I also created this sample GitHub repository that contains all of the examples shown in this post, so you view the code and can see how they look in the GitHub Actions menu.
Have another approach that you think should be on this list, or other relevant information? Leave a comment and let me know.
Happy pipeline building!
Comments
Colin
I’ve been using Azure DevOps for some years now and have started using GitHub actions. One thing that quickly irked is the lack of a concept of “stages” in GH action workflows.
Quite often, I find that a “deployment” to an environment involves running multiple jobs (infrastructure, database, application code, etc.). In AzDO, I can logically group that collection of jobs into a “stage”, have a single set of approval gates for all the jobs in the stage… and can even apply default values to be used by all the jobs in a stage (e.g. the agent pool).
I can see how your recommended approach allows us to create a reusable workflow (/template) that contains all the jobs needed to deploy to an environment. However, in the actual deployment workflow runs, there doesn’t seem to be any way of seeing the jobs related to a single environment logically grouped in any way (other than a naming convention).
As such, there doesn’t appear to be a way to easily visualise the deployment flow through the environments as you can in AzDO. Not only this but - since approvals are at the job level - it seems like you would have to provide multiple approvals: One for each job in the group.
Does GitHub actions support any other means of achieving what Stages give us in AzDO?
Ulad
Great article, thanks from me learning GH after ADO :((((.
Can you please clarify 4 and 5 options? Do I understand correctly that in these scenarios build and deploy pipelines are different and do not overlap in terms of runtime? Meaning, build pipeline will do its build stuff, and deployment pipeline will duplicate build pipeline work (yes using the same build code, but will generate different artifact) and then do its deploy stuff.
Is that correct?
Leave a Comment
Your email address will not be published. Required fields are marked *