
Master the Windows copy-paste clipboard
Copying and pasting is a common task that pretty much everyone does. Becoming more efficient with it is a great way to improve your productivity.
In this post we’ll cover:
- What is the Windows clipboard.
- The basics of using the Windows clipboard for copying and pasting (video).
- Look at new clipboard features introduced in Windows 10 (video).
- Be more productive by using free 3rd party tools that take the clipboard to the next level (video).
I’ve provided links to videos that cover these topics as well if you prefer to learn that way.
What is the clipboard
The Windows clipboard is simply a place that you can copy information to, and paste to get it out again.
You’ve likely used the clipboard before, but may not have known that it was called the clipboard.
Any time you copy or cut, you are placing information from an application on the clipboard; this is known as a clip.
When you paste, you’re copying that information (i.e. clip) from the clipboard back out into an application.
You can copy pretty much any type of information into the clipboard, including text, images, and files/directories.
Windows clipboard basics
The basic clipboard operations are:
- Copy: Copy information from an application onto the clipboard.
- Cut: Copy information from an application onto the clipboard, and also remove that information from the application.
- Paste: Copy information from the clipboard into an application. The information stays in the clipboard, allowing you to paste it multiple times if needed.
You can typically find these operations in an application’s context menu by selecting some text/images/files and right-clicking with the mouse.
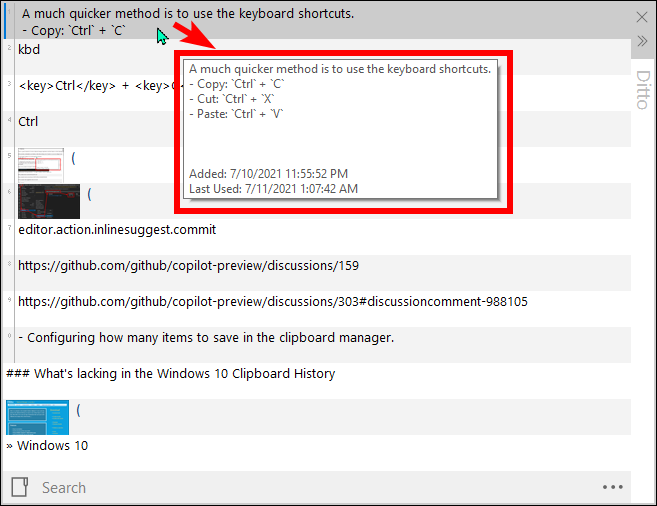
A much quicker method is to use the keyboard shortcuts.
- Copy: Ctrl + C
- Cut: Ctrl + X
- Paste: Ctrl + V
Sometimes an application may not have these operations in their mouse context menu, or may not even provide a context menu at all, but the keyboard shortcuts work in most cases.
Windows 10 clipboard enhancements
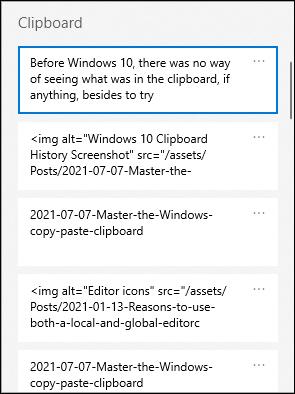
Before Windows 10, there was no way of seeing what was in the clipboard, if anything, besides to try pasting it. Also, the clipboard could only hold the last information that was copied; i.e. one clip.
Windows 10 introduced a new feature called the Windows Clipboard History. This feature includes the following benefits:
- Can hold the last 25 clips copied. Older clips roll off the clipboard and cannot be accessed any more.
- Allows you to visualize the clipboard and pick which clip you want to paste.
- Allows you to “Pin” clips so they don’t roll off the clipboard.
- Allows you to share your clipboard between other devices.
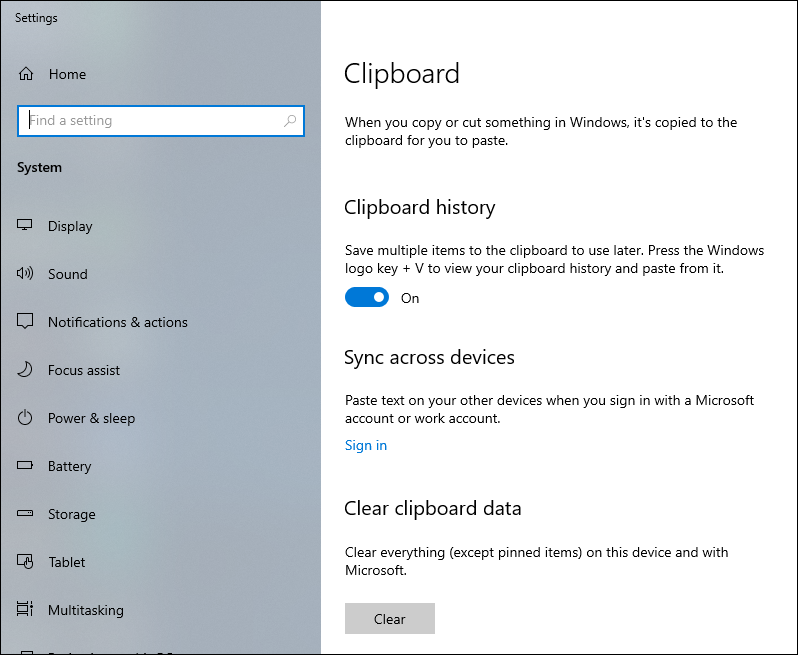
To access the Clipboard History feature simply use Windows Key + V. If the Clipboard History feature is not enabled, the window will prompt you to turn it on.
Go ahead, press Windows Key + V right now. I’ll wait…..
Once enabled, just start copying things. If you want to paste the last thing you copied, use Ctrl + V as usual. If you want to paste something you copied earlier though, use Windows Key + V and the Clipboard History window will appear and show you the last clips you copied. From there, choose the clip that you want and it will be pasted into your application. If you click away from the Clipboard History window, it will close without pasting anything.
Nice.
And, it’s built right into Windows 10, so there’s no need to download or install anything extra; it’s just there.
You can access the Clipboard History settings by hitting the Windows Key and searching for Clipboard settings.
What’s lacking in the Windows 10 Clipboard History
While it’s definitely an improvement, the Clipboard History feature is far from perfect. Here’s some downsides:
- Only holds the last 25 copied clips, which isn’t enough in my opinion.
- All 25 clips are cleared every time you restart your computer.
- Cannot search in the Clipboard History.
- Images don’t always show up; seems to depend how they are copied or which application they were copied from.
- The Clipboard History window cannot be moved or resized.
Hopefully these limitations will be addressed in later Windows updates, but at the moment they exist (I’m currently using Windows 10 version 20H2).
Free 3rd party clipboard manager apps that are way better
While the Windows 10 Clipboard History was only introduced in the past couple of years, 3rd party apps have been doing similar things for over 10 years. This means they’ve had a lot of time to introduce great features that really enhance the clipboard, such as:
- Configuring how many clips to save in the clipboard manager. e.g. thousands.
- Searching for clips in the clipboard manager.
- Favourite clips for easy access later.
- Pasting clips as plain text to remove formatting.
- Customizing additional keyboard shortcuts for quick access to additional functionality.
There are plenty of clipboard managers to choose from; you can find some lists here and here. The ClipAngel wiki has a nice comparison table of a few popular ones.
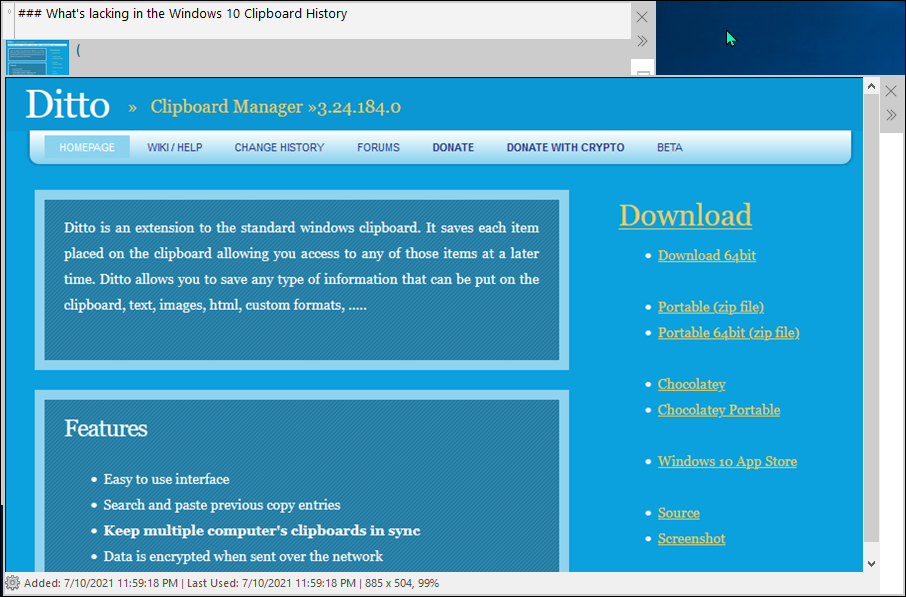
Ditto clipboard manager
While there are many clipboard managers out there, my favourite is the Ditto Clipboard Manager, which is free and can be installed from their website or from the Microsoft store. I like Ditto because it provides a minimalistic user interface, while still providing a ton of options so you can configure it just the way you like.
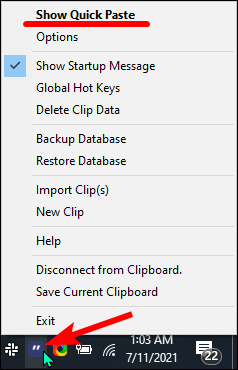
You can open Ditto by using a customizable keyboard shortcut (default is Ctrl + `), by double-clicking the tray icon (which looks like double quotes on a blue square  ), or by right-clicking the tray icon and selecting
 Show Quick Paste.
Here’s a screenshot of what my Ditto window currently looks like:
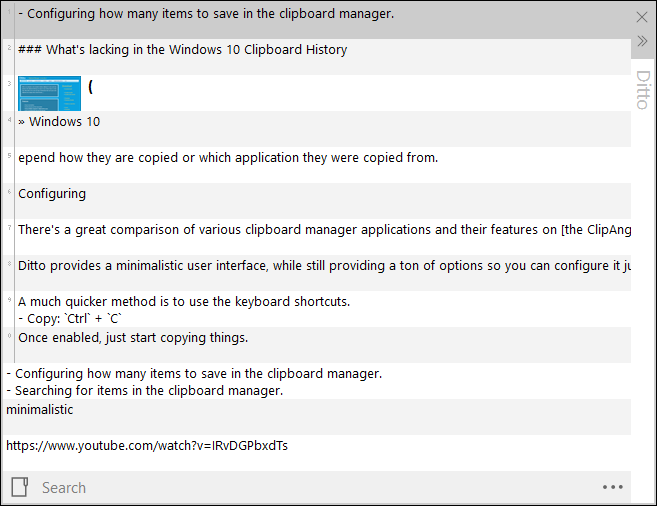
You can see that it displays previews for both text and images. If you hover your mouse over a clip you’ll get a larger preview of that clip, as well as some extra information, such as when it was copied to the clipboard.
If you want to see the entire text, or the image in it’s original size, you can right-click on the clip and choose View Full Description, or press F3.
The window can be moved around and is resizable, so if you want to see more or less clips, you can resize the window.
The best feature though is the ability to search for clips. Just open the Ditto window and start typing.
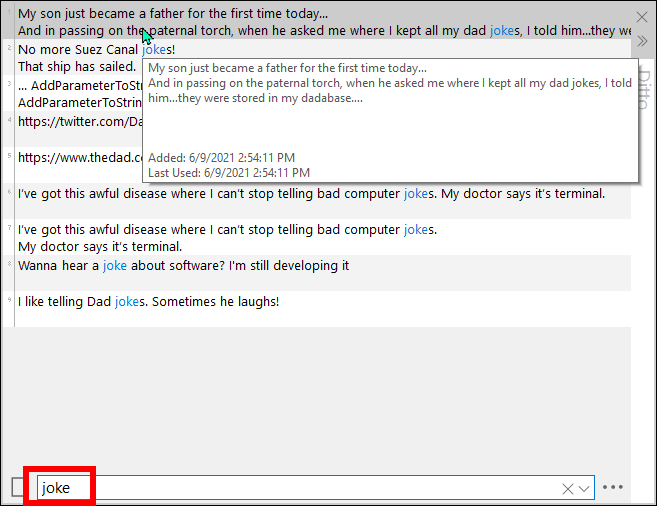
I use this feature all the time, typically to find something that I copied earlier that day or a few days ago. It’s even been a life saver at recovering something that I copied months ago.
Ditto options
Ditto has so many options, I’m not going to even try to list them all here.
I will however show you the ones that I feel are noteworthy, and ones that I change from their default values.
You can access the Options window from the ... on the bottom-right of the main window, or by right-clicking the tray icon and selecting Options.
General tab
On the General tab, the options of note are:
- Start Ditto on System Startup: Launch Ditto automatically so you don’t have to.
- Maximum Number of Saved Copies: The maximum number of clips to save in the clipboard manager. Use this to ensure the database doesn’t grow too large. I typically increase this quite a bit as I like being able to find clips from months ago.
- You can check the
Database Pathfile to see how large the database is. Depending on how large you set this, the database may consume GB of disk space.
- You can check the
- Theme: Ditto supports both light and dark themes.
- Popup Position: Do you want the window to appear where your typing cursor is, where your mouse is, or where you last moved it to.
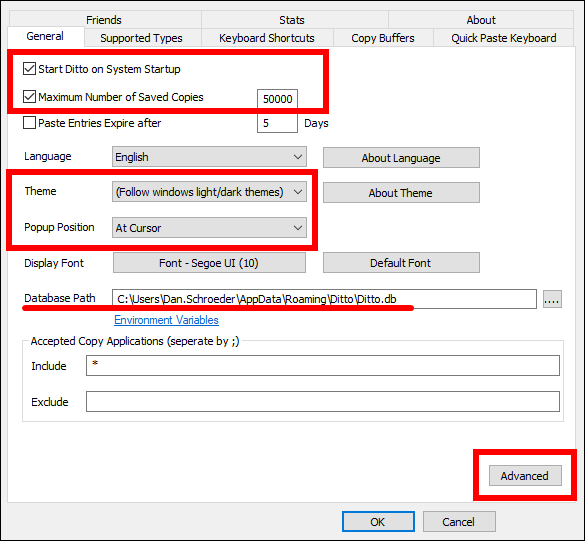
If you click on the Advanced button, you’ll find a lot more options. One that I typically change is:
- Paste Clip in active window after selection: Default is true, but I prefer this as false so that I have to manually use Ctrl + V to paste into an application.
In there you’ll also find buttons for running custom scripts whenever you copy or paste. I haven’t played around with it yet, but it looks interesting and there are links to a wiki page with examples.
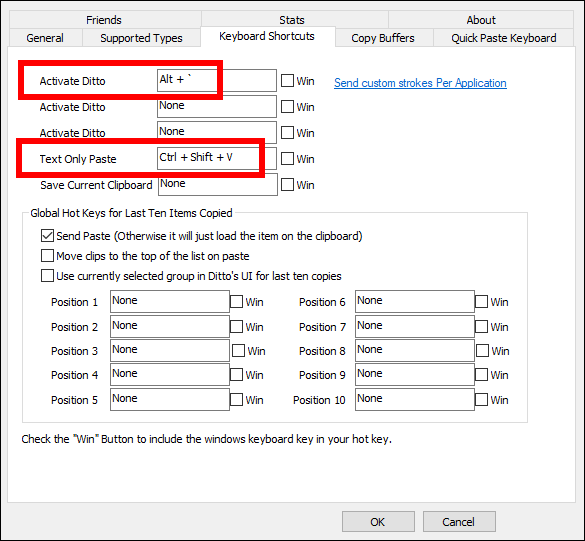
Keyboard Shortcuts tab
On the Keyboard Shortcuts tab the options of note are:
- Activate Ditto: The keyboard shortcut to open Ditto. The default is Ctrl + `, but I’ve modified mine to be Alt + ` because I use Ctrl + ` to open the terminal in Visual Studio and Visual Studio Code.
- Text Only Paste: This is a great one, as it will paste the clip with all formatting removed, including font, color, size, hyperlinks, etc. No more copying to Notepad to remove formatting!
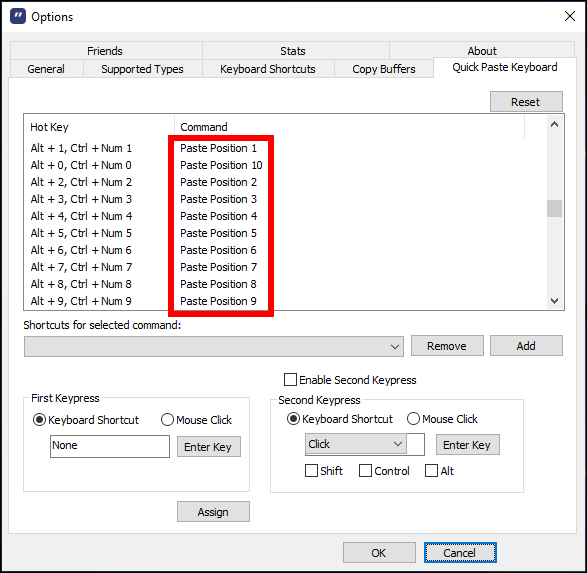
Quick Paste Keyboard tab
On the Quick Paste Keyboard tab you’ll find tons of configurable hotkeys.
The ones I want to mention are Paste Position 1 - Paste Position 10, as these allow you to quickly select one of the first 10 clips using the keyboard when you’re in Ditto.
This can save you from reaching for the mouse and having to click on the clip you want to select.
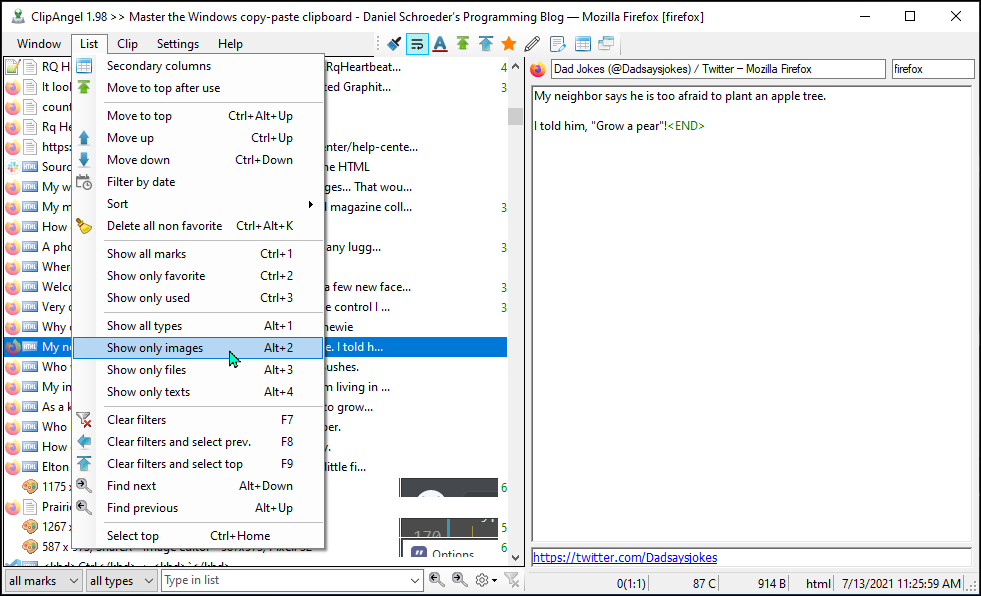
ClipAngel clipboard manager
Another great free clipboard manager is ClipAngel. ClipAngel is very comparable to Ditto and provides many of the same features, such as being able to search for clips, and pasting clips as plain text.
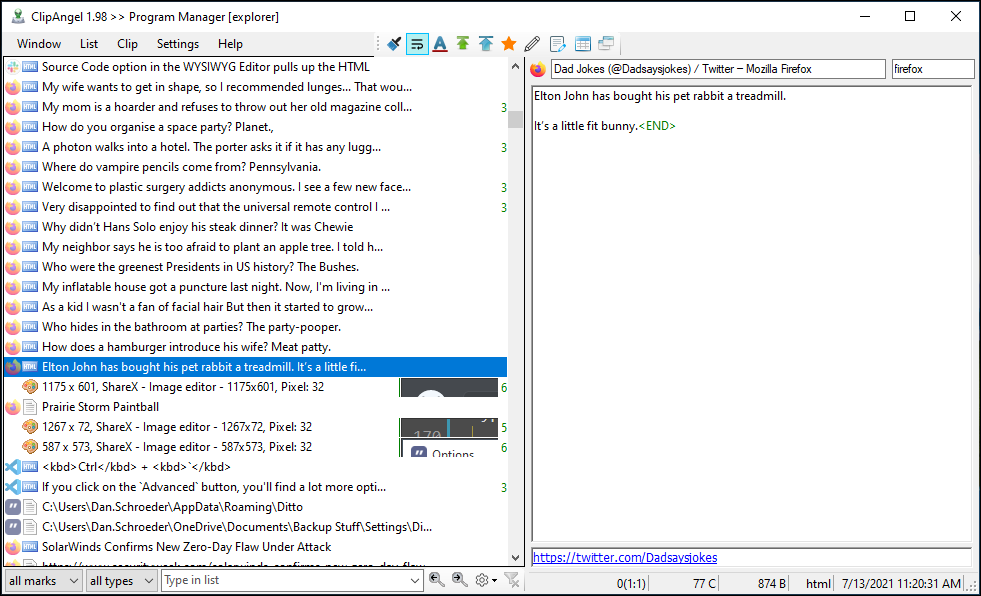
This is what ClipAngel looks like:
The default keyboard shortcut to open ClipAngel is Alt + V, and that can be changed if you like. You can also double click on the tray icon to open ClipAngel.
As you can see, ClipAngel shows quite a bit more things in it’s user interface, including a preview window of the selected clip. The preview window is nice when wanting to quickly view images or very long text clips.
Searching works as you would expect; simply open ClipAngel and start typing.
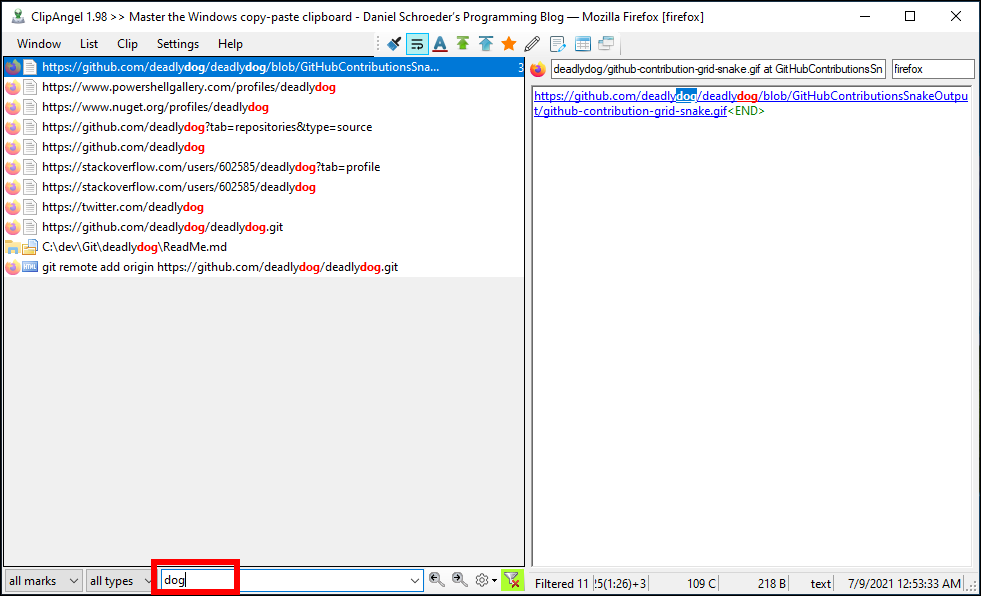
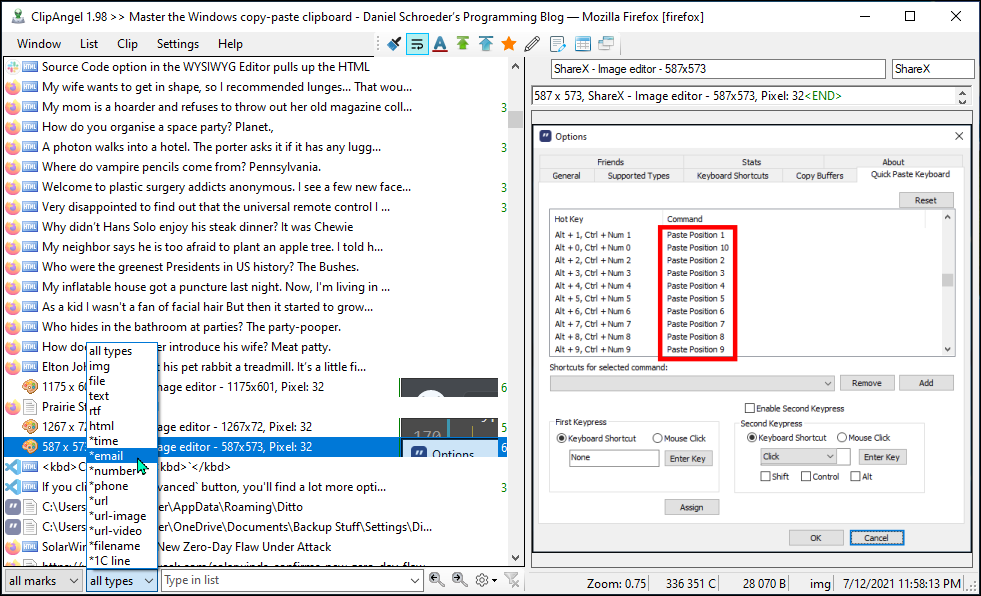
ClipAngel provides a few nice features that Ditto does not, such as showing which application a clip was copied from, and the ability to filter clips by various criteria. For example, you can have the list show only image clips, clips that contain an email address, or clips created between a certain date range. Those additional filter options are great for when you can’t remember specific text from the clip that you’re searching for.
I personally prefer Ditto for it’s minimalistic user interface and ton of configurable options, but you may prefer ClipAngel.
Conclusion
In this post we looked at what the clipboard is, it’s basic operations, how to leverage the Clipboard History feature built into Windows 10, and looked at a couple free 3rd party clipboard managers that can greatly improve the clipboard experience.
We looked at the Ditto and ClipAngel clipboard managers, both of which are free and still under active development, so their feature sets may continue to expand and improve. There are other options out there, but of the ones I tried these 2 were my favourite and are the ones I’d recommend.
Do you use a different clipboard manager that you think is better? Let me know in the comments!
If you’re not using a clipboard manager yet, I hope you’ll consider it, and that it makes you more productive.
Happy copy-pasting :)
Comments
WS
http://bluemars.org/clipx/ by “nullsoft/winamp”
Leave a Comment
Your email address will not be published. Required fields are marked *