
Ensure Windows power settings are not slowing your CPU
My computer was sometimes very slow and unresponsive. It turned out the Windows power settings were throttling my processor speed.
This post will show you how to check if your CPU is being throttled by the Windows power settings, and how to correct it.
Check if your CPU is throttled
The way in which the Windows power settings may be throttling your CPU is by setting the CPU Maximum Frequency to be less than 100%.
To quickly get a sense for what your CPU Maximum Frequency is set to, open the Resource Monitor app (by hitting the Windows Key and searching for Resource Monitor) and then navigate to the CPU tab.
In the Processes header near the top, you will see CPU Usage and Maximum Frequency percentage values.
These values will likely fluctuate up and down as you watch them.
On the right side of the window you will also see a CPU - Total graph showing the CPU Usage (green line), and Maximum Frequency (blue line) over time.
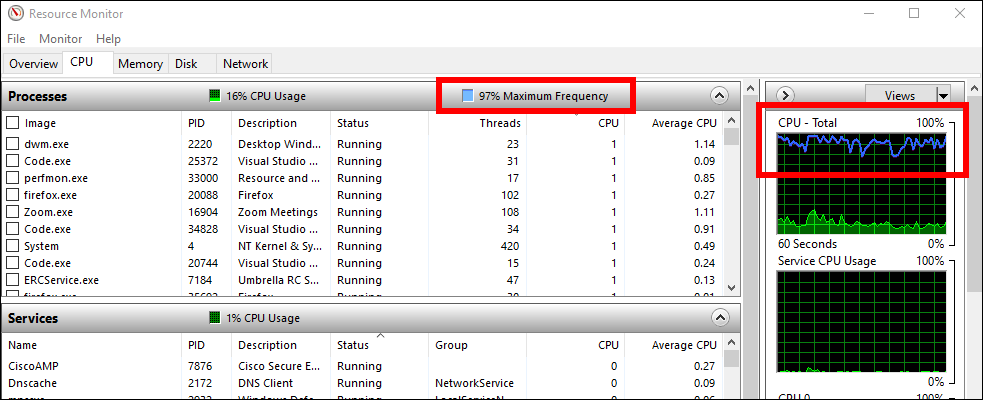
What you are looking for is to see if the Maximum Frequency never goes above a given value (e.g. 30%), and also if the green CPU Usage line is often hitting the blue Maximum Frequency line. This should be especially apparent if you watch it while doing something CPU intensive, like playing a game or running multiple applications at once.
For example, I noticed that my PC would often become very sluggish and slow to respond, even though Task Manager showed my CPU was not busy and the memory usage was low.
In the Resource Manager though, I saw the CPU Maximum Frequency never went above 30%, and that the green CPU Usage line was continually bumping up against the blue Maximum Frequency line.
This meant that even though my CPU wasn’t particularly busy, it was being throttled to not be able to run at more than 30% of it’s capacity.
Windows was throttling it, preventing it from running at it’s full speed, and making my PC slow to respond.
See this Super User question for a bit more info on the CPU Maximum Frequency. In short, Windows may intentionally throttle your CPU to save power. If you are not using a power saver mode though, then you may want to manually modify your current power plan’s settings to have the CPU run at full power.
Modify the CPU Max Frequency
Following this guide I was able to increase my CPU Maximum Frequency to 100%, and I’ll present the steps I took here.
Enable viewing the Maximum Processor Frequency value
In order for the Maximum processor frequency value to be shown in the Windows Power Options Advanced Settings, we need to first enable it.
This only needs to be done once:
- Open a command prompt as an administrator.
- Hit the Windows Key and type
Command prompt. - Right click on the
Command Promptapp and chooseRun as administrator.
- Hit the Windows Key and type
- In the command prompt window, type the following and hit enter:
powercfg -attributes SUB_PROCESSOR 75b0ae3f-bce0-45a7-8c89-c9611c25e100 -ATTRIB_HIDE - Restart your computer.

View the Maximum Processor Frequency value
To view the Maximum processor frequency value in the Power Options:
- Open the Windows Power and Sleep settings.
- Hit the Windows Key and type “Power Settings” and choose the
Power & sleep settingsapp.
- Hit the Windows Key and type “Power Settings” and choose the
- Under
Related settingsclick theAdditional power settingslink. - In the Power Options window that opened, find which power plan you are using and click the
Change plan settingslink. - In the Edit Plan Settings window that opened, click the
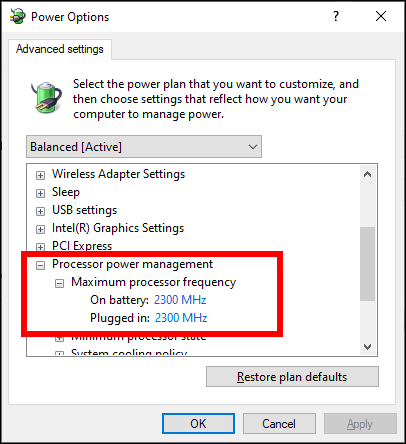
Change advanced power settingslink. - In the Advanced Settings window that opened, expand the
Process power managementnode and then theMaximum processor frequencynode. - Here you will see the current values for the
Maximum processor frequencywhen running on battery and when plugged in.
Initially when I navigated here on my PC both values were set to 0, but my CPU Maximum Frequency in the Resource Manager was still capped at 30% for some reason.
Note that some power plans, such as power saver, may intentionally lower the Maximum processor frequency value in order to save power.
In my case I only had one power plan, which was Balanced, so I wanted it to be able to leverage the full normal processor speed.
Also, I wanted it to run at full speed whether on battery or plugged in, so I wanted to change both values.
If you want to change these values, Windows expects them to be in MHz, not percent, so you’ll need to know your CPU’s frequency in MHz.
Find your CPUs frequency
To find your CPU’s frequency:
- Open
System Informationby hitting the Windows Key and searching forSystem Information. - In the System Information window’s System Summary, locate the
Processoritem and look at the GHz or MHz value.
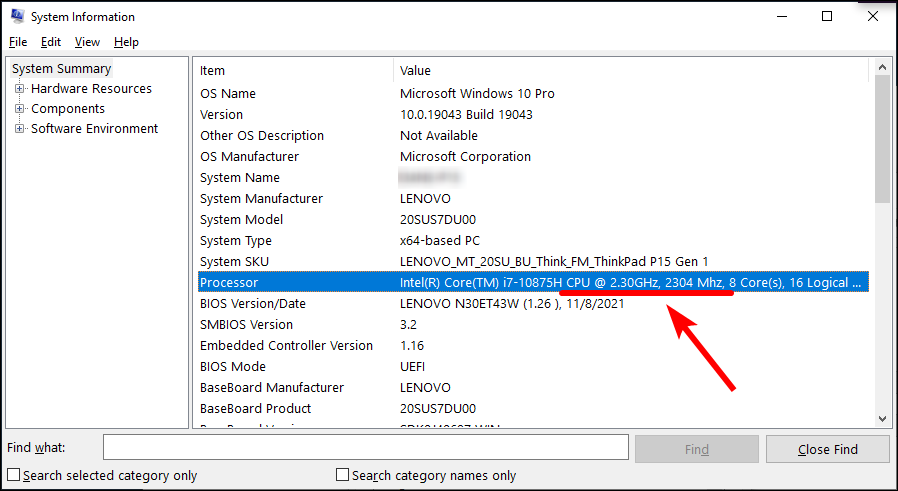
1 GHz = 1000 MHz, so if it only lists your processor speed in GHz, you’ll need to multiply it by 1000 to get the MHz value. e.g. 2.3 GHz = 2300 MHz.
Update the Maximum Processor Frequency value
Now that you know your processor frequency speed in MHz, you can update the values in the Advanced Power Settings window.
- Go back to the Power Options Advanced Settings window.
- Find your way back to the
Maximum processor frequencynode. - Update the
On batteryandPlugged invalues to be equal to your CPU’s frequency in MHz.- Be sure not to use a value greater than your CPU’s frequency, as that may overclock your CPU which can cause overheating and potentially damage your CPU hardware.
- Hit OK to save the settings.
- Restart your computer for the change to take effect.
Verifying the change worked
Head back into the Resource Monitor and verify that the CPU Maximum Frequency is now going higher than it was before, reaching up to 99% or 100%.
Conclusion
We’ve seen how to quickly check your CPU’s maximum frequency to see if it’s throttling your CPU, as well as how to find your CPU’s frequency speed. We also showed how to view and edit the Windows power settings to ensure it’s not throttling your processor speed, so your PC runs at full speed.
Happy computing!
Comments
Mike
This didn’t cure Maximum frequency stuck at 30% for me. What did the trick was the registry key
Computer\HKEY_LOCAL_MACHINE\SYSTEM\CurrentControlSet\Services\intelppm. Changing the value ofstartfrom 3 to 4 (followed by a reboot).Thanks for clues along the way to resolving the issue!
Leave a Comment
Your email address will not be published. Required fields are marked *