
Creating A .PFX Certificate And Applying It On The Build Server At Build Time
There are many project types that require a .pfx file in order to build and/or publish successfully, such as ClickOnce and UWP (Universal Windows Platform) applications. When you build these projects locally in Visual Studio everything is fine and dandy, but when you try to build them on a build server (such as part of a Continuous Integration build) the build server may fail with an error like:
Error APPX0108: The certificate specified has expired. For more information about renewing certificates, see http://go.microsoft.com/fwlink/?LinkID=241478.
error MSB4018: The “ResolveKeySource” task failed unexpectedly. System.InvalidOperationException: Showing a modal dialog box or form when the application is not running in UserInteractive mode is not a valid operation. Specify the ServiceNotification or DefaultDesktopOnly style to display a notification from a service application.
Cannot import the following key file: companyname.pfx. The key file may be password protected.
These errors will often occur when you are still using the temporary file that was generated automatically when the project was created in Visual Studio, or when using a .pfx file that is password protected.
If your .pfx file is password protected, we can import the certificate at build time, as shown further below. The nice thing about this approach is it does not require you (or one of your company admins) to manually install the certificate on every build server, as many other sites suggest. This way you don’t have to bother your admin or get unexpected broken builds when a new build server is added to the pool.
If your .pfx file has expired, you need to remove the current pfx file and add a new (password-protected) one in its place.
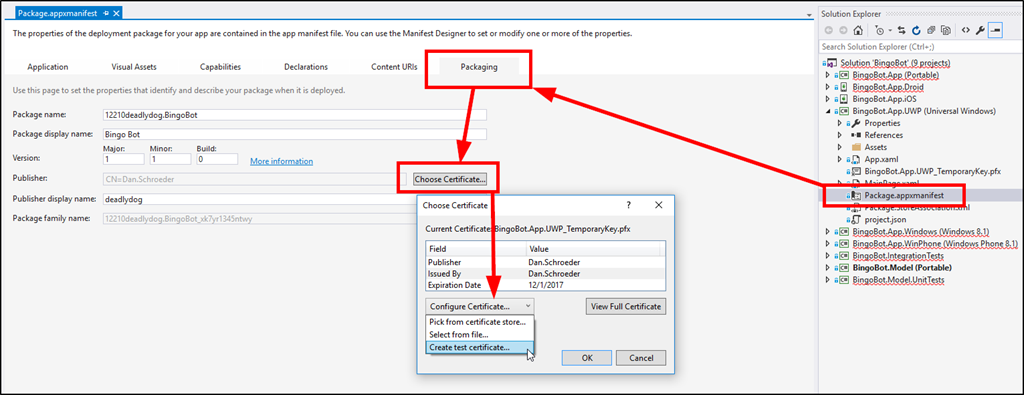
Creating a new .pfx file for a UWP application
To create a new password protected .pfx file in a UWP application,
- open the Package.appxmanifest file that resides in the root of the project and
- go to the Packaging tab.
- In here, click the Choose Certificate… button.
- In the Configure Certificate… dropdown, choose an existing certificate that you have, or create a new test certificate and provide a password for it. This should create the certificate and add the new .pfx file to your project’s root.
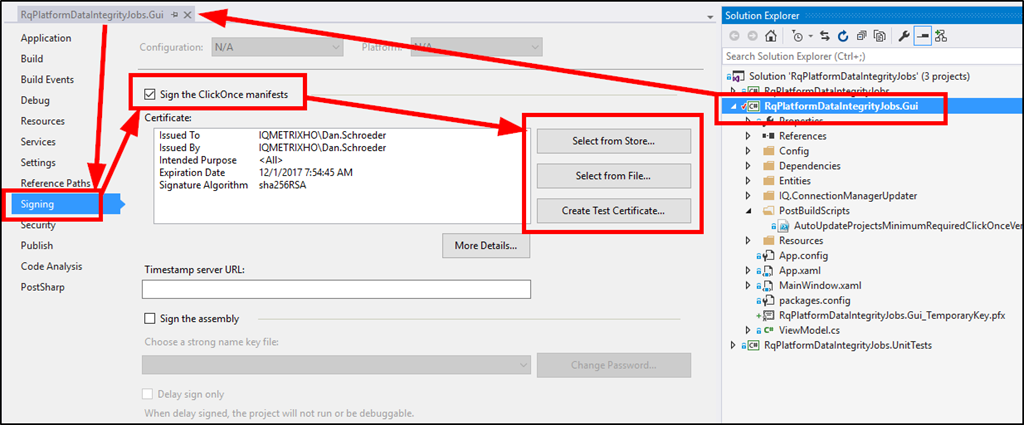
Creating a new .pfx file for a ClickOnce application
Creating a pfx file for a ClickOnce application is similar, but instead you want to
- open up the project’s Properties window (by right-clicking on the project) and
- go to the Signing tab.
- Check off the box to Sign the ClickOnce manifests and then
- choose the certificate you want to use, or create your own password-protected test certificate.
Applying the .pfx file before building on the build server
Now that the project has a pfx certificate, we will need to update our build server to apply it before attempting to build the solution, otherwise a certificate related error will likely be thrown.
Before building the solution, we will want to apply the certificate using this PowerShell script, Import-PfxCertificate.ps1:
param([string] $PfxFilePath, $Password)

# You may provide a [string] or a [SecureString] for the $Password parameter.

$absolutePfxFilePath = Resolve-Path -Path $PfxFilePath
Write-Output "Importing store certificate '$absolutePfxFilePath'..."

Add-Type -AssemblyName System.Security
$cert = New-Object System.Security.Cryptography.X509Certificates.X509Certificate2
$cert.Import($absolutePfxFilePath, $Password, [System.Security.Cryptography.X509Certificates.X509KeyStorageFlags]::PersistKeySet)
$store = new-object system.security.cryptography.X509Certificates.X509Store -argumentlist "MY", CurrentUser
$store.Open([System.Security.Cryptography.X509Certificates.OpenFlags]::"ReadWrite")
$store.Add($cert)
$store.Close()
You can download the Import-PfxCertificate Powershell script from here.
To do this you will need to save this Import-PfxCertificate.ps1 file in your version control repository so that the build system has access to it. In my projects I have a root buildTools directory that I store these types of build scripts in. In your build system, you will need to configure a new step to run the PowerShell script before the step to actually build your solution. When you call the script you will need to pass it the path to the .pfx file (which should also be checked into source control), and the password for the .pfx file. If your build system supports using “hidden”/”private” variables, then it is recommended you use them to keep the .pfx file password a secret.
Here I am using VSTS (Visual Studio Team Services), but the same steps should generally apply to any build system (e.g. TeamCity). I have created a new build step called Apply Store Certificate that calls the Import-PfxCertificate.ps1 PowerShell script. This step is set to occur before the Build solution step, and provides the required parameters to the script; the path to the .pfx file and the certificates password (as a hidden variable that I configured in the build system). Notice that I also set the Working folder that the script will run from to the directory that the .pfx resides in, so that the script will be able to resolve the absolute file path.

Your build system should now be able to apply the certificate before building the solution, avoiding the certificate errors and hopefully resulting in a successful build.
Hopefully this post has helped you out. Happy coding!
Comments
Baala
Thanks a ton for this awesome solution. Worked like a charm in my VSTS build for doing CI build for my UWP project.
Loke
Thanks a lot for this. You saved my day!
DM
This was extremely helpful - I don’t have much experience of automated build environments, and I wasn’t sure how to configure VSTS to use the cert. Thanks for the detailed breakdown - made things very clear for me!
Borik
Hi, Thank you for this write up, but i am still confused how does msbuild know to use Cert from Store?
Thank you.
Borik
@Borik Never mind, this is just to use the same one, is to just by pass Cert Validation…
To use Diff Cert, Just Modify Proj file with new Cert Name and Tump Print.
Timothy Ross
If you’re using a VSTS Hosted queue, wouldn’t this be invalidating the intention of signing something securely? Wouldn’t this be putting your code signing certificate on someone else’s machine?
Jay
I still get build error saying “C:\Program Files (x86)\Microsoft Visual Studio\2017\Professional\MSBuild\Microsoft\VisualStudio\v15.0\AppxPackage\Microsoft.AppXPackage.Targets(4216,5): Error APPX0108: The certificate specified has expired. For more information about renewing certificates, see http://go.microsoft.com/fwlink/?LinkID=241478.”
deadlydog
@Jay The answer is in the error you posted; your .pfx certificate is expired. You’ll need to get a new .pfx file that hasn’t expired yet.
Jay
@deadlydog @deadlydog I did create a test certificate using my visual studio and pushed it to the remote repository and then I am using this certificate in my PowerShell task with the script as mentioned in your blog. Initially, PowerShell script was throwing the same error and after pushing new certificate to remote repository PowerShell script is not throwing the error anymore but now build solution task is throwing the error.
Continuously Deploy Your ClickOnce Application From Your Build Server – Kannekens
[…] it succeeds. If the build fails with an error relating to an expired certificate or pfx file, see my other blog post on importing the required certificate on the build server at build-time, which involves adding one more “Import-PfxCertificate.ps1” build step before the MSBuild […]
Lucian M. Muntean
Awesome article! Worked like a charm. Thank you!
Jayavardhan
With the above powershell script to import .pfx i am getting below error on jenkins pipeline. If i login and logout the jenkins server then it’’s working fine. Any suggestions ?
(VisualStudioForApplicationsBuild target) -> C:\Program Files (x86)\Microsoft Visual Studio\2019\BuildTools\MSBuild\Microsoft\VisualStudio\v16.0\OfficeTools\Microsoft.VisualStudio.Tools.Office.targets(328,9): error MSB3482: An error occurred while signing: Invalid provider type specified.
Marliese
You helped me out, tried a lot, but your solution worked for me! Thanks a lot!
shalini
I am getting this error :( Exception calling “Import” with “3” argument(s): “The system cannot find the file specified.
Dan
@shalini you likely have your $PfxFilePath parameter or the Working Folder set incorrectly, as it’s saying it can’t find the file .pfx file at the path you’re providing. If you’re providing a relative path for the $PfxFilePath parameter it will look for it in the Working Folder; otherwise you can try providing the absolute file path to the .pfx file if you have it.
Leave a Comment
Your email address will not be published. Required fields are marked *