
Continuously Deploy Your ClickOnce Application From Your Build Server
ClickOnce applications are a great and easy way to distribute your applications to many users, and have the advantage of offering automatic application updates out-of-the-box. Even though ClickOnce applications are super easy to deploy from Visual Studio (literally 3 clicks, just click Build –> Publish –> Finish), you may still want to have your build system publish the updates for various reasons, such as:
- You don’t want you (or your team members) to have to remember to manually publish a new version all the time; even if it is very quick and easy.
- If you are signing your ClickOnce application (to make your app more secure and avoid annoying Windows security warnings during every update), your team members may not have the certificate installed, or you may not want them to know the certificate password.
- All of the other benefits of deploying automatically from a build server; you can be sure the project was built in Release mode, all unit tests have run and passed, you are only publishing a new version of the application from a specific branch (e.g. master), etc.
In this post I’m going to show how to continuously deploy your ClickOnce application using Visual Studio Team Services (VSTS), but you can adopt what’s shown here to work on any build system, such as Team City or Jenkins.
Step 1 – Configure and publish your ClickOnce application manually
Before we can publish a new version of the application from the build server, we first have to build the project to create the artifacts to publish. And even before that, we have to make sure the project is setup properly with all of the required ClickOnce metadata. You will typically do this by going into your project Properties page and going to the Publish tab. There are several other websites and blog posts that discuss configuring a project for ClickOnce deployment, including the official MSDN documentation for configuring and publishing ClickOnce applications, so I won’t go into it any further here.
Basically you should have your project in a state where you can easily publish a new version manually, and it is configured the way that you want (includes the necessary files, has the destination to publish to specified, specifies if the application is only available online or not, etc.). Once you’ve published your project manually and confirmed that it’s configured the way you like, we can move onto the next step.
Step 2 – Setup the build on your build server
On your build server you will want to configure a new vanilla build that builds your project/solution. There are a couple modifications you will need to make that are different from building a regular console app or class library project.
The first difference is that you will need to provide the “/target:Publish” argument to MSBuild when it builds your project. Here is what this looks like in VSTS:
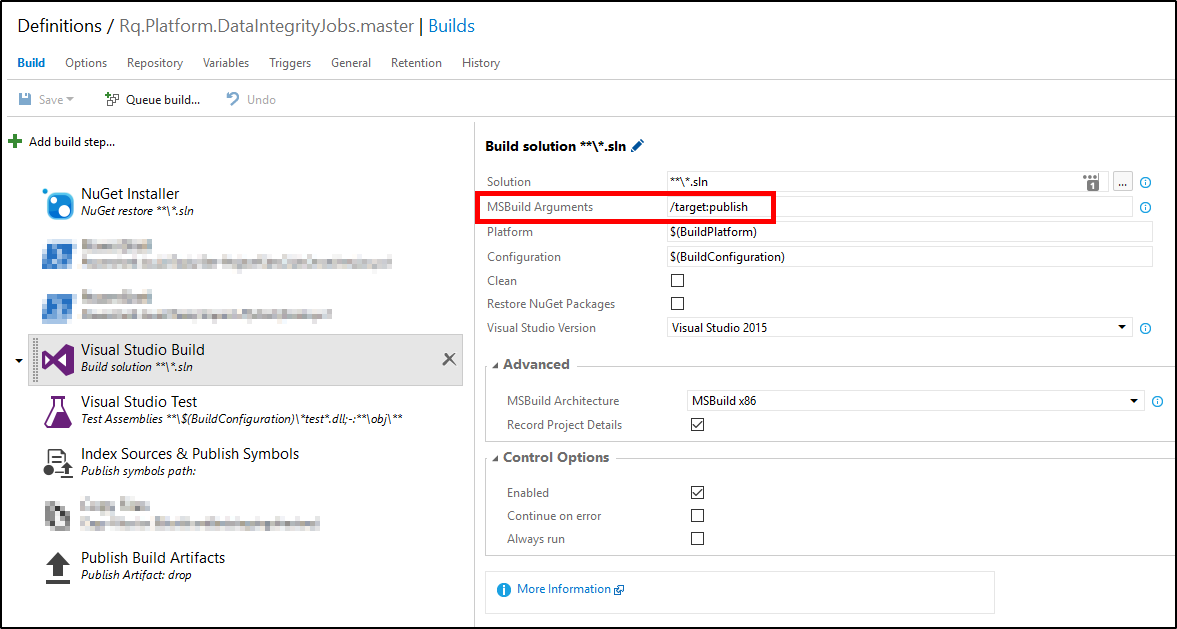
This will cause MSBuild to build the required artifacts into an “app.publish” directory. e.g. bin\Debug\app.publish.
The next difference is that you will want to copy that “app.publish” directory to your build artifacts directory. To do this, you will need to add a Copy Files step into your build process that copies the “app.publish” directory from the ClickOnce project’s bin directory to where the build artifacts are expected to be. You will want to do this before the step that publishes your build artifacts. Here is what this looks like in VSTS:
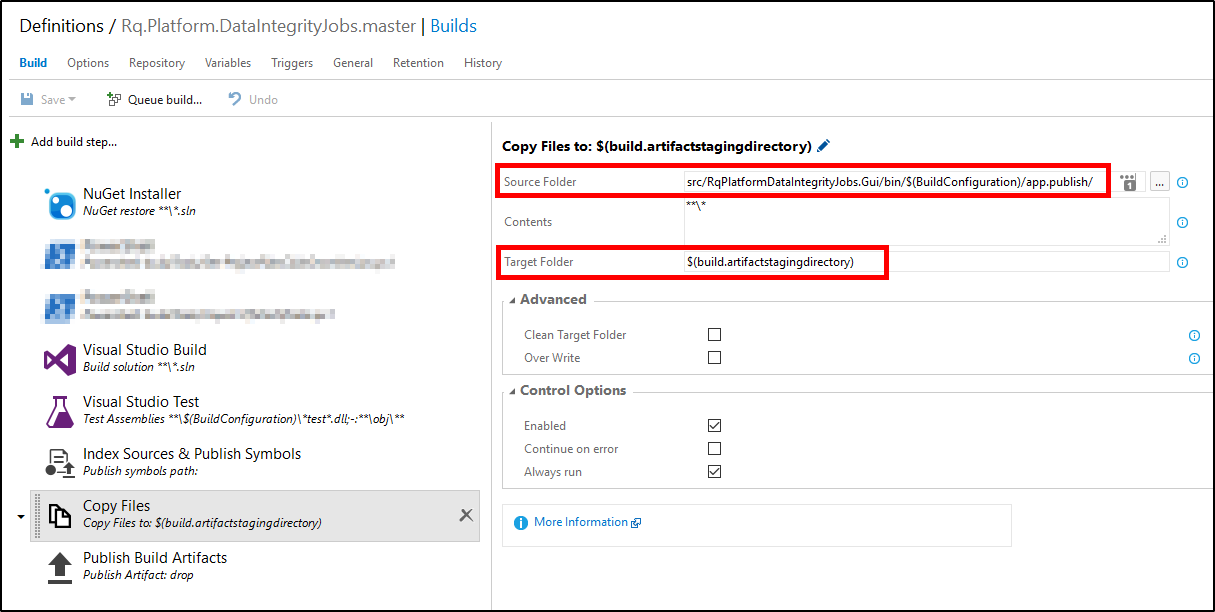
So we copy the files into the build artifacts directory, and then the Publish Build Artifacts step at the end will copy those files to wherever you’ve specified; in my case it’s a network share.
If you like you can now run the build and see if it succeeds. If the build fails with an error relating to an expired certificate or pfx file, see my other blog post on importing the required certificate on the build server at build-time, which involves adding one more “Import-PfxCertificate.ps1” build step before the MSBuild step.
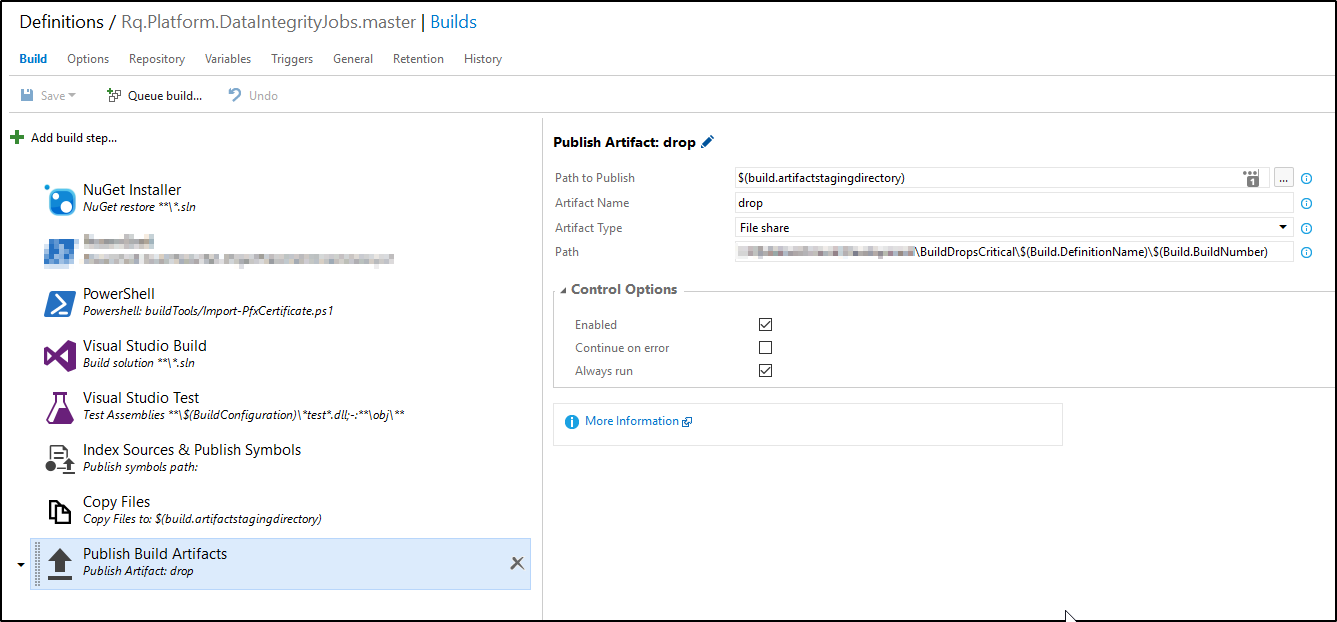
For completeness sake, this is what my Publish Build Artifacts step looks like in VSTS, and you’ll also notice the “Import-PfxCertificate.ps1” step before the MSBuild step as well:
So we now have the ClickOnce artifacts being generated and stored in the appropriate directory. If you wanted, you could publish the build artifacts to the ClickOnce application’s final destination right now (instead of a file share as I’ve done here), but I’m going to follow best practices and separate the application “build” and “deployment” portions into their respective subsystems, as you may want separate control over when a build gets published, or maybe you don’t want to publish EVERY build; only some of them.
Hopefully at this point you are able to create a successful build, but we’re not done yet.
Step 3 – Publish the build artifacts to the ClickOnce application’s destination
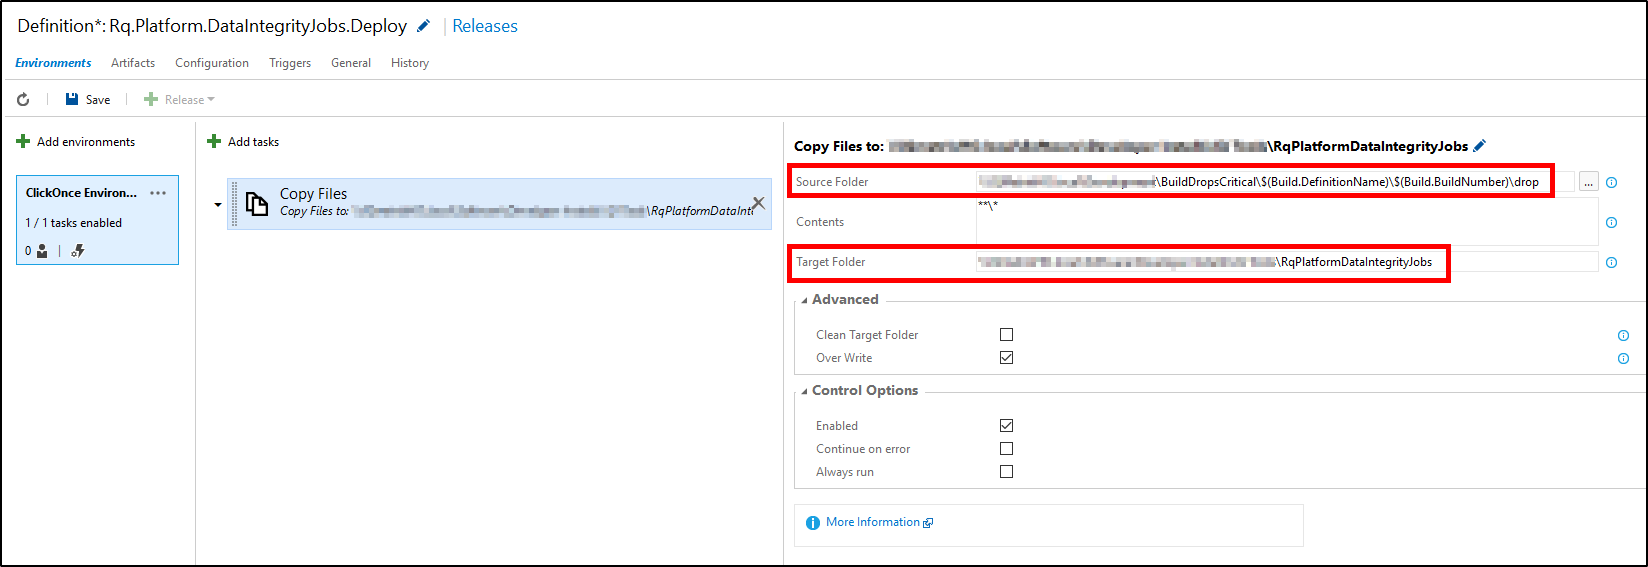
Now that we have the build artifacts safely stored, we can publish them to the ClickOnce application’s destination. With VSTS this is done by using the Release subsystem. So create a new Release Definition and setup an Environment for it. By default it adds a “Copy and Publish Build Artifacts” step to the release definition. When configuring and using this default step, I received the error:
[error]Copy and Publish Build Artifacts task is not supported within Release
So instead I removed that default step and added a simple “Copy Files” step, and then configured it to grab the files from the file share that the build published the artifacts to, and set the destination to where the ClickOnce application was publishing to when I would do a manual publish from within Visual Studio. Here is what that step looks like in VSTS:
You should be able to run this release definition and see that it is able to post a new version of your ClickOnce application. Hooray! I setup my releases to automatically publish on every build, but you can configure yours however you like.
If you make changes and commit them, the build should create new artifacts, and the release should be able to publish the new version. However, if you launch your ClickOnce application, you may be surprised that it doesn’t actually update to the latest version that you just committed and published. This is because we need one additional build step to actually update the ClickOnce version so it can detect that a new version was published. If you launch another build and publish them, you’ll see that the files being published are overwriting the previous files, instead of getting published to a new directory as they are supposed to be.
You may be wondering why we need another build step to update the ClickOnce version. Part of the build artifacts that are created are a .application manifest file, and a directory that contains the applications files, both of which have the ClickOnce version in them. Can’t we just modify the directory name and .application manifest file to increment the old version number? This was my initial thought, but the .application manifest file contains a cryptography hash to ensure that nobody has tampered with it, meaning that it needs to contain the proper version number at the time that it is generated.
Step 4 – One more build step to update the ClickOnce version
The ClickOnce version is defined in your project file (.csproj/.vbproj) (as the <ApplicationVersion> and <ApplicationRevision> xml elements), and is different from the assembly version that you would typically set to version your .dll/.exe files via the AssemblyInfo.cs file. Unless you manually updated the ClickOnce version in Visual Studio, it will still have its original version. When publishing the ClickOnce version in Visual Studio, Visual Studio automatically takes care of incrementing ClickOnce version’s Revision part. However, because we’re publishing from our build system now, we’ll need to come up with an alternative method. To help solve this problem, I have created the Set-ProjectFilesClickOnceVersion GitHub repository. This repository houses a single Set-ProjectFilesClickOnceVersion.ps1 PowerShell script that we will want to download and add into our build process.
In order for the build system to access this Set-ProjectFilesClickOnceVersion.ps1 script you will need to check it into source control. Also, you need to make sure you add this build step before the MSBuild step. Here is what this step looks like in VSTS:
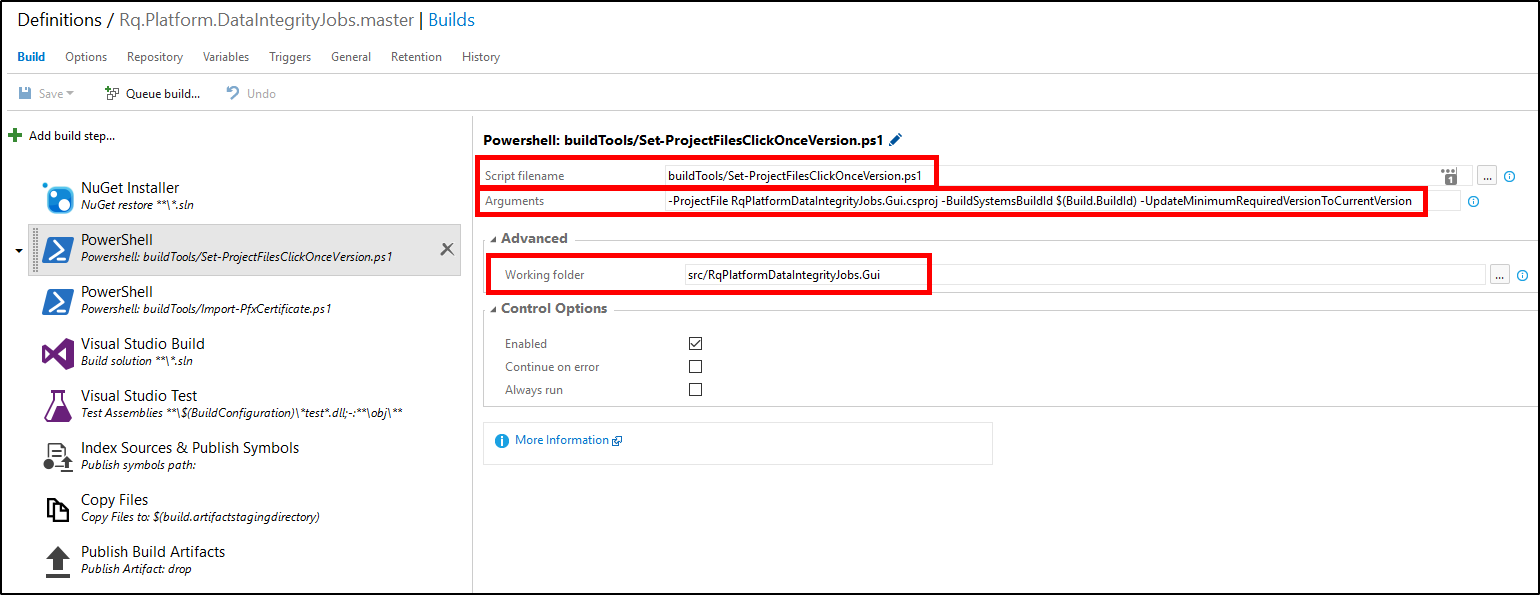
The Script Filename points to the location of the Set-ProjectFilesClickOnceVersion.ps1 script in my repository. Also note that I set the Working Folder to the directory that contains the .csproj project file. This is necessary since we are dealing with relative paths, not absolute ones.
For the Arguments I provide the name of the project file that corresponds to my ClickOnce application, as well as the VSTS Build ID. The Build ID is a globally unique ID that gets auto-incremented with every build, and most (all?) build systems have this. The script will translate this Build ID into the Build and Revision version number parts to use for the ClickOnce version, to ensure that they are always increasing in value. So you should never need to manually modify the ClickOnce version, and every build should generate a version number greater than the last, allowing the ClickOnce application to properly detect when a newer version has been published.
Maybe you update your application’s version number on every build, and want your ClickOnce version to match that version. If this is the case, then use the –Version parameter instead of –BuildSystemsBuildId. The other alternative is to use the –IncrementProjectFilesRevision switch to simply increment the ClickOnce Revision that is already stored in the project file. If you use this switch, you need to be sure to check the project file back into source control so that the Revision is properly incremented again on subsequent builds. I like to avoid my build system checking files into source control wherever possible, so I have opted for the BuildSystemsBuildId parameter here.
The last argument I have included is the UpdateMinimumRequiredVersionToCurrentVersion parameter, and it is optional. If provided, this parameter will change the ClickOnce application’s Minimum Required Version to be the same as the new version, forcing the application to always update to the latest version when it detects that an update is available. I typically use this setting for all of my ClickOnce applications. If you still plan on publishing your ClickOnce applications from Visual Studio, but want this functionality, simply install the AutoUpdateProjectsMinimumRequiredClickOnceVersion NuGet Package.
That’s it! Now if you launch another build it should create new artifacts with a larger ClickOnce version number, and once published your application should update to the new version.
Bonus – Displaying the ClickOnce version in your application
The ClickOnce application version number may be different than your assembly version number, or perhaps you don’t update your product’s version number on every publish; it’s easy to forget. I typically like to use semantic versioning for my projects, which only involves the first 3 version parts. This leaves the last version part, the Revision number, available for me to set as I please. I will typically use the ClickOnce Revision in my application’s displayed version number. This makes it easy to tell which actual release a client has installed in the event that the product version was not updated between releases. The code to do it is fairly simple.
public Version ApplicationVersion = new Version("1.11.2");

private void MainWindow_Loaded(object sender, RoutedEventArgs e)
{
    // If this is a ClickOnce deployment, append the ClickOnce Revision to the version number (as it gets updated with each publish).
    if (ApplicationDeployment.IsNetworkDeployed)
        ApplicationVersion = new Version(ApplicationVersion.Major, ApplicationVersion.Minor, ApplicationVersion.Build, ApplicationDeployment.CurrentDeployment.CurrentVersion.Revision);

    // Display the Version as part of the window title.
    wndMainWindow.Title += ApplicationVersion;
}
Here I hard-code the product version that I want displayed in my application in a variable called ApplicationVersion. When the WPF application is launched, I obtain the ClickOnce Revision and append it onto the end of the version number. I then display the version in my application’s window title, but you might want to show it somewhere else, such as in an About window. If you want, you could even display both the full application version and full ClickOnce version.
I hope this blog has helped you further your automation-foo. Happy coding!
Comments
Leszek
Hi,
Thank you very much for this up2date article! God bless you! Just missing here a step to create a QA/TEst/UAT version of click once application (changed assembly and product name) and published to diff destination folder.
Cheers
Leszek
@Leszek With updating application version/assembly version - how to grab current version like: $ver = $(vbproj).Version // 1.2.3.0 $(vbproj).Version = 1.2.3.%build_number% ?
Devon Powell
Thanks for the great how-to. I almost have it all working but keep getting a build failure for an incorrect AssemblyVersion. I tracked this to using the %2a in the version number (fails when making this change in VS2017). I wonder if the syntax for version # and revision # in the .proj file changed? Have you run into this issue?
deadlydog
@Devon Powell I use VS 2017 exclusively on my workstation and haven’t had any problems, but when I looked I noticed that my TFS builds were set to use VS 2015. After switching it to VS 2017, it is still building and publishing without any issues, so I’m not sure what the problem is with your build. Is the project able to build successfully in the Visual Studio GUI with that change in there, and only breaking on the build server? Does it break if you try and build the .sln directly with MsBuild? Perhaps it’s a weird encoding or hidden character problem?
Also, just to make sure things are in the correct format, your .csproj file elements should end up looking something like this:
    <ApplicationRevision>90</ApplicationRevision>
    <ApplicationVersion>1.0.0.%2a</ApplicationVersion>
uday
@deadlydog When i downloaded the script, it added %2a in the code where you are stting ApplicationVersion value to the node. I removed these characters and it started working
José Vargas
Awesome article! Daniel. This was the seventh blog I cheked in my path to undertand MSBuild and how to deploy a ClickOnce App and it was the one that neild it! Excelently writen, technically sound and super generous with the free licensing of the script!
It was super helpull for us and helped me not only understand the tool, but also succeed in a task asigned to me when no body else in the team had no idea on how to do it!.
eudoux
Daniel, I must agree that after countless hours (not entirely countless, just embarrassing to reveal lol) of scouring the internet for information of everything VSTS and ClickOnce, this article was often a place of comfort and learning. Thank you!!
Continuously Deploy Your ClickOnce Application From Your Build Server – Kannekens
[…] https://blog.danskingdom.com/continuously-deploy-your-clickonce-application-from-your-build-server/ from Daniel Schroeder’s (aka deadlydog) Programming Blog […]
burnoutMusic
If you have a solution with more than one win forms project, when specifying the MSBuild argument “\target:publish”, which project will be published?
Leszek
@burnoutMusic The main one, or the one that you specify in target.
datageneral
Thanks for the great article. How can i create the “install.htm” in my build definition, that usually the publish assistant generates for the clickOnce-App?
Tobias
We had the need to move the assigning of the clickOnce version from the build process to the release process. This helped us out “Update ClickOnce Package”: https://marketplace.visualstudio.com/items?itemName=IfPCInsuranceSE.UpdateClickOncePackage
TFBuild
Release process is not generating clickonce Publish.htm?
Tobias
Is there any possibility to change the app.config parameters after the build process? In the Release-Pipeline I want to adjust some app.config parameters for Test, Integration and Production.
deadlydog
Hey Tobias, you could perhaps try modifying the config file in the Applicaiton Files directory. e.g. Application Files[App Name]_[Version][App Name].exe.config.deploy. I suspect though that the ClickOnce installer will detect that a file was changed/tampered with after the package had been generated, and give a security error about it.
The other, probably preferable, option is to modify the app.config and build the project several times in your build pipeline; once for each environment that you want to deploy to and needs the config transform, and then publish the artifacts for each build. Then in your Release pipeline the Dev stage could copy the Dev build artifacts to the Dev file location to publish the Dev version of the app; the Test stage could copy the Test build artifacts to the Test file location to publish the Test version, etc.
Rod
Thank you, @deadlydog, for this blog post. I’ve been struggling with getting a build/release of a ClickOnce app from Azure DevOps Services, for an awfully long time. This blog post looks like it will address issues I’ve struggled with.
One thing I’d like to ask. Some of the images you’ve got in this blog post, are too fuzzy that I cannot read them. For example, the Copy Files image in Step 3, I cannot read what is meant to be read (not what you’ve intentionally blurred out). Is there a way those could be either larger or made clickable to that I can see a larger version of them, please?
Daniel Schroeder
Hi Rod, if you are viewing this site from your desktop computer you should be able to right-click on the image and choose “View image” or “Open image in new tab” (wording may differ depending on which browser you use). This should open the full size image, making it easier to read everything.
Leave a Comment
Your email address will not be published. Required fields are marked *