
Windows settings I change after a clean install
Windows has a ton of native settings and features that can make it more pleasant and efficient to use. Below are some of my favorites that I always adjust after a fresh install of Windows. These are all personal preference, and I show the settings I like, but use whatever works best for you.
This post was written with Windows 11 in mind, so some of the settings may not be available in other versions of Windows, or you may need to access them differently.
As I discover more awesome settings I’ll add them here, so be sure to check back from time to time. Also, if you have a favourite that I don’t have listed here, please let me know in the comments below.
If you enjoy this post, check out my My favourite Windows shortcuts post.
File Explorer settings
Have File Explorer open to the This PC view
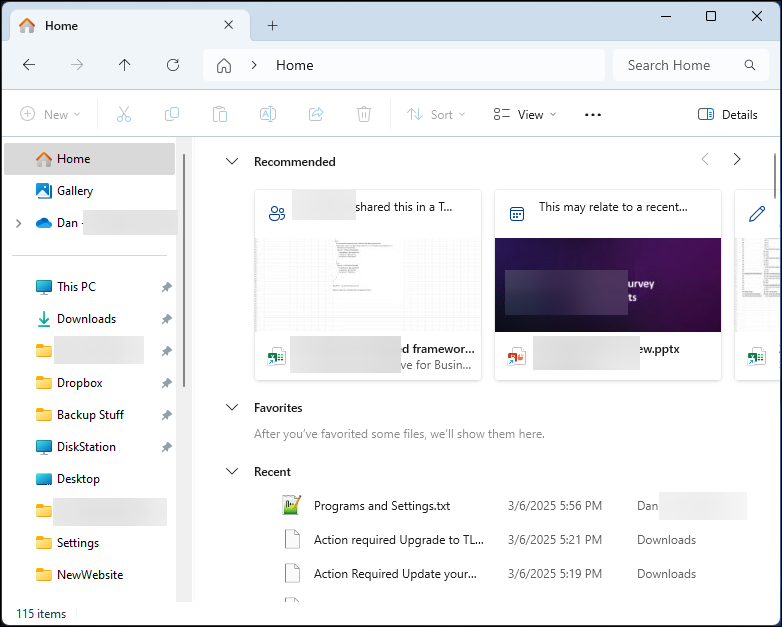
By default, File Explorer opens to the Home view, which shows a bunch of things, such as your most used folders and files.
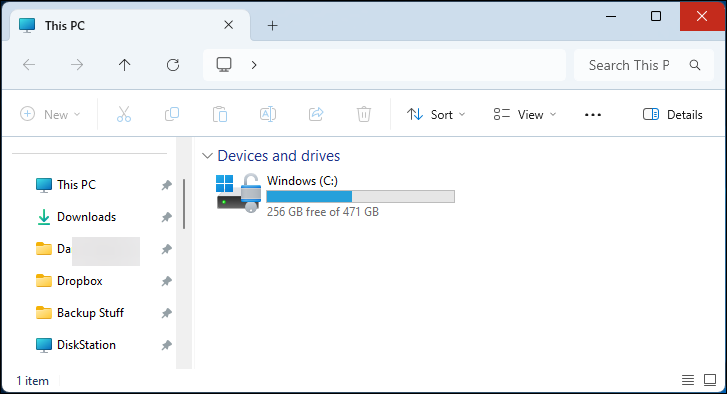
I find that view very cluttered, and often just want to get into the root of one of my drives, so I prefer to start at the This PC view.
Below are screenshots of the default Home view and the This PC view:
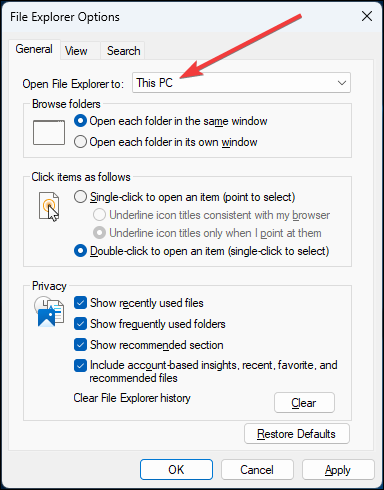
To change the default view of File Explorer to This PC:
- In the Start Menu, search for
File Explorer Optionsand open it. - In the File Explorer Options window, change the
Open File Explorer tosetting toThis PC.
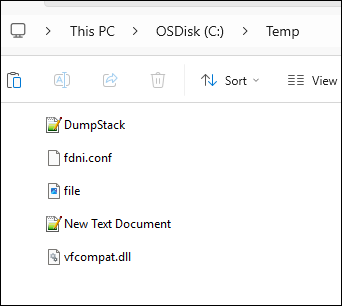
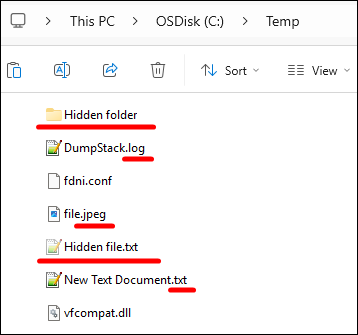
Show hidden files and folders and file extensions in File Explorer
By default, File Explorer will not show hidden files and folders, nor show file extensions for known file types. I don’t like Windows hiding things from me, so I always enable these settings.
Below are screenshots showing how a directory in File Explorer might look before and after making the changes:
To enable the settings:
- Open File Explorer Options.
- You can search for
File Explorer Optionsin the Start Menu, or find it in File Explorer by clicking theViewtab, thenOptionson the right side (Windows 10), or the...button thenOptions(Windows 11).
- You can search for
- In the Folder Options window, click on the
Viewtab. - Under
Advanced settings, find the following settings:- Enable
Show hidden files, folders, and drives - Disable
Hide extensions for known file types
- Enable
- Click
Applyto apply it to the current folder. - Click
Apply to Foldersto apply it to all folders.

The last step of clicking the Apply to Folders button is important so that you don’t have to do this for every folder you open.
Mouse settings
Show where the mouse cursor is with the Ctrl key
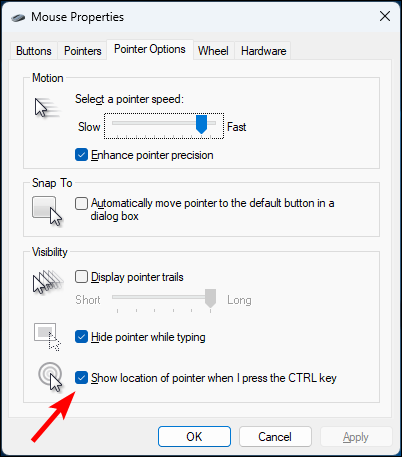
If you have multiple monitors, it’s easy to lose the mouse cursor. Windows has a feature that when you press the Ctrl key, it will show you where the mouse cursor is by briefly circling it.

To enable this feature:
- Use the Start Menu to search for
Mouse settings. - In the Mouse settings window, open the
Additional mouse settings, which should pop up theMouse Propertieswindow. - Click on the
Pointer Optionstab. - Enable
Show location of pointer when I press the CTRL key.
Bonus: See the Microsoft PowerToys section at the end to allow spotlighting the mouse cursor when you press the Ctrl key twice.
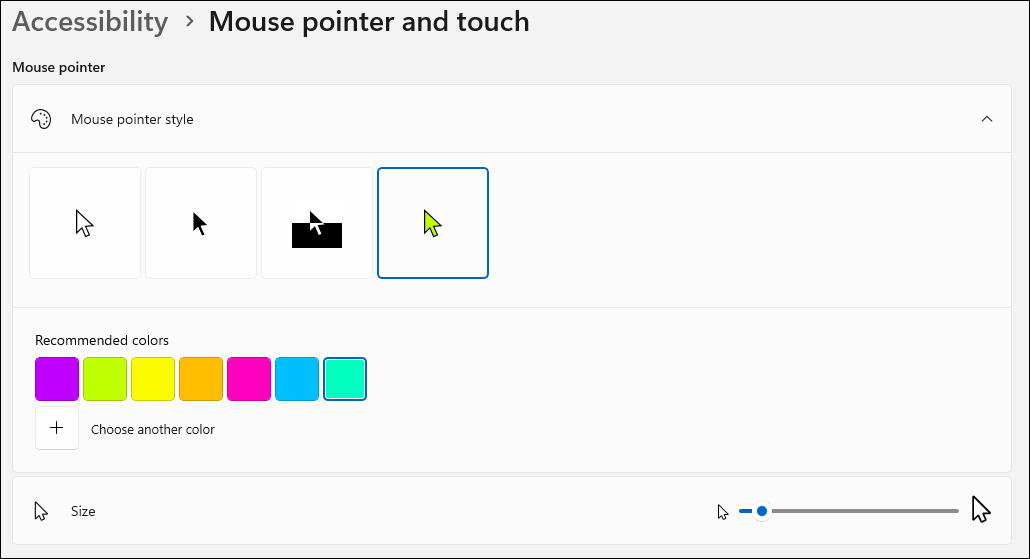
Make the mouse cursor larger and change the color
Having a large resolution on a small monitor can make it difficult to see the mouse cursor. I like to enlarge my cursor a bit, and change the color to make it stand out so it’s easier to see.
To adjust your mouse cursor settings, use the Start Menu to search for Mouse pointer size.
There you can adjust the size and color of the mouse cursor.
Disable the Touchpad when using a mouse
When using Windows on a laptop without an external keyboard, I sometimes accidentally touch the touchpad while typing, which causes the cursor to jump around. To prevent this, I disable the touchpad when a mouse is connected.
To disable the touchpad when a mouse is connected:
- Use the Start Menu to search for
Touchpad settings. - Expand the
Touchpadsection. - Uncheck
Leave touchpad on when a mouse is connected.
Change Touchpad triple-tap to middle-click
By default Windows opens the Windows search when you triple-tap the touchpad. That’s what the Windows key is for. Instead, I prefer to have the triple-tap act as a middle-click.
To change the touchpad triple-tap to middle-click:
- In the touchpad settings window, expand the
Three-finger gesturessection. - Change the
Tapsdropdown toMiddle mouse button.

Taskbar settings
The Windows taskbar has many settings that can be adjusted.
To open the taskbar settings window:
- Right-click on the taskbar and choose
Taskbar settings, or you can search the Start Menu forTaskbar settings.
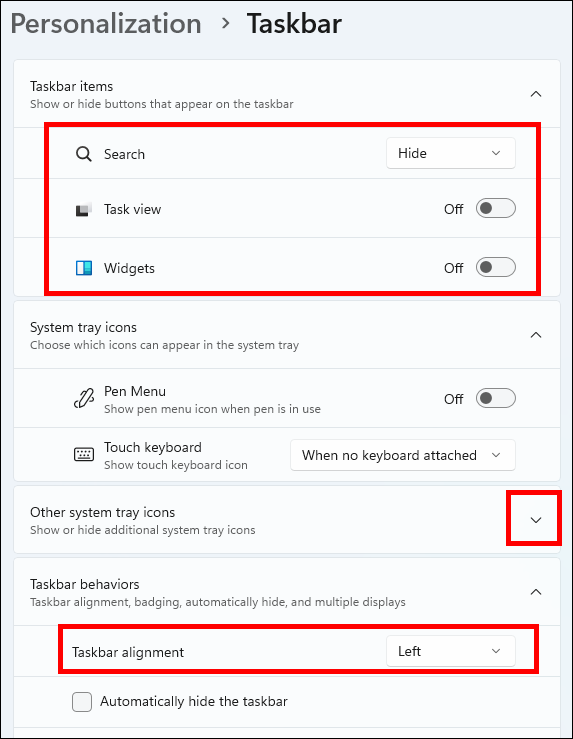
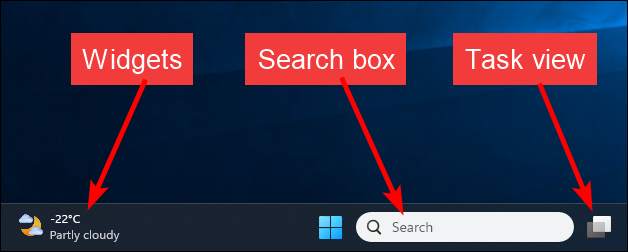
Hide the search box from the taskbar
When I want to search, I use the Win key and start typing, so I don’t like the search box taking up space on the taskbar.
In the taskbar settings window, in the Taskbar items section, change the Search to Hide.
Hide the task view button
I don’t use multiple task views, and use Alt + Tab to switch between windows, so I hide the task view button. You can also use Win + Tab to open the task view.
In the taskbar settings window, in the Taskbar items section, toggle the Task view to Off.
Disable widgets
I don’t use the widgets on the taskbar and find them distracting, so I disable them.
In the taskbar settings window, in the Taskbar items section, toggle the Widgets to Off.
Decide which system tray icons to always show
The system tray is the area on the right side of the taskbar where you can see the time, volume, network status, and other system icons.
There are some tray icons that I always want to see, and others that I don’t care about.
You can control which ones are always shown, and which ones are hidden behind the Show hidden icons button to save space on the taskbar.
In the taskbar settings window, expand the Other system tray icons section, then toggle On the apps that you want to always show, and Off the ones to hide.
![]()
You can also simply drag-and-drop the system tray icons to/from the hidden area to control which ones are always shown.
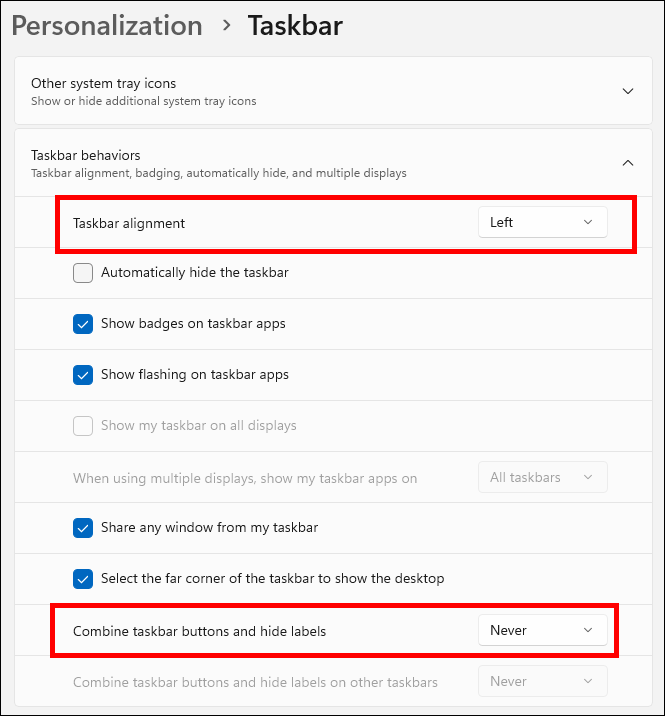
Shift the Start Menu to the left
Windows 11 moved the Start Menu to the center of the taskbar by default. I prefer the previous Windows behaviour where it was on the left.
In the taskbar settings window, in the Taskbar behaviors section, change the Taskbar alignment to Left.
Never group taskbar buttons
I like to see all of my taskbar buttons including their labels, so I disable grouping them so it’s easy to see which ones are open and quickly select the one I want.
Here is a screenshot of the taskbar with the buttons combined:

And the same taskbar with the buttons not combined:

In the taskbar settings window, in the Taskbar behaviors section, change the Combine taskbar buttons and hide labels to Never.
Enable End Task on right-clicking taskbar icons
Typically when an application hangs, you need to open the Task Manager to kill the app.
You can enable End Task in the right-click context menu of taskbar icons to make it easier to kill unresponsive apps.

To enable End Task on right-clicking taskbar icons, go to Settings > System > For developers and enable End Task.

Desktop settings
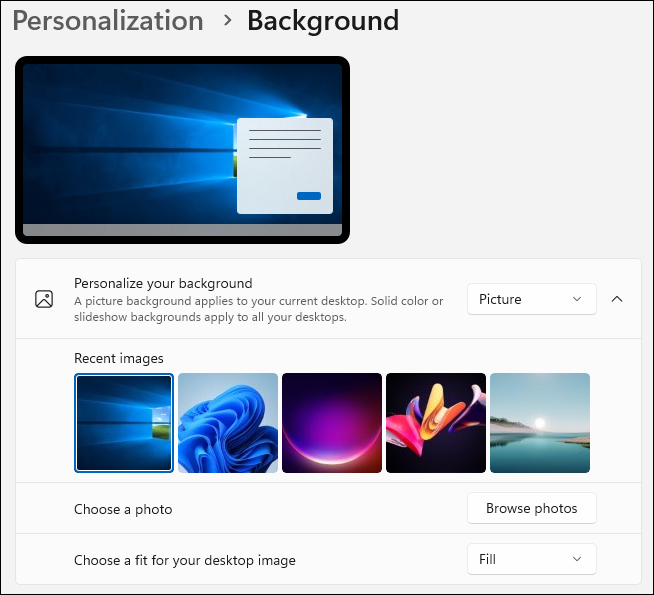
Change your desktop background image
By default Windows will often display a different desktop background image each day from Bing. I actually quite like this functionality for my personal computer, but prefer to have a static image on my work computer where I often do screen sharing. You may also want to adjust the desktop image if you remote desktop to other computers regularly, so that it’s easy to tell when you are working on your local computer or a remote one.
To change the desktop background image:
- Right-click on the desktop and choose
Personalize. - In the Personalization settings window, click on
Background.- You could also get here by searching the Start Menu for
Background image settings.
- You could also get here by searching the Start Menu for
- In the
Personalize your backgroundsection, choosePicturefrom the dropdown.- If you want to cycle through multiple images, you can choose
Slideshowinstead.
- If you want to cycle through multiple images, you can choose
- Click the
Browsebutton to select a picture or directory from your computer. - You may want to change the
Choose a fitsetting toFill,Fit, orStretchto make the image look better on your screen.
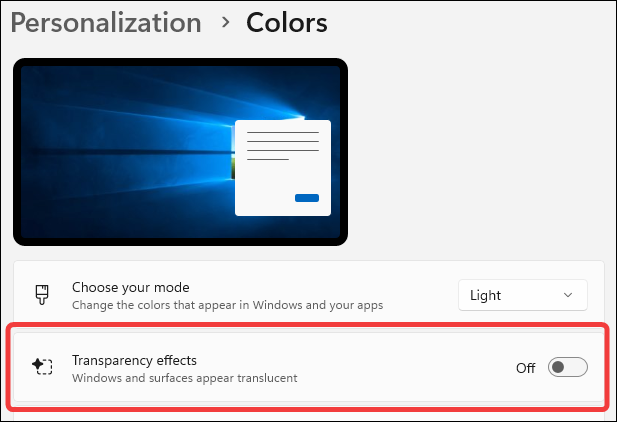
Turn transparency effects off
I don’t like transparency in my windows and menus, and you get a small performance boost by disabling it.
To disable transparency effects:
- Right-click on the desktop and choose
Personalize. - In the Personalization settings window, click on
Colors. - Toggle the
Transparency effectsswitch toOff.
Power settings
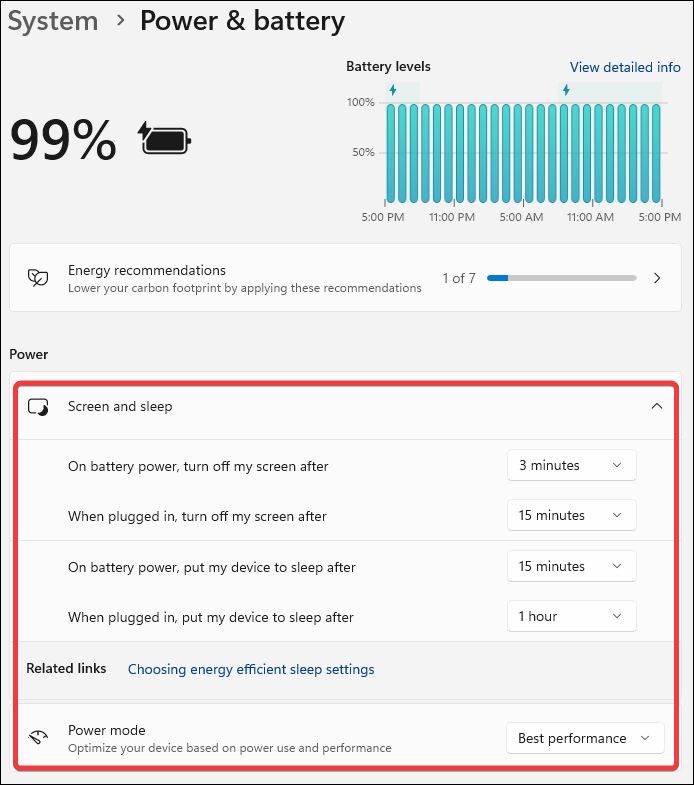
Don’t turn off the screen and go to sleep so fast
Windows will often turn the monitor off or put the computer to sleep after a short period of inactivity, such as 5 or 15 minutes depending on if it is on battery or not. I like to extend this time so that if I walk away from my computer for a little while, it’s less likely to be asleep when I come back.
To change the power settings:
- Use the Start Menu to search for
Power settingsand open thePower, sleep, and battery settings. - Expand the
Screen and sleepsection if needed. - Adjust when the computer turns off the screen and goes to sleep to your liking.
Turn on enhanced performance power mode
In that same Power, sleep, and battery settings window, you can adjust the Power mode to prioritize performance over battery life and energy efficiency if you like.
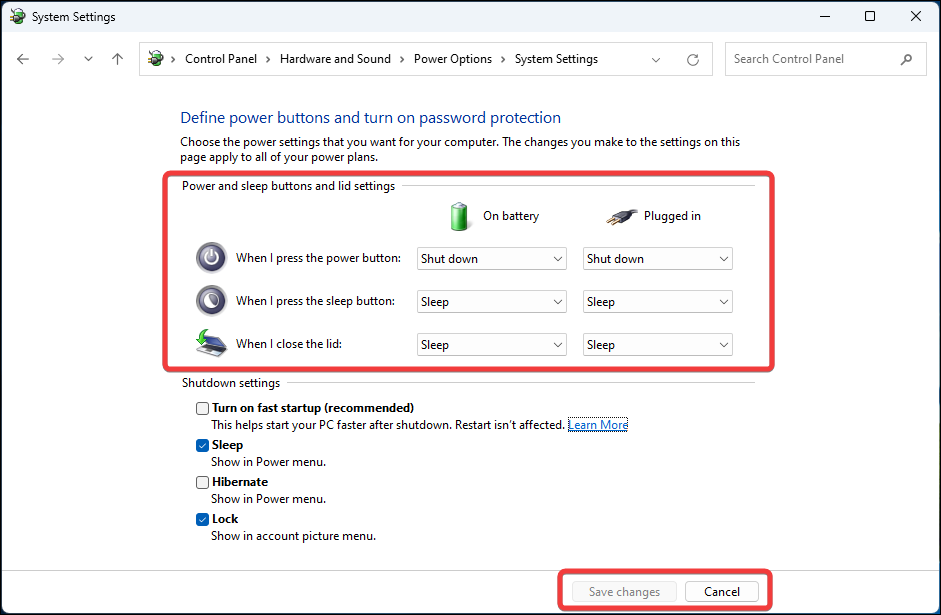
Turn the computer off when I press the power button
By default, Windows will put the computer to sleep when you close the lid, or press the power button. I prefer to have the computer actually shut down when I press the power button. You may want your laptop to do nothing when the lid is closed, so it keeps running.
To change the power button and lid settings:
- Use the Start Menu to search for
Close lidand open theChange what closing the lid doesoption. - Adjust the
When I close the lidandWhen I press the power buttonsettings to your liking. - Click
Save changesto apply the settings.
Windows features
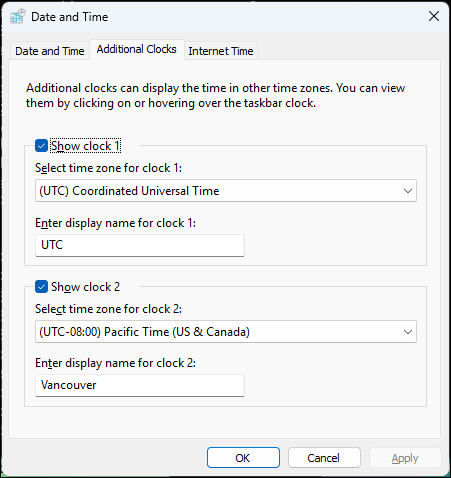
Show multiple time zones in the taskbar clock
You can configure multiple time zones to show in the taskbar clock when you hover over it or click on it. This is great if you work with people in different time zones, travel frequently, or are a software developer and just want to know what the current UTC time is 😄.
To add additional time zones:
- Right-click on the taskbar clock and choose
Adjust date/time.- You can also search the Start Menu for
Date & time settings.
- You can also search the Start Menu for
- In the
Date & timesettings window, scroll down and click on theAdditional clockssection. - The
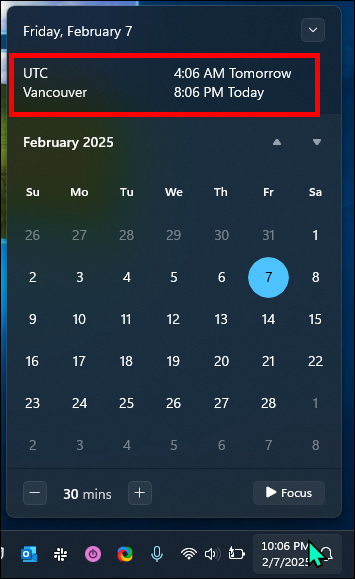
Date and Timewindow should open, allowing you to add up to 2 additional clocks and give them friendly names.
The result when hovering the mouse over the clock:
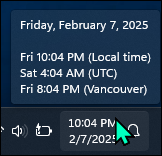
And when clicking on the clock:
Use the Windows Sandbox to test software and settings safely
Windows includes an app called Windows Sandbox.
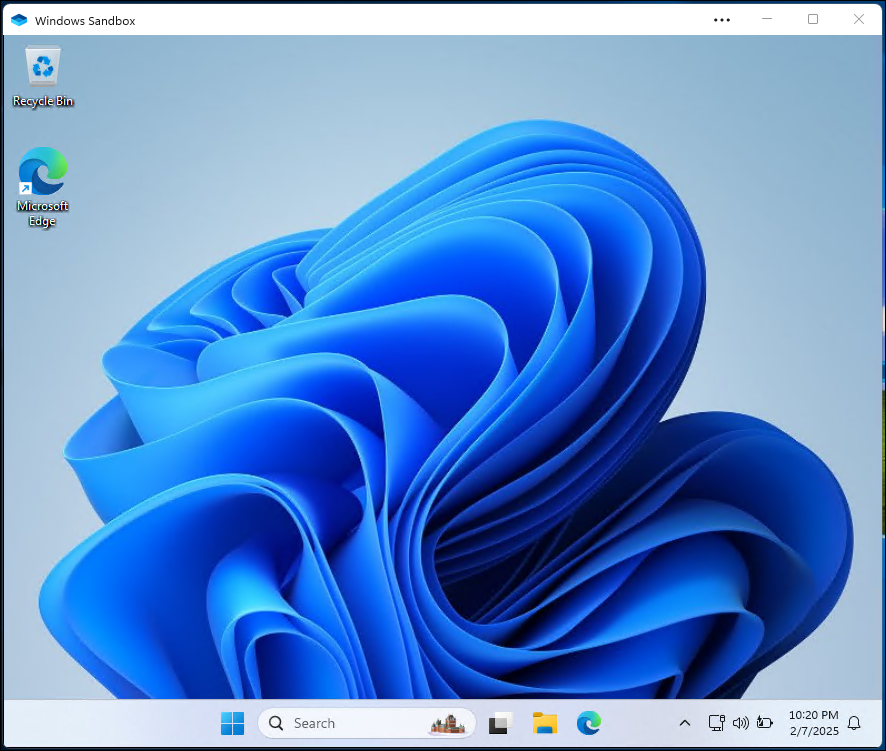
When you open the Windows Sandbox app, it creates a clean virtual environment that looks like a fresh install of Windows.
Here you can experiment with software, settings, or files without affecting your main system, and when you close the app everything is erased.
This is great for testing software or settings that you’re not sure about, without risking your main system.
Just be sure not to save anything important in the Windows Sandbox, as it will be erased when you close it.
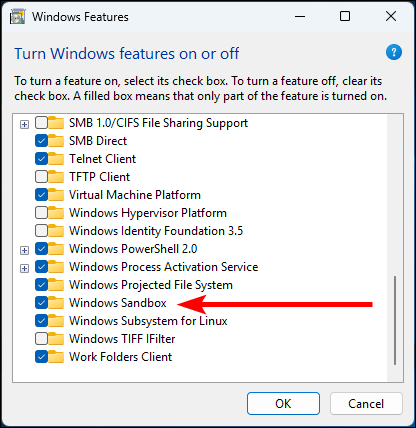
The Windows Sandbox app is not installed by default, so you may need to install it from the Windows Features:
- Search the Start Menu for
Windows Features, and chooseTurn Windows features on or off. - In the Windows Features window, scroll down and enable
Windows Sandbox. - Click
OKto install it. - Restart your computer if prompted.
Now search for Windows Sandbox in the Start Menu to open the app.
Registry tweaks that don’t have a GUI setting
NOTE: Modifying the registry can be dangerous if you don’t know what you’re doing, so be sure to backup your registry before making any manual changes.
You can try the commands below in the Windows Sandbox first to see if you like the changes.
I provide terminal commands instead of manual point-and-click steps for modifying the registry to help ensure that only the intended keys are modified. You can run these commands in PowerShell or Command Prompt.
Some commands shown below may need to be ran from an elevated terminal (e.g. run PowerShell as an Administrator), otherwise you may get an error like Requested registry access is not allowed.
Also, you may need to restart your computer for some changes to take effect.
If you are curious about the syntax of the registry commands, you can find the reg.exe MS docs here.
If you want to easily apply all of the registry tweaks below, simply download this .reg file and double-click it to run it.
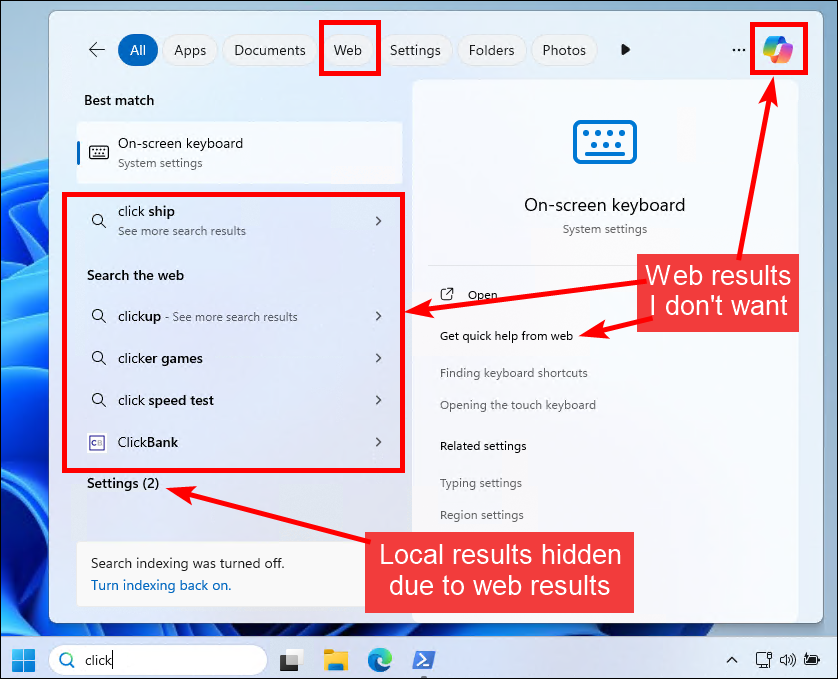
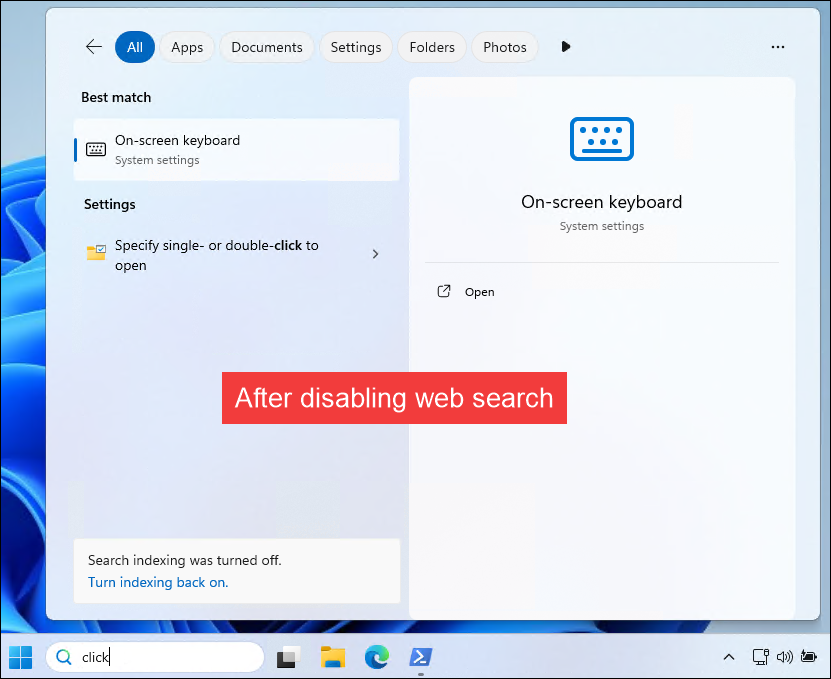
Disable searching the web in the Start Menu search
When I search from the Start Menu, I want it to only search my local machine.
Here are screenshots before and after disabling the web search:
Run the following command to disable web search in the Start Menu:
reg.exe add "HKCU\SOFTWARE\Microsoft\Windows\CurrentVersion\Search" /v BingSearchEnabled /t REG_DWORD /d 0 /f
To revert back to the default behavior, run:
reg.exe delete "HKCU\SOFTWARE\Microsoft\Windows\CurrentVersion\Search" /v BingSearchEnabled /f
Note that it also disables Copilot, which may or may not be desired.
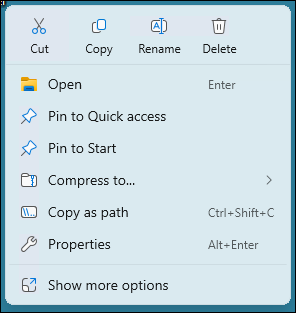
Always open “More options” context menu in Windows 11+
Windows 11 modified the right-click context menu to only show a few options by default, and you have to click “Show more options” to see the rest. I prefer the previous Windows behavior where all options are shown by default.
Below are screenshots of the context menu before and after running the command.
Default right-click context menu:
Right-click context menu with all options shown:
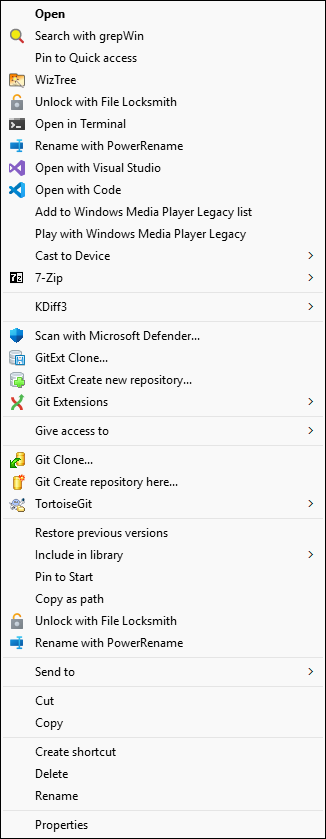
Run the following command to always show all options in the context menu:
reg.exe add "HKCU\Software\Classes\CLSID\{86ca1aa0-34aa-4e8b-a509-50c905bae2a2}\InprocServer32" /f /ve
To revert back to the default behavior, run:
reg.exe delete "HKCU\Software\Classes\CLSID\{86ca1aa0-34aa-4e8b-a509-50c905bae2a2}" /f
NOTE: Windows 11 updated to allow pressing Shift + Right-click to show all options in the context menu, so you may prefer to do that over using this registry tweak.
Speed up the right-click context menu
When you right-click a file or folder, Windows has an artificial delay of 400 milliseconds before showing the context menu.
Run the following command to change the delay to 50 milliseconds:
reg.exe add "HKCU\Control Panel\Desktop" /v MenuShowDelay /t REG_SZ /d 50 /f
To revert back to the default behavior, run:
reg.exe add "HKCU\Control Panel\Desktop" /v MenuShowDelay /t REG_SZ /d 400 /f
Also, before the context menu is shown, the Send to menu discovers all of the apps and connected devices you can send the file to before it actually shows the menu.
We can change this so that it does not enumerate devices until you hover over the Send to menu.
Run the following command to delay Send To from looking for devices right away:
reg.exe add "HKLM\SOFTWARE\Microsoft\Windows\CurrentVersion\Explorer" /v DelaySendToMenuBuild /t REG_DWORD /d 1 /f
To revert back to the default behavior, run:
reg.exe delete "HKLM\SOFTWARE\Microsoft\Windows\CurrentVersion\Explorer" /v DelaySendToMenuBuild /f
Disable delay of startup apps
Windows puts a delay of 10 seconds before it starts launching apps in the Startup folder.
Run the following command to disable the startup apps delay:
reg.exe add "HKCU\SOFTWARE\Microsoft\Windows\CurrentVersion\Explorer\Serialize" /v Startupdelayinmsec /t REG_DWORD /d 0 /f
To revert back to the default behavior, run:
reg.exe delete "HKCU\SOFTWARE\Microsoft\Windows\CurrentVersion\Explorer\Serialize" /v Startupdelayinmsec /f
Bonus: Microsoft PowerToys
I was planning to keep this post to only native Windows features and settings, but I couldn’t resist including Microsoft PowerToys. PowerToys is kind of Microsoft’s way of quickly experimenting and iterating on features that should be in Windows, but aren’t. If a feature gets popular enough, it may be included in Windows natively.
Microsoft PowerToys is an application that adds a ton of great features to Windows, and it is being updated all the time.
See the Microsoft PowerToys docs for extensive documentation on all of the features, and how to install and configure them.
A few of my favourite features are:
- Always On Top: Keep a window always on top of others.
- Find My Mouse: Spotlight the mouse cursor when you press the Ctrl key twice.
- File Locksmith: Easily unlock files that are in use by other processes.
- Image Resizer: Resize images quickly and easily.
- Color Picker: Get the RGB, HEX, and HSL values of any color on the screen.
You can install PowerToys by running the following command in a terminal, such as PowerShell:
winget install --id Microsoft.PowerToys --source winget
Conclusion
I hope you found some of these settings and features helpful. Have a favourite or one that I didn’t mention? Let me know in the comments!
Happy customizing!
Comments
Ryan Paul
Nice list! I use many of these as well. A tweak I found recently that you may appreciate is disabling Animation Effects and Transparency Effects. Just type “Animation” into the start menu to access the appropriate settings panel. While I doubt this increases system performance on a technical level, it feels much snappier and performant. A nice trick for those uninterested in some of the GUI fluffyness.
Leave a Comment
Your email address will not be published. Required fields are marked *